
:max_bytes(150000):strip_icc():format(webp)/GettyImages-585151372-a659baf0c7b441b9b7e7896716b12784.jpg)
2024 Approved From Sideways to Right-Side Up Easy Video Flipping
From Sideways to Right-Side Up: Easy Video Flipping
How to Flip Video Quickly and Easily

Ollie Mattison
Mar 27, 2024• Proven solutions
It’s very common that you filmed some amazing portrait or landscape videos but in the wrong direction. This is an error made by many people because not everyone will always think about orientation when filming. Is there an easy way to flip/rotate videos so that you can watch them without turning your head sideways?
What you need is just an ease to use video editor like Wondershare Filmora to flip/rotate your video clips easily and quickly. This application offers a remarkably easy way to flip videos clockwise or anticlockwise, horizontal or vertical. What’s more, this flip software also offers a broad range of video editing features, effects and intro/credits.
In the following, I’ll describe how to flip a video in Windows using this video flip program. If you’re a Mac user, just adopt Wondershare Filmora X for Mac (Latest Filmora version X for Mac) to achieve the same.
First, please download Filmora X for free as per your operating system, and then follow the steps below.


1. Import Your Original Video Clips
After launching Filmora X, click “New Project” to begin. Click “Import” to browse your file folder on computer or drag the video clips directly into the media library.
When you import all of them, click the thumbnails showing in the left pane to preview in the right screen window.
Note that this video editor supports an array of video & audio formats, such as MOV, MP4, AVI, WMV, DV, avchd (MTS, M2TS). And still image files like JPG, BMP, JPEG, PNG. TIFF are all fully compatible.
And then drag your video files from media library to the video Timeline.

Learn the complete list of supported files formats of Filmora X.
2. Flip the Whole Video
Then double click the video in the timeline to access the editing panel. In the window that appears, switch to Video tab and you will find Transform option located on the top.
Click on the Transform to expand the four options including Rotate, Flip, Scale and Position. To get the effect you need, you can adjust the Rotate and Flip settings and check the real-time effect in the previewing window. Though only four buttons available, you can create more options by using them together.
- Rotate: rotate video at any angle by entering the angle value or moving the Rotate slide: rotate 90° clockwise & anti-clockwise, rotate at 180°, rotate 270°, and more
- Flip: Flip video horizontally, i.e. flip video left to right; flip video vertically that is fliping video upside down
- You can combine Rotate and Flip feature to flip video vertically and rotate 90°clockwise or flip video vertically and rotate 90°counterclockwise.

Besides, you can also change the video position and the video scale. This is the step of flips the whole part of the video.
3. Flip Only a Part of the Video
Sometimes, you may just need to flip parts of your video file, e.g. only 1 minute instead of the whole video. In this case, you need to split your video into separate files , and then repeat step 2 to flip them individually.
To do it, just move the playhead to the position you want to split, and click the “Scissors” icon in the menu bar.

Learn more about how to split videos
4 Export Flipped Video
When you’re satisfied with the result, click “Export” in the middle right to save the flipped video. In the pop-up output window that appears, select your wanted format or configured preset for your portable player directly to watch on the go.
You may also want to upload your creation to YouTube or burn to DVD disc for better preservation, just go for it. Finally, click Export to let this video flip program perform the rest.

With the latest Filmora X video editor, you can do more than just flipping video files. For example, you can apply special effects, add background music, create picture-in-picture effect, and more. Try it now!
Check Best Program to Flip Video
Conclusion
If you are someone that can’t be bothered to learn a new video editor or someone that doesn’t want to fuss around and just want to get things done, Filmora is designed for you. Known for its lowest learning curve and low price, Filmora can help you to get the job done easily. Try it out with the buttons below to see if it matches your appetite.
Ollie Mattison
Ollie Mattison is a writer and a lover of all things video.
Follow @Ollie Mattison
Ollie Mattison
Mar 27, 2024• Proven solutions
It’s very common that you filmed some amazing portrait or landscape videos but in the wrong direction. This is an error made by many people because not everyone will always think about orientation when filming. Is there an easy way to flip/rotate videos so that you can watch them without turning your head sideways?
What you need is just an ease to use video editor like Wondershare Filmora to flip/rotate your video clips easily and quickly. This application offers a remarkably easy way to flip videos clockwise or anticlockwise, horizontal or vertical. What’s more, this flip software also offers a broad range of video editing features, effects and intro/credits.
In the following, I’ll describe how to flip a video in Windows using this video flip program. If you’re a Mac user, just adopt Wondershare Filmora X for Mac (Latest Filmora version X for Mac) to achieve the same.
First, please download Filmora X for free as per your operating system, and then follow the steps below.
1. Import Your Original Video Clips
After launching Filmora X, click “New Project” to begin. Click “Import” to browse your file folder on computer or drag the video clips directly into the media library.
When you import all of them, click the thumbnails showing in the left pane to preview in the right screen window.
Note that this video editor supports an array of video & audio formats, such as MOV, MP4, AVI, WMV, DV, avchd (MTS, M2TS). And still image files like JPG, BMP, JPEG, PNG. TIFF are all fully compatible.
And then drag your video files from media library to the video Timeline.
Learn the complete list of supported files formats of Filmora X.
2. Flip the Whole Video
Then double click the video in the timeline to access the editing panel. In the window that appears, switch to Video tab and you will find Transform option located on the top.
Click on the Transform to expand the four options including Rotate, Flip, Scale and Position. To get the effect you need, you can adjust the Rotate and Flip settings and check the real-time effect in the previewing window. Though only four buttons available, you can create more options by using them together.
- Rotate: rotate video at any angle by entering the angle value or moving the Rotate slide: rotate 90° clockwise & anti-clockwise, rotate at 180°, rotate 270°, and more
- Flip: Flip video horizontally, i.e. flip video left to right; flip video vertically that is fliping video upside down
- You can combine Rotate and Flip feature to flip video vertically and rotate 90°clockwise or flip video vertically and rotate 90°counterclockwise.
Besides, you can also change the video position and the video scale. This is the step of flips the whole part of the video.
3. Flip Only a Part of the Video
Sometimes, you may just need to flip parts of your video file, e.g. only 1 minute instead of the whole video. In this case, you need to split your video into separate files , and then repeat step 2 to flip them individually.
To do it, just move the playhead to the position you want to split, and click the “Scissors” icon in the menu bar.
Learn more about how to split videos
4 Export Flipped Video
When you’re satisfied with the result, click “Export” in the middle right to save the flipped video. In the pop-up output window that appears, select your wanted format or configured preset for your portable player directly to watch on the go.
You may also want to upload your creation to YouTube or burn to DVD disc for better preservation, just go for it. Finally, click Export to let this video flip program perform the rest.
With the latest Filmora X video editor, you can do more than just flipping video files. For example, you can apply special effects, add background music, create picture-in-picture effect, and more. Try it now!
Check Best Program to Flip Video
Conclusion
If you are someone that can’t be bothered to learn a new video editor or someone that doesn’t want to fuss around and just want to get things done, Filmora is designed for you. Known for its lowest learning curve and low price, Filmora can help you to get the job done easily. Try it out with the buttons below to see if it matches your appetite.
Ollie Mattison
Ollie Mattison is a writer and a lover of all things video.
Follow @Ollie Mattison
VLLO for Mac: Download Guide and Alternatives
VLLO for Mac: Download Guide and Alternatives

Shanoon Cox
Mar 27, 2024• Proven solutions
VLLO is one of the most recognized video-editing software among iOS and Android users. Still, there is no VLLO Mac version yet. Nor the vendor has indicated that there will be future releases for MacBook. But it does not mean that you cannot download the VLLO on Mac devices.
Scroll down to find out how to install VLLO on Mac and the best alternatives to VLLO for MacBook. The first part of the article discusses how to install VLLO on Mac, whereas the second part mentions the best alternatives to VLLO.
Part 1: Download VLLO on Mac
Given that the Macs come integrated with the dual-processor,quad-core, 6-core, and 8-core, you can utilize an emulator and run iOS or Android applications conveniently. Here are how to download VVLO on Mac devices:
Step 1: Download BlueStacks Emulator/NoxPlayer
You can download any of the two Emulators mentioned: BlueStack or NoxPlayer. To download NoxPlayer on Mac:
- Download the NoxPlayer emulator on Mac.
- Run the software on your Mac and click Install.
- Agree to terms and conditions of the application.
- On the next page, you have to choose whether you want to utilize the online or offline platform. Choose Offline.
- Once installed, the software will show on the Mac.

Similar to this, you can also install BlueStack on Mac by visiting the official Bluestack page and selecting the Mac edition of the software.
Step 2: Access Google Play
- After installing any of the two emulators, choose Google folder
- Then choose Google Play Store App
- Sign in via the Google Account
- Once you sign in successfully, you will see the same interface of the Google Play Store like the one you see on Android smartphones.
Step 3: Install VLLO on Mac
- To install VLLO on MacBook.
- Go to search enter VLLO Video Editor
- Click search icon
- Hit Install
- Confirm Install
- Click Open.

There you go, you can now use the VLLO video editor on your MacBook. Of course, the application will not be that handy, but you have to consider the fact that the application is designed for smartphones, not computers. Still, the feature set remains the same, so it will be convenient if you have already used the application beforehand.
Part 2: Best VLLO for Mac Alternatives
Not impressed with VLLO and looking for alternatives? Well, here are the two best applications that have the capabilities to impress you. First on the list is among the most powerful video-editing tools on the internet, and second Apple’s own free program for Mac users. Read on to find which one is the best for you!
1. Wondershare Filmora [YouTubers & Vloggers]
Wondershare Filmora for Mac is recognized as the best macOS video editor software for beginners and intermediates in the industry. The reason: be it the interface, supported formats, features, or export options — the Filmora for Mac is superior in comparison to regular software.
The AI-backed interface is intuitive enough to allow even beginner-level video editors to utilize the application to the fullest; plus, it is powerful enough to impress expert video editors. Also, the software supports all video, audio, and image formats, so you do not have to waste your time with encoding before proceeding to edit the videos. Coming to the features — to sum up in brief — the Filmora for Mac contains all that is expected from video-editing software.

Why should I use the Filmora for Mac instead of VLLO? Reasons:
- Filmora has an intuitive, modern interface that makes things like rotating, merging, trimming, splitting, cropping, and flipping videos effortless and convenient for newbies, semi-pros, or pros.
- The software is free to utilize
- Auto-color and color correction options to tune your video exactly as you want
- Easiest keyframing experience of any software; one-click options preset options to create custom animations
- The application allows you to record a voiceover directly into your project timeline.
- You can remove video noise from your footage.
2. iMovie [Beginners]
Apple native iMovie is a simple and basic video editing tool that can well compete with the likes of VLLO. But there is a good reason to mention the application as the second in the list next to Filmora for Mac. And the reason: it is not as powerful, intuitive as Filmora for Mac. Mind you, iMovie includes all the basic features needed for everyday video editing. You can cut, split, trim, and apply filters, effects, and more. However, for the sake of the simple interface — Apple excluded important features like Timeline panel from the interface, giving you less control over the videos.
In all, the application is suitable for the users who do not need powerful editing features or take much control of what’s happening in the video. Still, given the fact that the application is free to utilize, it does not hurt to download the application and verify whether the application will suit your needs or not.

Why should I use iMovie instead of VLLO? Reasons:
- First things first, iMovie interface will be much more convenient to the users on MacBook instead of the smartphone-type interface of the VLLO
- The app has all the basic editing options needed to enrich the footage looks
- Free to utilize application, no ads like VLLO
Conclusion
VLLO may be a great tool, but it is not the only application. As indicated, software tools like Wondershare Filmora for Mac are powerful, simple, and include features that allow you to videos like a professional within minutes. Whereas the iMovie is another simple option suitable mostly for typical users who only need basic options. But if you are serious about video editing or want to edit videos like a professional by tailoring every detail exactly like you want - Filmora for Mac is the way to go!
Shanoon Cox
Shanoon Cox is a writer and a lover of all things video.
Follow @Shanoon Cox
Shanoon Cox
Mar 27, 2024• Proven solutions
VLLO is one of the most recognized video-editing software among iOS and Android users. Still, there is no VLLO Mac version yet. Nor the vendor has indicated that there will be future releases for MacBook. But it does not mean that you cannot download the VLLO on Mac devices.
Scroll down to find out how to install VLLO on Mac and the best alternatives to VLLO for MacBook. The first part of the article discusses how to install VLLO on Mac, whereas the second part mentions the best alternatives to VLLO.
Part 1: Download VLLO on Mac
Given that the Macs come integrated with the dual-processor,quad-core, 6-core, and 8-core, you can utilize an emulator and run iOS or Android applications conveniently. Here are how to download VVLO on Mac devices:
Step 1: Download BlueStacks Emulator/NoxPlayer
You can download any of the two Emulators mentioned: BlueStack or NoxPlayer. To download NoxPlayer on Mac:
- Download the NoxPlayer emulator on Mac.
- Run the software on your Mac and click Install.
- Agree to terms and conditions of the application.
- On the next page, you have to choose whether you want to utilize the online or offline platform. Choose Offline.
- Once installed, the software will show on the Mac.
Similar to this, you can also install BlueStack on Mac by visiting the official Bluestack page and selecting the Mac edition of the software.
Step 2: Access Google Play
- After installing any of the two emulators, choose Google folder
- Then choose Google Play Store App
- Sign in via the Google Account
- Once you sign in successfully, you will see the same interface of the Google Play Store like the one you see on Android smartphones.
Step 3: Install VLLO on Mac
- To install VLLO on MacBook.
- Go to search enter VLLO Video Editor
- Click search icon
- Hit Install
- Confirm Install
- Click Open.
There you go, you can now use the VLLO video editor on your MacBook. Of course, the application will not be that handy, but you have to consider the fact that the application is designed for smartphones, not computers. Still, the feature set remains the same, so it will be convenient if you have already used the application beforehand.
Part 2: Best VLLO for Mac Alternatives
Not impressed with VLLO and looking for alternatives? Well, here are the two best applications that have the capabilities to impress you. First on the list is among the most powerful video-editing tools on the internet, and second Apple’s own free program for Mac users. Read on to find which one is the best for you!
1. Wondershare Filmora [YouTubers & Vloggers]
Wondershare Filmora for Mac is recognized as the best macOS video editor software for beginners and intermediates in the industry. The reason: be it the interface, supported formats, features, or export options — the Filmora for Mac is superior in comparison to regular software.
The AI-backed interface is intuitive enough to allow even beginner-level video editors to utilize the application to the fullest; plus, it is powerful enough to impress expert video editors. Also, the software supports all video, audio, and image formats, so you do not have to waste your time with encoding before proceeding to edit the videos. Coming to the features — to sum up in brief — the Filmora for Mac contains all that is expected from video-editing software.
Why should I use the Filmora for Mac instead of VLLO? Reasons:
- Filmora has an intuitive, modern interface that makes things like rotating, merging, trimming, splitting, cropping, and flipping videos effortless and convenient for newbies, semi-pros, or pros.
- The software is free to utilize
- Auto-color and color correction options to tune your video exactly as you want
- Easiest keyframing experience of any software; one-click options preset options to create custom animations
- The application allows you to record a voiceover directly into your project timeline.
- You can remove video noise from your footage.
2. iMovie [Beginners]
Apple native iMovie is a simple and basic video editing tool that can well compete with the likes of VLLO. But there is a good reason to mention the application as the second in the list next to Filmora for Mac. And the reason: it is not as powerful, intuitive as Filmora for Mac. Mind you, iMovie includes all the basic features needed for everyday video editing. You can cut, split, trim, and apply filters, effects, and more. However, for the sake of the simple interface — Apple excluded important features like Timeline panel from the interface, giving you less control over the videos.
In all, the application is suitable for the users who do not need powerful editing features or take much control of what’s happening in the video. Still, given the fact that the application is free to utilize, it does not hurt to download the application and verify whether the application will suit your needs or not.
Why should I use iMovie instead of VLLO? Reasons:
- First things first, iMovie interface will be much more convenient to the users on MacBook instead of the smartphone-type interface of the VLLO
- The app has all the basic editing options needed to enrich the footage looks
- Free to utilize application, no ads like VLLO
Conclusion
VLLO may be a great tool, but it is not the only application. As indicated, software tools like Wondershare Filmora for Mac are powerful, simple, and include features that allow you to videos like a professional within minutes. Whereas the iMovie is another simple option suitable mostly for typical users who only need basic options. But if you are serious about video editing or want to edit videos like a professional by tailoring every detail exactly like you want - Filmora for Mac is the way to go!
Shanoon Cox
Shanoon Cox is a writer and a lover of all things video.
Follow @Shanoon Cox
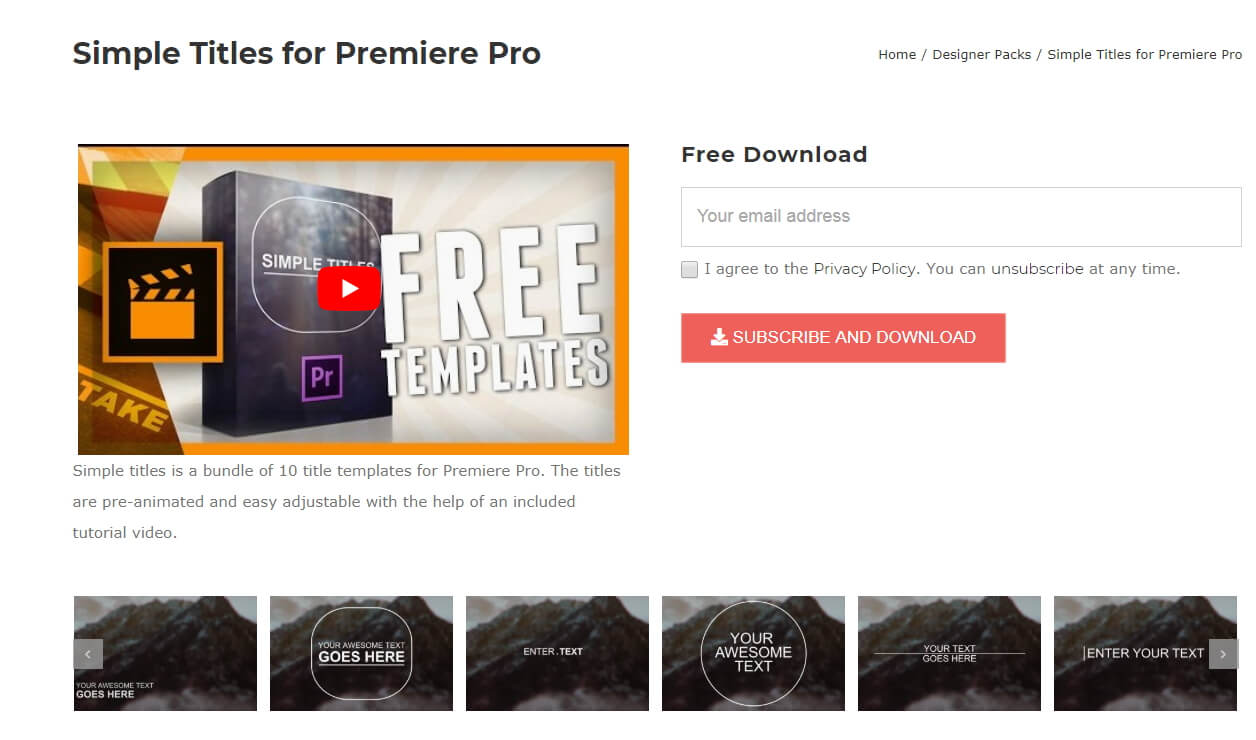
Unleash Your Creativity: Top 20 Free Adobe Premiere Title Templates
Top 20 Adobe Premiere Title/Intro Templates [Free Download]

Benjamin Arango
Mar 29, 2024• Proven solutions
One of the things that can make your output stand out from the crowd is the titles. Many people think creating eye-catching title effects is beyond them, but with Premiere Pro, you really couldn’t be more wrong.
As Premiere Pro doesn’t have built-in templates, the ability to import free Premiere Pro templates is a must. Anyone need to find a custom title style that suits the project and looks professional and carries impact.
The great thing is that there are many of these resources that are offered entirely free! If you don’t know how to add text/title to Adobe Premiere, here are steps to add text resources .
In this article, we will share with you 20 Free to download Title Templates for Premiere Pro.
- Part1: Top 15 Free Adobe Premiere Pro Title Templates
- Part2: Best 5 Premiere Pro Intro Templates Free Download
- Part3: How to Import and Customize Title Templates in Premiere
You may also like: 10 Free Star Wars Fonts to Make Your Video Amazing
Part 1: Top 15 Free Adobe Premiere Title Templates
Adding the finishing touches to a project, like creating the opening titles or end credits, is often not at the top of anyone’s priority list during the video editing process.
Nonetheless, making a unique opening sequence along with impressive animations in Adobe Premiere Pro can be a time-consuming endeavor, so instead of spending countless hours on producing a perfect combination of text and images, you can just download a title template from the Internet.
1 Premier Pro
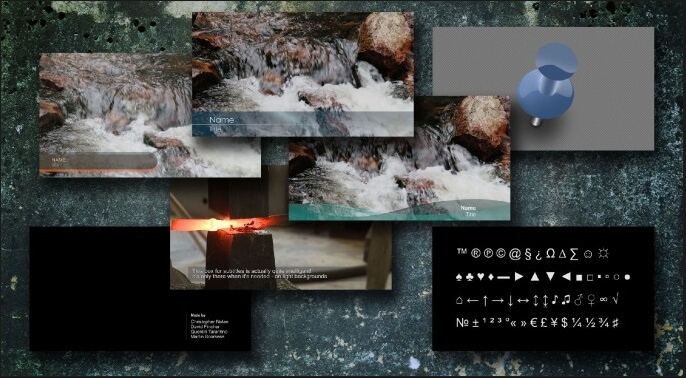
Jarle Leirpoll runs this site, and it is a treasure trove of information, help, and advice on Premiere from a man who wrote the book (literally, it’s for sale on the site!) on Premiere.
His first title collection is consisting of 8 templates, including Lower Thirds templates, end credit template, and some special characters. However, it well worth a look around the site as there is plenty more free stuff including presets, and a whole range of tips and tricks to help with your editing.
Features:
- Free Premiere Pro templates to download
- Easy to import the title template to Premiere
- 100% ready to use
In case that you’re just a beginner of video editing software, you can start with Wondershare Filmora (Latest Filmora version 11) to add text to videos, which is powerful but easy-to-use for green hands. Download the Wondershare Filmora below.
There are hundreds of Text and Titles presets available in Filmora, which allows you to add titles, subtitles, scrolling end credits, lower 3d, and openers with ease. You can also apply some animation effects to the selected title presets.
Check the video below to find out how to add text to video with Wondershare Filmora.
Besides the built-in title presets, Wondershare Filmora (Latest Filmora version X) also provides more title templates in Filmstock , which offers lots of special effects templates.
Currently, there are Title Expansion Set, business title set, wedding title set, and lower third expansion set to download. Check the video below to watch the Title Expansion set templates.
Download Mac Version ](https://tools.techidaily.com/wondershare/filmora/download/ )
Learn more details about How to Add Text to Video with Filmora.
2 Richard Harrington
This is another site that offers templates for download but is also a great place to visit for ideas and information. Richard approaches Premiere from a photographer’s viewpoint, and so has a slightly different view on many topics that are well worth reading.
He has links to a sizable number of templates on Richard Harrington covering a range of styles and subjects, including DVD menus, animated text, and high-quality models. Still, his blog is updated regularly and often includes free downloads.
Features:
- Supports Adobe Premiere intro templates to use
- It includes various templates and presets on Windows and Mac
- More than title templates also has DVD menus and animated text
3 ProVideoCoalition
Another all-encompassing site has a huge amount of information and knowledge to be gained. The templates are just part of the story. They are available on Pro Video Coalition and include numerous files and even some free video content showing their implementation.
Also on this page are links to some other sites offering free content or advice on various aspects of Premiere, making it well worth a visit and definitely worth its place in this top 10.
Of particular interest on this site is the regularly updated news which focuses on the latest hardware and software announcements.
Features:
- Supports lower thirds for Adobe Premiere
- You can customize the Premiere Pro intro template free download
- You can create graphic elements
4 Coremelt
This is a commercial site that offers a wide variety of high-quality plugins and templates for several video editing platforms. However, we are on the lookout for that fabulous price of free here, so a little digging finds this page , here you will find ten templates from one of their best selling products offered entirely free.
All templates are quality professionally produced products and worth the visit alone. For anyone who is looking to take their editing output to the professional level, the commercial products on offer here are well worth a look, high quality, and a reasonable cost.
Features:
- It includes 3D text and motion graphics templates
- Free and safe download the Premiere template

5 Bestproaction
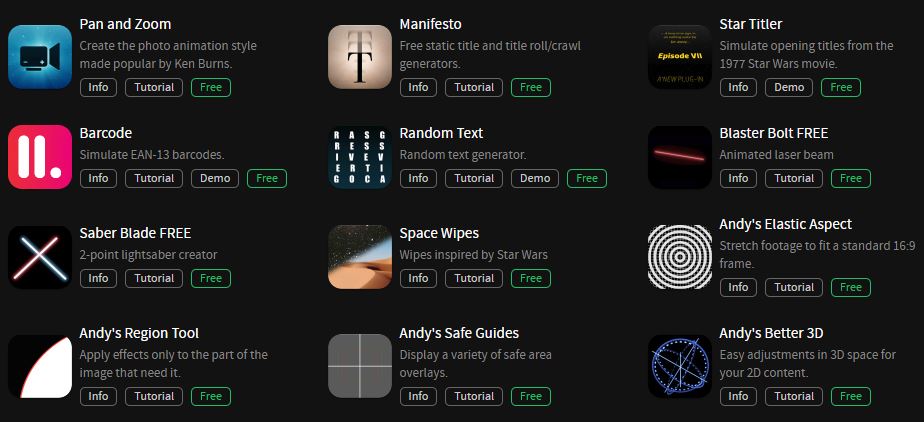
Another commercial site. This one has a range of free templates and presets to download for Premiere. Fourteen open items altogether can be downloaded. This site at least deserves a browse through their catalog after a download. The emphasis here is on low cost but high quality, useful templates, and plugins to suit any project.
Even for those of us with a limited budget, there may be something that catches the eye. It is an excellent site for browsing when looking for inspiration.
Features:
- Offers multimedia products like free Premiere Pro text, title templates
- Includes professional Premiere Pro template for videographers
- You can create graphic elements
6 FXFactory
This is another commercial site that has a smattering of very high-quality free downloads on offer, including a beautiful template for the original Star Wars movie style scrolling titles.
Again, it is worth browsing the catalog when you are on the site, but all the free products can be found here .
FX Factory has also created some great video tutorials on a variety of aspects of video production that are well worth a view when you are at the site.
Features:
- Free Premiere Pro effects templates to download
- Includes a step by step Premiere Pro tutorial
7 Creative Impatience
A fantastic site full of information, tips, and opinion on all aspects of video production, it’s a great place to spend some time, with the bonus of a bunch of free downloads for Premiere.
Of particular note are the tutorials, an excellent source of information and tricks that you may not have seen before, with their YouTube channel being a great source of free guidance for editors of any sort of experience.
Features:
- Apart from free Premiere Pro templates, you can also find blogs
- Easy steps to make Premiere Pro templates
- Safe and clean to use. All real
8Filmimpact
A commercial site is offering some great products at competitive prices. At first glance, this may not seem to be a useful place for our search for the free stuff.
However, all the products do have a free trial download, and as a bonus, the trial for pack one includes four free to use templates. They are quality products too, and well worth a look.

9 Style4Type
Style4Type is an exciting site regularly updated with new free templates as well as offering technical advice and having further templates available as commercial products.
And to the side is even a free download for a PDF file that walks you through installing and using the templates within Premiere once you have them.
There are already a lot of free templates on offer covering a wide variety of styles, but they are added to with regularity, so it is a site to bookmark for the future.
Features:
- Free title templates to use including texture templates
- Professional tools to better your video

10 Premiere Beat
Lots of information on this site as its been running for a decade, it is a website that imparts a wealth of knowledge along the way on not just video editing but music.
The pack includes 21 Premiere title templates to use. Another site that you will want to visit again and again.
Features:
- High-quality Premiere Pro templates to download
- A large number of Premiere templates to use
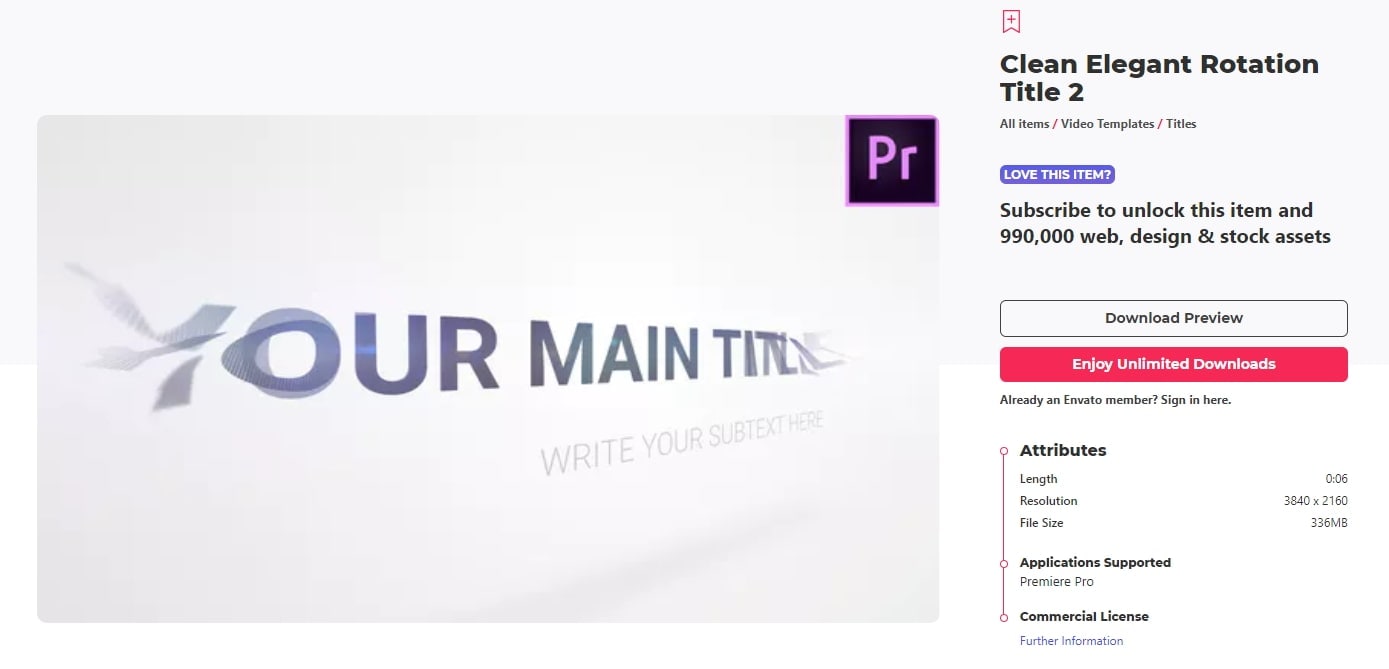
11 Clean Elegant Rotation Title
It is a clean title template without unnecessary parts. If you like simple titles, this one is best for you. You can customize in Premiere easily with a few clicks. For beginners, it also includes free tutorials to use.
Features:
- Simple and clean Premiere title templates
- Customizable in Premiere
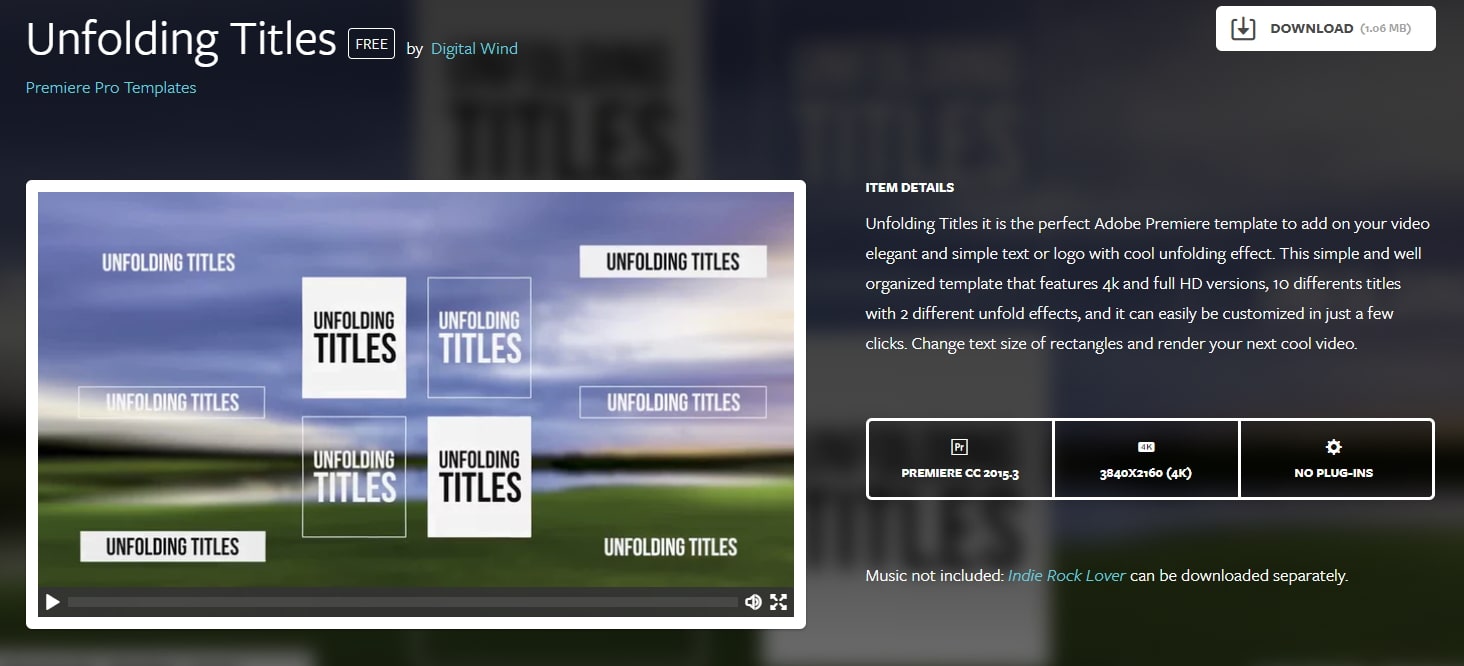
12 Unfolding Titles
It is a clean title template with an unfolding effect. Each text has two unfolding effects, which are convenient to use with customization. It supports 4K and HD versions. In this pack, it wons 10 title formats. After importing Premiere, you can also change text size.
Features:
- 20 unfolding title effects
- Supports rendering your video
13 Orange83
These are five modern title packs for Premiere. With it, you don’t need to use After Effects as you can import them to edit. The best part is you can include your logo and other stuff you like.
Features:
- Include 5 title packs
- Modern and clean titles
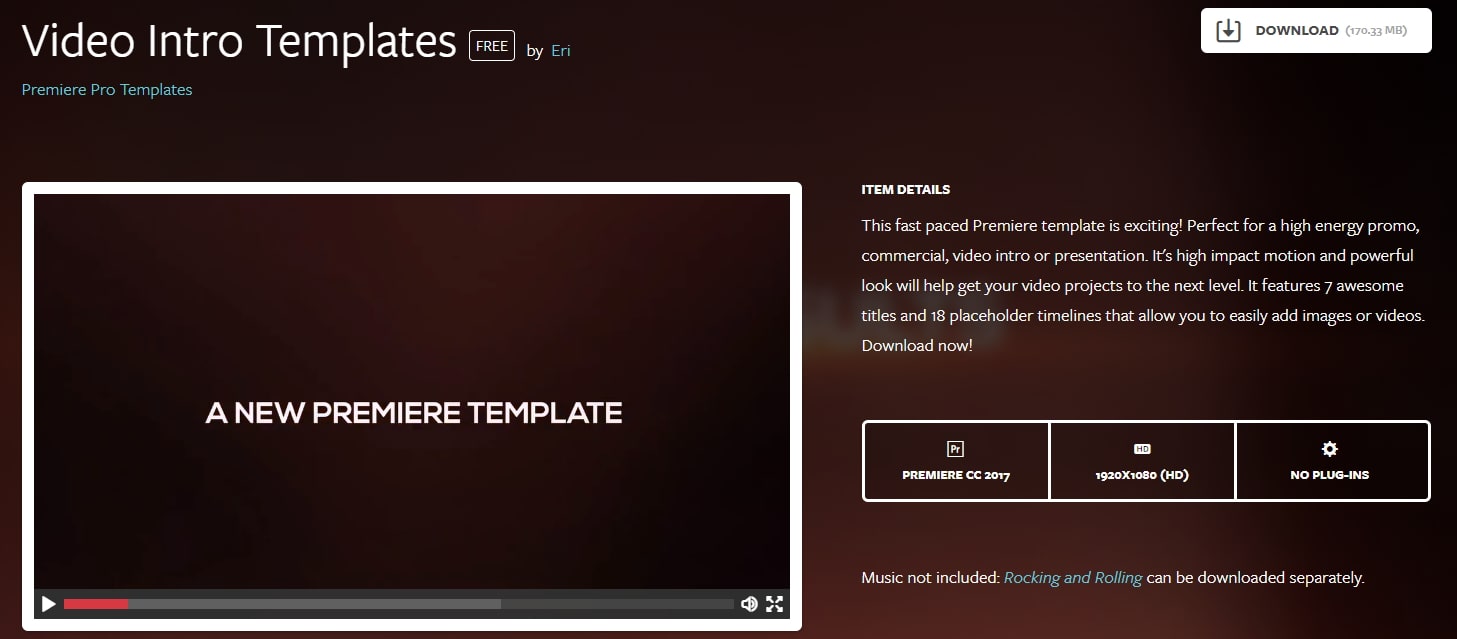
14 Video Intro Templates - Premiere Pro intro template free download
It is a free download Premiere Pro intro template that you can add to your video. It is highly recommended to use promotion and commercial video.
This intro template can be adjusted after you import it to Premiere Pro. This Premiere Pro intro template is HD, so you don’t need to worry about the whole video quality.
Features:
- 1920X1080 (HD) is supported
- This intro template doesn’t include built-in music
15 Elegant Promo - another Premiere Pro intro template free to use
It is intro template for Premiere Pro is modern and free to use. The whole style is young and energetic, which will give viewers a fresh new feeling. It includes 12 images and 26 text layers, and all of them are free to download.
You can use it for your presentation, promotional video, and product video. Besides, it doesn’t require a plug in to use this intro template in Premiere Pro.
Features:
- It includes animated intro elements.
- Use an HD intro template to make a popular video.

These are free templates, and they are enough to get anyone up and running with a new project. As said before, with the commercial enterprises that offer freebies, it’s always worth checking out their paid for output as well, you may not be in the market for it right now, but something may stick for a later time.
Part 2: Bonus: Best 5 Premiere Pro Intro Templates Free Download
Even though all websites we featured in this article offer some free intro templates for Adobe Premiere Pro. However, it is still a much better solution to buy a subscription plan on a platform if you are working on a large number of projects each month.
Let’s see which websites you can use to download the intro and title templates for Premiere Pro.
16. Motion Array
In addition to an impressive library of intro templates, Motion Array offers presets, sound effects, royalty-free music, and stock footage.
Furthermore, you can choose the software version to make sure that the templates you download can be used with the version of Adobe Premiere Pro you have installed on your computer.
The website provides you with powerful search tools, so you can select the resolution of the template, up to 8K, or choose which types of templates are going to be displayed.
Using the free subscription plan can limit your options since you’ll only be able to download free templates, and your upload storage will be limited to just 1GB.
The Pro subscription plan that can be purchased for $54 per month will grant you access to an almost endless selection of title templates as well as a huge selection of plugins for Adobe Premiere Pro.

17. Cinecom – Simple Intro for Premiere Pro
It is a designer pack that features ten pre-animated lower-thirds intro templates. You can change the duration of the font and color of the text in each template, and you can choose if you want to download a 1080 or the 4K version of the designer pack.
The templates are compatible with CS6, CC2013, CC2014, and CC2016 versions of the Premiere Pro. The Simple Titles pack can be easily installed, as you just have to drag and drop it into the software.
However, before you can download these title templates, you have to subscribe to Cinecom’s mailing list.
Even though this can be a bit inconvenient, it is very well worth the trouble since you’ll be able to transform or build upon the intro templates and use them freely in all videos you edit in Adobe Premiere Pro.
18. EnvatoElements
You can find much more than intro templates on the EnvatoElements platform since you can choose from 740.000 items you can use for anything from creating a WordPress website to preparing your next business presentation.
The Video Templates category alone features over 4000 items, including Logo Stings or Infographics assets.
There are nearly one hundred available intro templates for Adobe Premiere Pro, but downloading any of them requires you to create an account and purchase a subscription plan.
Prices start from $16.50 per month, and packages include virtually unlimited access to stock photos and videos, video templates, and much more. The EnvatoElements platform also offers assets that can be used with Final Cut Pro, Adobe After Effects or Apple Motion.

19. Videohive
Videohive is a part of the Envato Market platform that also features Web Themes and Templates, Code, Audio, or Graphic sections. It is free to use, but only a limited amount of assets can be downloaded for free.
To download an item, you must purchase it, and prices can range from $16 to $50 for a single title template.
Videohive is also a great source of title templates for Adobe After Effects, as it offers more than 5000 titles and intros that are compatible with this software.
Furthermore, you can download presets for both Premiere Pro and After Effects that can be used to create stop-motion animations, perform color correction, or make the footage look like it was captured with a VHS camera.

20. RocketStock
This option is best suited for video editors who want to create their intros because RocketStok’s Cinematic Style Library extends the scope of options provided by Premiere Pro.
Downloading all fonts except Helvetica Neue is free, but you must check which fonts you can use in commercial projects. You will have no trouble installing the fonts since you can just double-click on the font and follow the on-screen instructions.
Once you’ve installed all the fonts from the library, you can use them to replace the software’s default library. You just have to click on the Replace Style Library option that can be accessed from Premiere Pro’s Title Style tab.
If you don’t feel comfortable creating your titles or if you simply don’t have the time to create your own titles, the Free Cinematic Style Library is not the best choice for you.
On the other hand, Premiere Pro’s users who don’t often use title templates can benefit from downloading RocketStock’s intro library.

Part 3: How to Import and Customize Title Templates in Premiere
If you download the template, all the title templates support customization. You can change its size, font, color, and add 3D effects.
It is easy to import and use it to touch up your video. Check out the steps below to know how to import title templates quickly.
- Install the title template. Choose one template you like and download it to your PC. Remember to unzip it before importing it. Now install them.
- Import the title template. You just need to go to click Effects at the top. Then at right, you will find Presets in the effects section.
- Right-click on presets, and choose Import Presets. If the title template format is .mogrt, you need to open it in Essential Graphics Panel. At the bottom right corner, click the plus icon to import the title template and install it.
- Customize the title template. Once the title template is imported, drag it to the timeline. Click the Editing tab. Here you can customize colors, text, opacities, and positions. There are more options for you to explore.
- You can also copy and paste the title template to another place in the timeline. If you change one place of the pasted template, the original one will remain the same.
Note: each version of Premiere’s interface will look different, but the workflow is similar.
Conclusion
Using title templates can help you achieve a certain visual style faster, so you don’t have to spend a lot of time looking for a perfect background or animating the text.
The Internet provides almost unlimited video editing resources, but not all of these resources can be acquired for free.
Which website you will choose as a source of fresh title templates depends on how often you work on new projects in Adobe Premiere Pro.
If you want to make professional video editing and tired of Premiere, try Filmora! It includes various titles templates to use.
You can sync audio automatically, use detailed color correction to make your title and video like a movie. Download it now (FREE)!
Benjamin Arango
Benjamin Arango is a writer and a lover of all things video.
Follow @Benjamin Arango
Benjamin Arango
Mar 29, 2024• Proven solutions
One of the things that can make your output stand out from the crowd is the titles. Many people think creating eye-catching title effects is beyond them, but with Premiere Pro, you really couldn’t be more wrong.
As Premiere Pro doesn’t have built-in templates, the ability to import free Premiere Pro templates is a must. Anyone need to find a custom title style that suits the project and looks professional and carries impact.
The great thing is that there are many of these resources that are offered entirely free! If you don’t know how to add text/title to Adobe Premiere, here are steps to add text resources .
In this article, we will share with you 20 Free to download Title Templates for Premiere Pro.
- Part1: Top 15 Free Adobe Premiere Pro Title Templates
- Part2: Best 5 Premiere Pro Intro Templates Free Download
- Part3: How to Import and Customize Title Templates in Premiere
You may also like: 10 Free Star Wars Fonts to Make Your Video Amazing
Part 1: Top 15 Free Adobe Premiere Title Templates
Adding the finishing touches to a project, like creating the opening titles or end credits, is often not at the top of anyone’s priority list during the video editing process.
Nonetheless, making a unique opening sequence along with impressive animations in Adobe Premiere Pro can be a time-consuming endeavor, so instead of spending countless hours on producing a perfect combination of text and images, you can just download a title template from the Internet.
1 Premier Pro
Jarle Leirpoll runs this site, and it is a treasure trove of information, help, and advice on Premiere from a man who wrote the book (literally, it’s for sale on the site!) on Premiere.
His first title collection is consisting of 8 templates, including Lower Thirds templates, end credit template, and some special characters. However, it well worth a look around the site as there is plenty more free stuff including presets, and a whole range of tips and tricks to help with your editing.
Features:
- Free Premiere Pro templates to download
- Easy to import the title template to Premiere
- 100% ready to use
In case that you’re just a beginner of video editing software, you can start with Wondershare Filmora (Latest Filmora version 11) to add text to videos, which is powerful but easy-to-use for green hands. Download the Wondershare Filmora below.
There are hundreds of Text and Titles presets available in Filmora, which allows you to add titles, subtitles, scrolling end credits, lower 3d, and openers with ease. You can also apply some animation effects to the selected title presets.
Check the video below to find out how to add text to video with Wondershare Filmora.
Besides the built-in title presets, Wondershare Filmora (Latest Filmora version X) also provides more title templates in Filmstock , which offers lots of special effects templates.
Currently, there are Title Expansion Set, business title set, wedding title set, and lower third expansion set to download. Check the video below to watch the Title Expansion set templates.
Download Mac Version ](https://tools.techidaily.com/wondershare/filmora/download/ )
Learn more details about How to Add Text to Video with Filmora.
2 Richard Harrington
This is another site that offers templates for download but is also a great place to visit for ideas and information. Richard approaches Premiere from a photographer’s viewpoint, and so has a slightly different view on many topics that are well worth reading.
He has links to a sizable number of templates on Richard Harrington covering a range of styles and subjects, including DVD menus, animated text, and high-quality models. Still, his blog is updated regularly and often includes free downloads.
Features:
- Supports Adobe Premiere intro templates to use
- It includes various templates and presets on Windows and Mac
- More than title templates also has DVD menus and animated text
3 ProVideoCoalition
Another all-encompassing site has a huge amount of information and knowledge to be gained. The templates are just part of the story. They are available on Pro Video Coalition and include numerous files and even some free video content showing their implementation.
Also on this page are links to some other sites offering free content or advice on various aspects of Premiere, making it well worth a visit and definitely worth its place in this top 10.
Of particular interest on this site is the regularly updated news which focuses on the latest hardware and software announcements.
Features:
- Supports lower thirds for Adobe Premiere
- You can customize the Premiere Pro intro template free download
- You can create graphic elements
4 Coremelt
This is a commercial site that offers a wide variety of high-quality plugins and templates for several video editing platforms. However, we are on the lookout for that fabulous price of free here, so a little digging finds this page , here you will find ten templates from one of their best selling products offered entirely free.
All templates are quality professionally produced products and worth the visit alone. For anyone who is looking to take their editing output to the professional level, the commercial products on offer here are well worth a look, high quality, and a reasonable cost.
Features:
- It includes 3D text and motion graphics templates
- Free and safe download the Premiere template
5 Bestproaction
Another commercial site. This one has a range of free templates and presets to download for Premiere. Fourteen open items altogether can be downloaded. This site at least deserves a browse through their catalog after a download. The emphasis here is on low cost but high quality, useful templates, and plugins to suit any project.
Even for those of us with a limited budget, there may be something that catches the eye. It is an excellent site for browsing when looking for inspiration.
Features:
- Offers multimedia products like free Premiere Pro text, title templates
- Includes professional Premiere Pro template for videographers
- You can create graphic elements
6 FXFactory
This is another commercial site that has a smattering of very high-quality free downloads on offer, including a beautiful template for the original Star Wars movie style scrolling titles.
Again, it is worth browsing the catalog when you are on the site, but all the free products can be found here .
FX Factory has also created some great video tutorials on a variety of aspects of video production that are well worth a view when you are at the site.
Features:
- Free Premiere Pro effects templates to download
- Includes a step by step Premiere Pro tutorial
7 Creative Impatience
A fantastic site full of information, tips, and opinion on all aspects of video production, it’s a great place to spend some time, with the bonus of a bunch of free downloads for Premiere.
Of particular note are the tutorials, an excellent source of information and tricks that you may not have seen before, with their YouTube channel being a great source of free guidance for editors of any sort of experience.
Features:
- Apart from free Premiere Pro templates, you can also find blogs
- Easy steps to make Premiere Pro templates
- Safe and clean to use. All real
8Filmimpact
A commercial site is offering some great products at competitive prices. At first glance, this may not seem to be a useful place for our search for the free stuff.
However, all the products do have a free trial download, and as a bonus, the trial for pack one includes four free to use templates. They are quality products too, and well worth a look.
9 Style4Type
Style4Type is an exciting site regularly updated with new free templates as well as offering technical advice and having further templates available as commercial products.
And to the side is even a free download for a PDF file that walks you through installing and using the templates within Premiere once you have them.
There are already a lot of free templates on offer covering a wide variety of styles, but they are added to with regularity, so it is a site to bookmark for the future.
Features:
- Free title templates to use including texture templates
- Professional tools to better your video
10 Premiere Beat
Lots of information on this site as its been running for a decade, it is a website that imparts a wealth of knowledge along the way on not just video editing but music.
The pack includes 21 Premiere title templates to use. Another site that you will want to visit again and again.
Features:
- High-quality Premiere Pro templates to download
- A large number of Premiere templates to use
11 Clean Elegant Rotation Title
It is a clean title template without unnecessary parts. If you like simple titles, this one is best for you. You can customize in Premiere easily with a few clicks. For beginners, it also includes free tutorials to use.
Features:
- Simple and clean Premiere title templates
- Customizable in Premiere
12 Unfolding Titles
It is a clean title template with an unfolding effect. Each text has two unfolding effects, which are convenient to use with customization. It supports 4K and HD versions. In this pack, it wons 10 title formats. After importing Premiere, you can also change text size.
Features:
- 20 unfolding title effects
- Supports rendering your video
13 Orange83
These are five modern title packs for Premiere. With it, you don’t need to use After Effects as you can import them to edit. The best part is you can include your logo and other stuff you like.
Features:
- Include 5 title packs
- Modern and clean titles
14 Video Intro Templates - Premiere Pro intro template free download
It is a free download Premiere Pro intro template that you can add to your video. It is highly recommended to use promotion and commercial video.
This intro template can be adjusted after you import it to Premiere Pro. This Premiere Pro intro template is HD, so you don’t need to worry about the whole video quality.
Features:
- 1920X1080 (HD) is supported
- This intro template doesn’t include built-in music
15 Elegant Promo - another Premiere Pro intro template free to use
It is intro template for Premiere Pro is modern and free to use. The whole style is young and energetic, which will give viewers a fresh new feeling. It includes 12 images and 26 text layers, and all of them are free to download.
You can use it for your presentation, promotional video, and product video. Besides, it doesn’t require a plug in to use this intro template in Premiere Pro.
Features:
- It includes animated intro elements.
- Use an HD intro template to make a popular video.
These are free templates, and they are enough to get anyone up and running with a new project. As said before, with the commercial enterprises that offer freebies, it’s always worth checking out their paid for output as well, you may not be in the market for it right now, but something may stick for a later time.
Part 2: Bonus: Best 5 Premiere Pro Intro Templates Free Download
Even though all websites we featured in this article offer some free intro templates for Adobe Premiere Pro. However, it is still a much better solution to buy a subscription plan on a platform if you are working on a large number of projects each month.
Let’s see which websites you can use to download the intro and title templates for Premiere Pro.
16. Motion Array
In addition to an impressive library of intro templates, Motion Array offers presets, sound effects, royalty-free music, and stock footage.
Furthermore, you can choose the software version to make sure that the templates you download can be used with the version of Adobe Premiere Pro you have installed on your computer.
The website provides you with powerful search tools, so you can select the resolution of the template, up to 8K, or choose which types of templates are going to be displayed.
Using the free subscription plan can limit your options since you’ll only be able to download free templates, and your upload storage will be limited to just 1GB.
The Pro subscription plan that can be purchased for $54 per month will grant you access to an almost endless selection of title templates as well as a huge selection of plugins for Adobe Premiere Pro.
17. Cinecom – Simple Intro for Premiere Pro
It is a designer pack that features ten pre-animated lower-thirds intro templates. You can change the duration of the font and color of the text in each template, and you can choose if you want to download a 1080 or the 4K version of the designer pack.
The templates are compatible with CS6, CC2013, CC2014, and CC2016 versions of the Premiere Pro. The Simple Titles pack can be easily installed, as you just have to drag and drop it into the software.
However, before you can download these title templates, you have to subscribe to Cinecom’s mailing list.
Even though this can be a bit inconvenient, it is very well worth the trouble since you’ll be able to transform or build upon the intro templates and use them freely in all videos you edit in Adobe Premiere Pro.
18. EnvatoElements
You can find much more than intro templates on the EnvatoElements platform since you can choose from 740.000 items you can use for anything from creating a WordPress website to preparing your next business presentation.
The Video Templates category alone features over 4000 items, including Logo Stings or Infographics assets.
There are nearly one hundred available intro templates for Adobe Premiere Pro, but downloading any of them requires you to create an account and purchase a subscription plan.
Prices start from $16.50 per month, and packages include virtually unlimited access to stock photos and videos, video templates, and much more. The EnvatoElements platform also offers assets that can be used with Final Cut Pro, Adobe After Effects or Apple Motion.
19. Videohive
Videohive is a part of the Envato Market platform that also features Web Themes and Templates, Code, Audio, or Graphic sections. It is free to use, but only a limited amount of assets can be downloaded for free.
To download an item, you must purchase it, and prices can range from $16 to $50 for a single title template.
Videohive is also a great source of title templates for Adobe After Effects, as it offers more than 5000 titles and intros that are compatible with this software.
Furthermore, you can download presets for both Premiere Pro and After Effects that can be used to create stop-motion animations, perform color correction, or make the footage look like it was captured with a VHS camera.
20. RocketStock
This option is best suited for video editors who want to create their intros because RocketStok’s Cinematic Style Library extends the scope of options provided by Premiere Pro.
Downloading all fonts except Helvetica Neue is free, but you must check which fonts you can use in commercial projects. You will have no trouble installing the fonts since you can just double-click on the font and follow the on-screen instructions.
Once you’ve installed all the fonts from the library, you can use them to replace the software’s default library. You just have to click on the Replace Style Library option that can be accessed from Premiere Pro’s Title Style tab.
If you don’t feel comfortable creating your titles or if you simply don’t have the time to create your own titles, the Free Cinematic Style Library is not the best choice for you.
On the other hand, Premiere Pro’s users who don’t often use title templates can benefit from downloading RocketStock’s intro library.
Part 3: How to Import and Customize Title Templates in Premiere
If you download the template, all the title templates support customization. You can change its size, font, color, and add 3D effects.
It is easy to import and use it to touch up your video. Check out the steps below to know how to import title templates quickly.
- Install the title template. Choose one template you like and download it to your PC. Remember to unzip it before importing it. Now install them.
- Import the title template. You just need to go to click Effects at the top. Then at right, you will find Presets in the effects section.
- Right-click on presets, and choose Import Presets. If the title template format is .mogrt, you need to open it in Essential Graphics Panel. At the bottom right corner, click the plus icon to import the title template and install it.
- Customize the title template. Once the title template is imported, drag it to the timeline. Click the Editing tab. Here you can customize colors, text, opacities, and positions. There are more options for you to explore.
- You can also copy and paste the title template to another place in the timeline. If you change one place of the pasted template, the original one will remain the same.
Note: each version of Premiere’s interface will look different, but the workflow is similar.
Conclusion
Using title templates can help you achieve a certain visual style faster, so you don’t have to spend a lot of time looking for a perfect background or animating the text.
The Internet provides almost unlimited video editing resources, but not all of these resources can be acquired for free.
Which website you will choose as a source of fresh title templates depends on how often you work on new projects in Adobe Premiere Pro.
If you want to make professional video editing and tired of Premiere, try Filmora! It includes various titles templates to use.
You can sync audio automatically, use detailed color correction to make your title and video like a movie. Download it now (FREE)!
Benjamin Arango
Benjamin Arango is a writer and a lover of all things video.
Follow @Benjamin Arango
Add Emotional Depth: Learn to Create a Ken Burns Effect in Minutes
How to Make Ken Burns Effect in Final Cut Pro?

Liza Brown
Mar 27, 2024• Proven solutions
Ken Burns Effect is an advanced feature of Final Cut Pro that allows users to add creative animations to their videos and images within minutes. You just need to select your picture, add movements to the clip, and choose the start and the end position to produce high-resolution stills. Besides, you can do a tilt, zoom in, a pan, or a combination of these three moves on a single image. This way, you can use the Ken Burns Effect to highlight the stimulating features in your photograph and save your memories in the form of innovative and high-definition animated clips.
This article introduces the readers to Final Cut Pro and explains how to add the Ken Burns Effect in 8 simple steps.
- Part 1: How to Make a Ken Burns Effect in Final Cut Pro?[detaied steps]
- Part 2: How to add the Ken Burns Effect to Multiple Camera Movements?
- Extensive Reading: Why Ken Burns Effect is Named after Ken Burns?
Part 1: How to Make a Ken Burns Effect in Final Cut Pro?
Final Cut Pro is user-friendly software and makes it easy for you to create a Ken Burns Effect without having advanced skills and expertise. So, are you interested in knowing the best part? Given below are a few simple steps to create Ken Burns Effect and make your pictures and videos look adorable.
Step 1: Add Images to the Timeline
First of all, you should specify a name for your project and add photos to the timeline in Final Cut Pro. For this purpose, select multiple photos and press E. A clip will be added to the timeline as shown in figure 1.

Step 2: Check Your Settings
As you can see, our timeline has no other video clip. Hence, Final Cut Pro will not recognize the clip until you adjust the video properties such as format, resolution, and rate, etc. For this purpose, click OK to use your preferred settings and press Shift + Z to fit the picture to your timeline window. Once you’re done it’s time to apply the Ken Burns Effect.

Step 3: Add the Ken Burns Effect
The Ken Burns Effect is used to focus on specific parts of an image and bring motionless content in to provoke emotional reactions. Follow these steps to add the Ken Burns Effect:
- Select the clip or picture;
- See the lower left of the viewer;
- Go to the Viewer window using the drop-down menu;
- Tap on the pop-up menu located in the bottom left-hand corner;
- Choose the Crop option from the menu or press Shift + C;
- Press the Ken Burns button in the Crop onscreen controls to add the effect; and
- Finally, notice the start frame and the end frame controls.

Step 4: Customize Your Effect
In the Ken Burns display, you can see the controls for adjusting the panning and zooms effects by changing the size and position of two-colored rectangles overlaying on the clip. To customize the Ken Burns effect:
- Adjust the green rectangle’s size and position to set the start position;
- Adjust the red rectangle’s size and position to set the end position;
- The arrow depicts the direction of camera position between start and end position;
- In the top left-hand corner, click on the Swap button to exchange the two positions as per your requirements;
- You can see the preview of the animation on the screen.

Step 5: Add a Freeze Frame
You’re not done yet because you need to hold your picture at the end of the animation. For this purpose, you should create a freezing frame at the end of the clip to make Ken Burns do this. Here’s the deal:
- Press the Down arrow followed by the Left arrow to go to the last frame;
- Press Option-F to add a freeze-frame;
- Make sure that your added frame matches the ending frame of the Ken Burns Effect.

Step 6: Adjust the Duration of the Freeze Frame
The users can also adjust the speed of the animation and the duration of the freeze-frame by trimming your clip. For this purpose, trim the length as per your requirement and it will optimize the speed as shown in figure 6.

Step 7: Swap the Start and End Frame
Now, swap the start and ending frame as per your preference for the Ken Burns animation. Here’s how you can do this:
- Click on the Swap button;
- The start frame will match the still frame (previous one);
- Grab the end frame and move it to your desired position;
- Apply enough zoom in to make the black areas disappear;
- Preview to see how your animation looks.

Step 8: Play/Preview Looping
After you have optimized the speed of the Ken Burns Effect by trimming the clip’s length and have widened the shot to include everyone, it’s time to preview the changes you have made. Given below are simple steps:
- Press the Play Loop button;
- Tap on the Pause icon and return to editing;
- Click Done and enjoy your animation.
Seems a little complicated? Filmora allows users to do Ken Burns effect, or pan and zoom effect, in much easier steps, click to download and have a try!
Part 2: How to add the Ken Burns Effect to Multiple Camera Movements?
Although you can apply a single Ken Burns movement to your image, you can still give the impression of multiple movements being used. This means the Ken Burns Effect can be added to multiple camera movements by duplicating the photo and building numerous movements in sequence.
- Add the first camera movement to your image;
- Duplicate the clip by click and drag option or copy and paste option;
- Press the Swap button in the Ken Burns settings to reverse the start and end positions;
- Verify if multiple camera movements have been added.
Extensive Reading: Why Ken Burns Effect is Named after Ken Burns?
What is the Ken Burns Effect?
The Ken Burns Effect is a feature in Final Cut Pro to create a pan and zoom effect by using your predefined start and end positions. Basically, it is a crop effect with one crop at the start of the clip while the other at the end. Ken Burns Effect can be further customized by adjusting the smoothness of the animation. While creating a Ken Burns Effect, the motion applied to the video clips gets automatically smoothed to accelerate and decelerate the movement slowly at the start and the end of the animation.
Why the Effect is named after Ken Burns?
Now, as you have learned the purpose of the Ken Burns Effect, you must be curious about its name. It is named after American documentarian Ken Burns, who is known for his instantly recognizable and highly influential visual aesthetic. Surprisingly, Ken Burns did not invent this Ken Burns Effect; rather, it has existed for decades. You might be wondering why the technique was then named after Ken Burns. This was due to the persistent and adroit use of this technique that it is now known as the Ken Burns Effect.

What are the Applications of Ken Burns Effect?
Primarily, the Ken Burns Effect is used due to the unavailability of a film or video. The technique gives action to still photographs to glorify the subjects of interest like couples in wedding photography. It gets better and better as you apply simulated parallax with Ken Burns Effect to make your 2D images appear as 3D plus advanced zooming visuals. You can also use the Ken Burns effect to make a video of your graduation ceremony pictures or memorable moments of reunion. Ken Burns Effect is also used in documentaries by professional filmmakers and editors.
Conclusion
Adding animated effects to your pictures and videos makes them look gorgeous. This is crazy, isn’t it, when you impress your peers with your editing skills. So, what’s the bottom line of this whole discussion? Try adding the Ken Burns Effect with Final Cut Pro to create a pan and zoom effect on your pictures and clips get the output in your desired format.
Liza Brown
Liza Brown is a writer and a lover of all things video.
Follow @Liza Brown
Liza Brown
Mar 27, 2024• Proven solutions
Ken Burns Effect is an advanced feature of Final Cut Pro that allows users to add creative animations to their videos and images within minutes. You just need to select your picture, add movements to the clip, and choose the start and the end position to produce high-resolution stills. Besides, you can do a tilt, zoom in, a pan, or a combination of these three moves on a single image. This way, you can use the Ken Burns Effect to highlight the stimulating features in your photograph and save your memories in the form of innovative and high-definition animated clips.
This article introduces the readers to Final Cut Pro and explains how to add the Ken Burns Effect in 8 simple steps.
- Part 1: How to Make a Ken Burns Effect in Final Cut Pro?[detaied steps]
- Part 2: How to add the Ken Burns Effect to Multiple Camera Movements?
- Extensive Reading: Why Ken Burns Effect is Named after Ken Burns?
Part 1: How to Make a Ken Burns Effect in Final Cut Pro?
Final Cut Pro is user-friendly software and makes it easy for you to create a Ken Burns Effect without having advanced skills and expertise. So, are you interested in knowing the best part? Given below are a few simple steps to create Ken Burns Effect and make your pictures and videos look adorable.
Step 1: Add Images to the Timeline
First of all, you should specify a name for your project and add photos to the timeline in Final Cut Pro. For this purpose, select multiple photos and press E. A clip will be added to the timeline as shown in figure 1.
Step 2: Check Your Settings
As you can see, our timeline has no other video clip. Hence, Final Cut Pro will not recognize the clip until you adjust the video properties such as format, resolution, and rate, etc. For this purpose, click OK to use your preferred settings and press Shift + Z to fit the picture to your timeline window. Once you’re done it’s time to apply the Ken Burns Effect.
Step 3: Add the Ken Burns Effect
The Ken Burns Effect is used to focus on specific parts of an image and bring motionless content in to provoke emotional reactions. Follow these steps to add the Ken Burns Effect:
- Select the clip or picture;
- See the lower left of the viewer;
- Go to the Viewer window using the drop-down menu;
- Tap on the pop-up menu located in the bottom left-hand corner;
- Choose the Crop option from the menu or press Shift + C;
- Press the Ken Burns button in the Crop onscreen controls to add the effect; and
- Finally, notice the start frame and the end frame controls.
Step 4: Customize Your Effect
In the Ken Burns display, you can see the controls for adjusting the panning and zooms effects by changing the size and position of two-colored rectangles overlaying on the clip. To customize the Ken Burns effect:
- Adjust the green rectangle’s size and position to set the start position;
- Adjust the red rectangle’s size and position to set the end position;
- The arrow depicts the direction of camera position between start and end position;
- In the top left-hand corner, click on the Swap button to exchange the two positions as per your requirements;
- You can see the preview of the animation on the screen.
Step 5: Add a Freeze Frame
You’re not done yet because you need to hold your picture at the end of the animation. For this purpose, you should create a freezing frame at the end of the clip to make Ken Burns do this. Here’s the deal:
- Press the Down arrow followed by the Left arrow to go to the last frame;
- Press Option-F to add a freeze-frame;
- Make sure that your added frame matches the ending frame of the Ken Burns Effect.
Step 6: Adjust the Duration of the Freeze Frame
The users can also adjust the speed of the animation and the duration of the freeze-frame by trimming your clip. For this purpose, trim the length as per your requirement and it will optimize the speed as shown in figure 6.
Step 7: Swap the Start and End Frame
Now, swap the start and ending frame as per your preference for the Ken Burns animation. Here’s how you can do this:
- Click on the Swap button;
- The start frame will match the still frame (previous one);
- Grab the end frame and move it to your desired position;
- Apply enough zoom in to make the black areas disappear;
- Preview to see how your animation looks.
Step 8: Play/Preview Looping
After you have optimized the speed of the Ken Burns Effect by trimming the clip’s length and have widened the shot to include everyone, it’s time to preview the changes you have made. Given below are simple steps:
- Press the Play Loop button;
- Tap on the Pause icon and return to editing;
- Click Done and enjoy your animation.
Seems a little complicated? Filmora allows users to do Ken Burns effect, or pan and zoom effect, in much easier steps, click to download and have a try!
Part 2: How to add the Ken Burns Effect to Multiple Camera Movements?
Although you can apply a single Ken Burns movement to your image, you can still give the impression of multiple movements being used. This means the Ken Burns Effect can be added to multiple camera movements by duplicating the photo and building numerous movements in sequence.
- Add the first camera movement to your image;
- Duplicate the clip by click and drag option or copy and paste option;
- Press the Swap button in the Ken Burns settings to reverse the start and end positions;
- Verify if multiple camera movements have been added.
Extensive Reading: Why Ken Burns Effect is Named after Ken Burns?
What is the Ken Burns Effect?
The Ken Burns Effect is a feature in Final Cut Pro to create a pan and zoom effect by using your predefined start and end positions. Basically, it is a crop effect with one crop at the start of the clip while the other at the end. Ken Burns Effect can be further customized by adjusting the smoothness of the animation. While creating a Ken Burns Effect, the motion applied to the video clips gets automatically smoothed to accelerate and decelerate the movement slowly at the start and the end of the animation.
Why the Effect is named after Ken Burns?
Now, as you have learned the purpose of the Ken Burns Effect, you must be curious about its name. It is named after American documentarian Ken Burns, who is known for his instantly recognizable and highly influential visual aesthetic. Surprisingly, Ken Burns did not invent this Ken Burns Effect; rather, it has existed for decades. You might be wondering why the technique was then named after Ken Burns. This was due to the persistent and adroit use of this technique that it is now known as the Ken Burns Effect.
What are the Applications of Ken Burns Effect?
Primarily, the Ken Burns Effect is used due to the unavailability of a film or video. The technique gives action to still photographs to glorify the subjects of interest like couples in wedding photography. It gets better and better as you apply simulated parallax with Ken Burns Effect to make your 2D images appear as 3D plus advanced zooming visuals. You can also use the Ken Burns effect to make a video of your graduation ceremony pictures or memorable moments of reunion. Ken Burns Effect is also used in documentaries by professional filmmakers and editors.
Conclusion
Adding animated effects to your pictures and videos makes them look gorgeous. This is crazy, isn’t it, when you impress your peers with your editing skills. So, what’s the bottom line of this whole discussion? Try adding the Ken Burns Effect with Final Cut Pro to create a pan and zoom effect on your pictures and clips get the output in your desired format.
Liza Brown
Liza Brown is a writer and a lover of all things video.
Follow @Liza Brown
Also read:
- Cutting It Up A Beginners Guide to Splitting Videos in Windows Live Movie Maker
- New Get Started with Videoleap on Your MacBook Today for 2024
- In 2024, Dont Miss These The Most Impressive 4K Videos
- Updated Discover the Best Free Online Video Editors for Your Needs for 2024
- New 2024 Approved Merge Videos Online for Free The Best Options This Year
- Updated Stop Motion Made Easy Cloud Software Guide and Recommendations
- Updated In 2024, GIF Speed Boosters Top Online and Mobile Apps
- Updated Movie Maker No More? Try These 10 Free Video Editing Alternatives
- Create Hollywood-Style Movies with These 8 Mac Apps for 2024
- 16 Best Apps to Cartoon Yourself on iPhone, iPad and Android
- Updated 2024 Approved Edit on the Go Best Mobile Video Editing Apps for iPhone and Android Devices
- New In 2024, Voice Over Essentials Fast Track to Pro Recordings in Final Cut Pro
- VidEdit Mac for 2024
- Updated Get Instagram Audio Offline Download MP3 Files Quickly
- Updated 2024 Approved Discover the Top Reaction Video Creation Platforms
- New Best Video Combining Tools Easy Alternatives for 2024
- New In 2024, The Ultimate Vlog Editors Guide Free and Paid Software for Every Platform
- Updated Unleashing the Power of Lower Thirds in FCPX Video Editing
- 2024 Approved Effortless Video Import and Export Tips and Tricks for Adobe Premiere Users
- 2024 Approved Budget Video Editing Top Picks
- New Revolutionize Your Edits The Best 10 Final Cut Pro X Plugins Free and Paid for 2024
- 2024 Approved 10 Blockbuster Films Edited with Final Cut Pro
- In 2024, Why Apple Discontinued Final Cut Express? What Are the Major Differences Between Final Cut Express and Final Cut Pro?
- New In 2024, 10 Essential Online Video Rotation Software for Creators
- New In 2024, Whats the Best Aspect Ratio for LinkedIn Videos? Weve Got the Answer
- In 2024, 10 Free and Easy Video Editing Software Alternatives to WMM
- Updated In 2024, Unshaking the Camera A Step-by-Step Guide to Video Stabilization in Premiere Pro
- Updated Up-to-Date Guide to Social Media Aspect Ratio
- In 2024, Top 5 Best Free 4K Video Editing Software
- Updated Unleash Your Creativity The Top 10 Vlog Editor Apps for 2024
- How to Downgrade Apple iPhone 15 Pro Max to an Older Version? | Dr.fone
- Updated 2024 Approved Do You Wish to Know How FFmpeg Can Remove Audio From a Video? If Yes, Keep Scrolling This Guide to Remove Audio From Video with FFmpeg and Other Alternative Software
- In 2024, Is pgsharp legal when you are playing pokemon On Itel A60s? | Dr.fone
- iPogo will be the new iSpoofer On Tecno Phantom V Fold? | Dr.fone
- In 2024, How to Change Lock Screen Wallpaper on Realme
- Best Ways on How to Unlock/Bypass/Swipe/Remove Honor Magic 5 Fingerprint Lock
- In 2024, Change Location on Yik Yak For your Asus ROG Phone 8 Pro to Enjoy More Fun | Dr.fone
- In 2024, Is Fake GPS Location Spoofer a Good Choice On Realme Narzo N55? | Dr.fone
- In 2024, 2 Ways to Transfer Text Messages from Nubia Red Magic 9 Pro+ to iPhone 15/14/13/12/11/X/8/ | Dr.fone
- New S Best Adobe Premiere Plugins Boost Your Video Editing Game
- iPhone Is Disabled? Here Is The Way To Unlock Disabled iPhone 8 | Dr.fone
- How to Upgrade iPhone 13 mini without iTunes? | Dr.fone
- The Ultimate Guide to Get the Rare Candy on Pokemon Go Fire Red On Nokia G310 | Dr.fone
- In 2024, Top 6 Apps/Services to Trace Any Motorola Edge 40 Location By Mobile Number | Dr.fone
- In 2024, How to Reset a Infinix Smart 8 HD Phone that is Locked?
- About Vivo V29e FRP Bypass
- A Working Guide For Pachirisu Pokemon Go Map On Apple iPhone 12 mini | Dr.fone
- Title: 2024 Approved From Sideways to Right-Side Up Easy Video Flipping
- Author: Charlotte
- Created at : 2024-04-29 06:50:25
- Updated at : 2024-04-30 06:50:25
- Link: https://smart-video-creator.techidaily.com/2024-approved-from-sideways-to-right-side-up-easy-video-flipping/
- License: This work is licensed under CC BY-NC-SA 4.0.
