
:max_bytes(150000):strip_icc():format(webp)/how-to-increase-internet-speed-5181475-b6fd84098c634a04a6934302184c5b1b.jpg)
Updated 2024 Approved AVI Video Trimming Made Easy Top 16 Tools for Every Device
AVI Video Trimming Made Easy: Top 16 Tools for Every Device
With the growing fame of video-sharing and social media applications like Twitter, Instagram, and TikTok, the demand for simple and fast video cutting and trimming tools has dramatically increased. Nowadays, you don’t have to play with complex video editing tools to produce high-quality videos.
Thanks to several user-friendly editing software to make things easy for everybody. However, finding the right programs to trim/cut videos is still challenging, especially in AVI format.
But, guess what? These top 16 AVI video cutters for Windows, MAC, Android, iPhone, and online will make video cutting and trimming fun, especially when you learn to do it using Filmora.
In this Article
Part 1: Best AVI Video Cutter to Trim/Cut AVI Video on Windows and MAC – Filmora Video Cutter [with steps}
Part 2: Top 3 Free AVI Video Cutter on Windows
Part 3: Top 3 Free AVI Video Cutter on MAC
Part 4: Top 3 Free AVI Video Cutter on Android
Part 5: Top 3 Free AVI Video Cutter on iPhone
Part 6: Top 3 Free AVI Video Cutter Online
Part 7: Bottom Line
Part 8: FAQs
Part 1: Best AVI Video Cutter to Trim/Cut AVI Video on Windows and MAC – Filmora Video Cutter [with steps]
Filmora by Wondershare is a star video editor with outstanding outcomes. Whether you have a MAC or Windows PC, you can download Filmora regardless of your operating system. The program best serves those who intend to make high-quality videos. The software provides editing support for all video formats, including AVI.
Although Filmora is an affordable editor with tons of audio and video editing options, you can still download the software for free and create projects if watermarks don’t bother you. Moreover, you can count this tool’s capabilities in cropping, resizing, and Chroma screen support. But that’s not the only sweet fruit.
In fact, Filmora is equipped with many jaw-dropping features, including preset templates, auto beat sync, split-screen, speed ramping, motion tracking, keyframing, creative transitions, titles, filters, and much more. And the best part is, you can learn and understand Filmora in no time. That’s why the program is loved and supported by all types of users.
So does Filmora helps cut and trim AVI videos? Yes! It does if you follow these steps correctly.
Step 1: Download Filmora Video Editor
First, download Filmora Video Editor by choosing your operating system, as seen in the screenshot below.
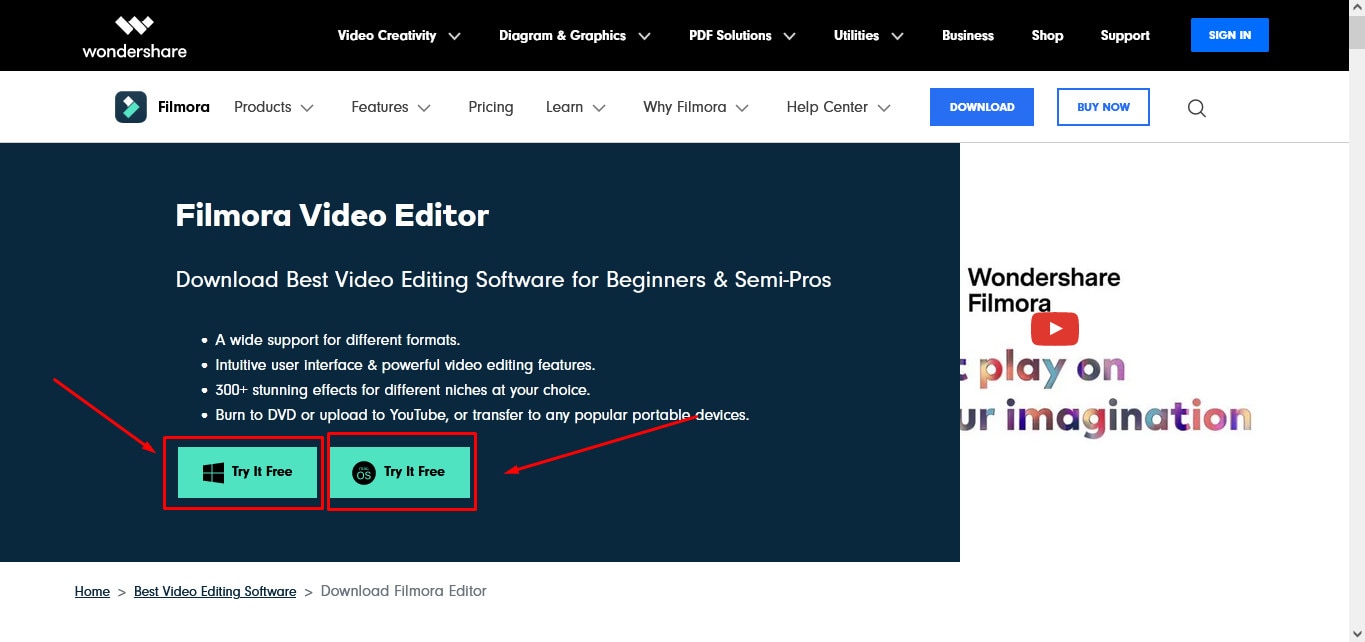
Run the setup and let it finish without any pause or break.
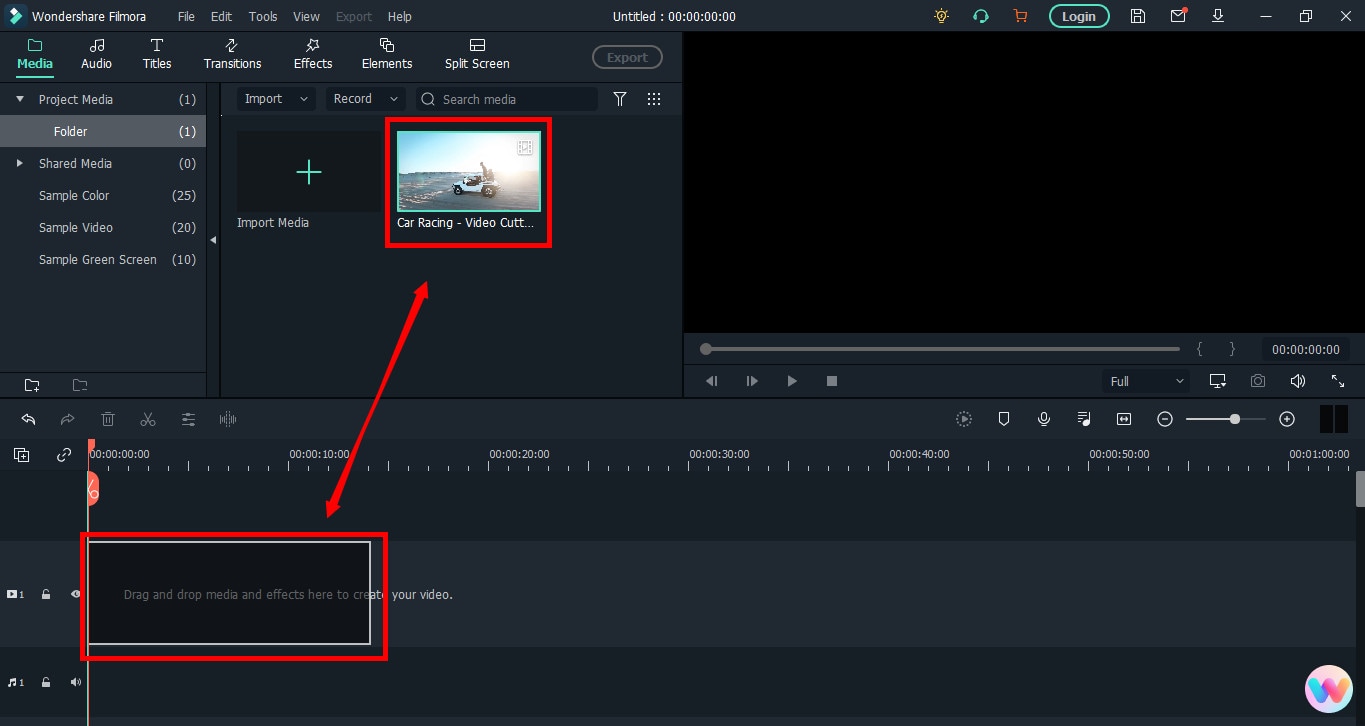
Step 2: Import Your Video to Filmora Video Editor
Importing your AVI video is a very simple process. Just click on the “Film Clip” icon.
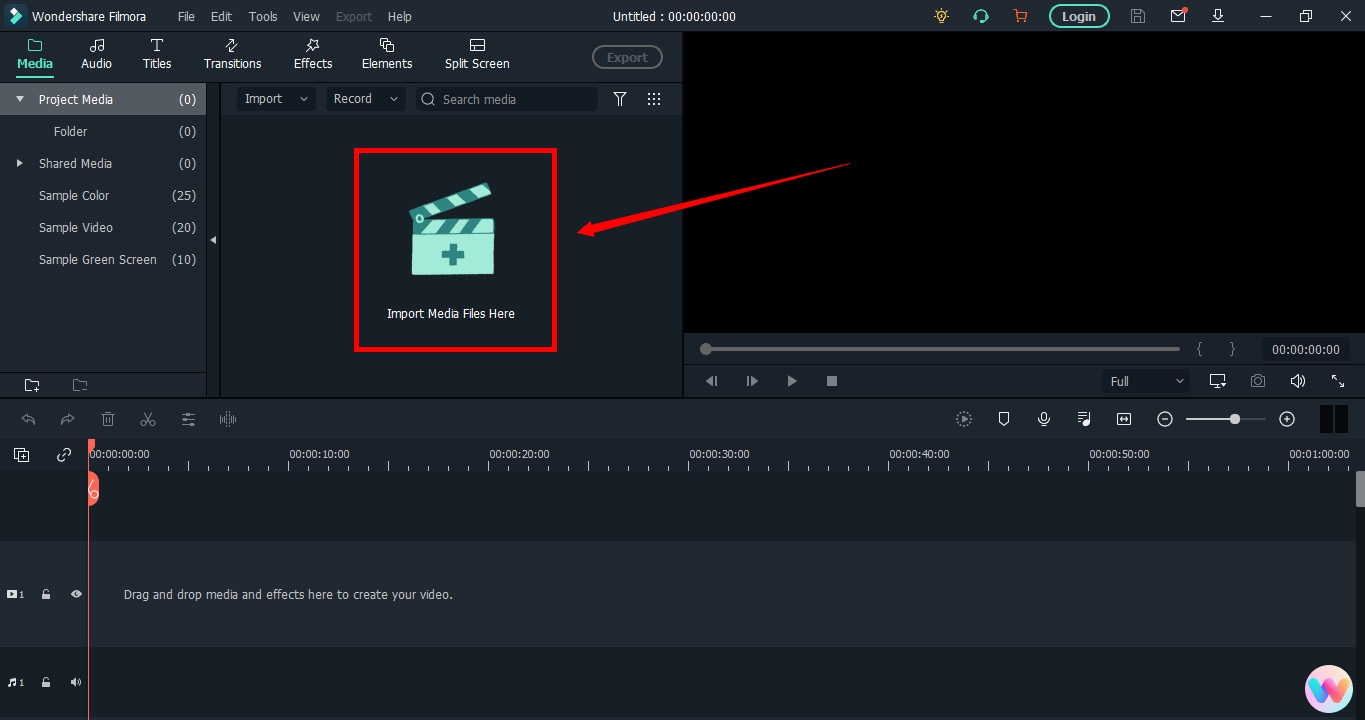
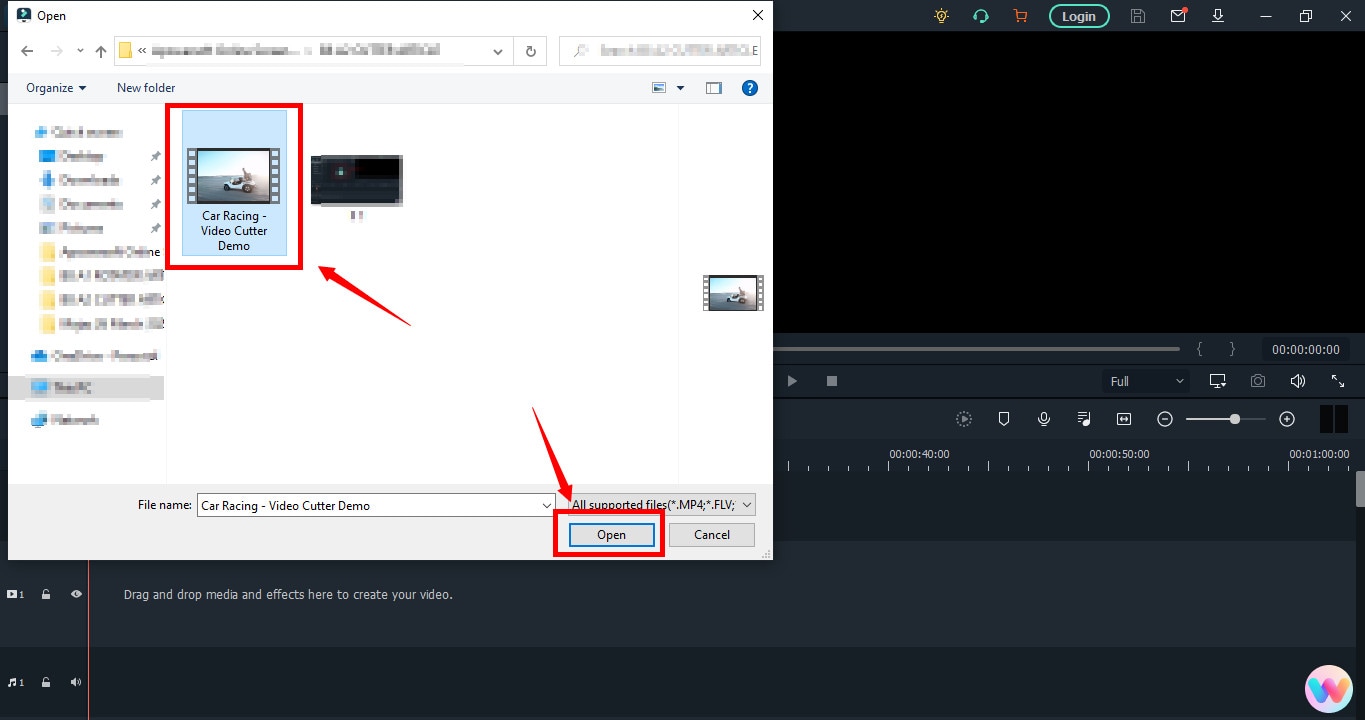
It will open a new window screen on your computer to select the video from the directory. Find the clip you want to import and cut. Use your mouse to select it and click the “Open” button.
The video will be loaded in the “Media” folder of Filmora. The clip’s thumbnail should be visible to assure you have done everything correctly.
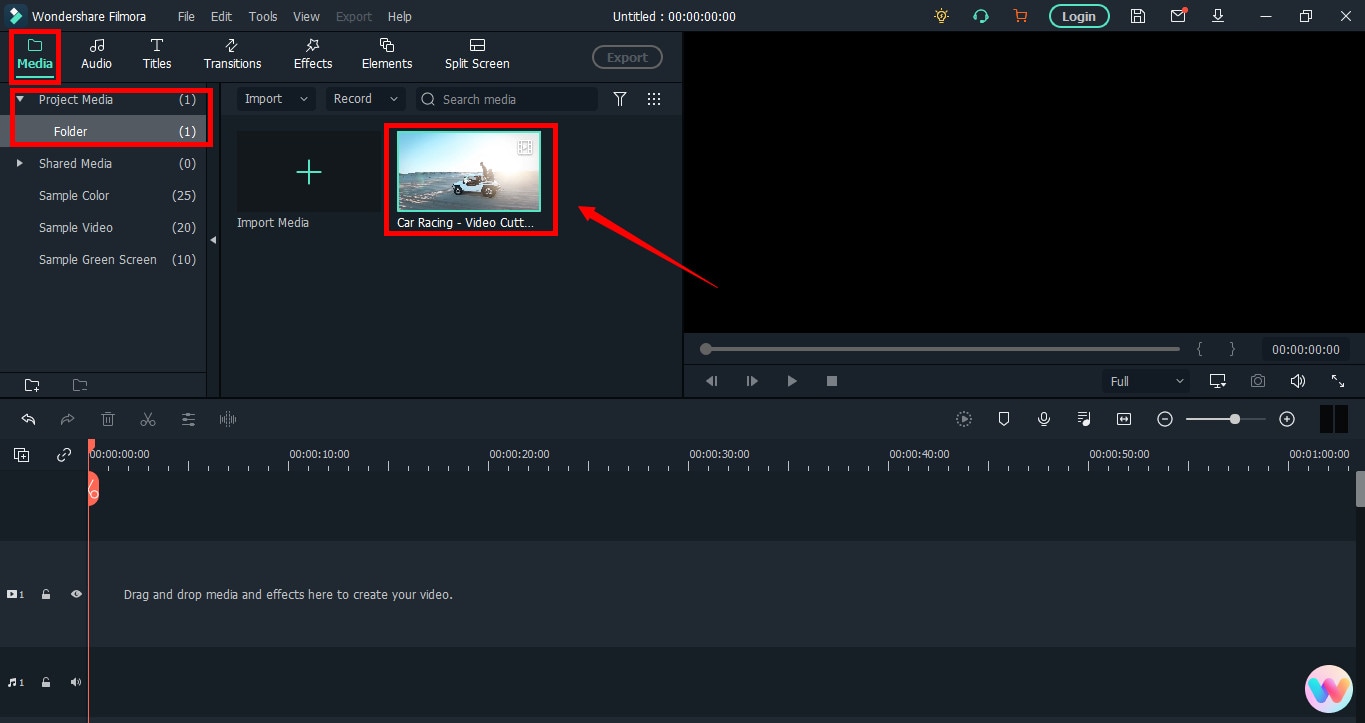
If you can see that, let’s go to the next step.
Step 3: Drag and Drop Video to Filmora’s Timeline
Select the video in the media folder by clicking over it once. Now, without leaving the hold of the left button of your mouse, slide the video down to the track in the timeline.
After that, a message will pop up, asking about your preference for the project settings. It is recommended to choose the “Match to Media” option unless you’re an experienced video editor who knows how to play with the resolution and frame rates.
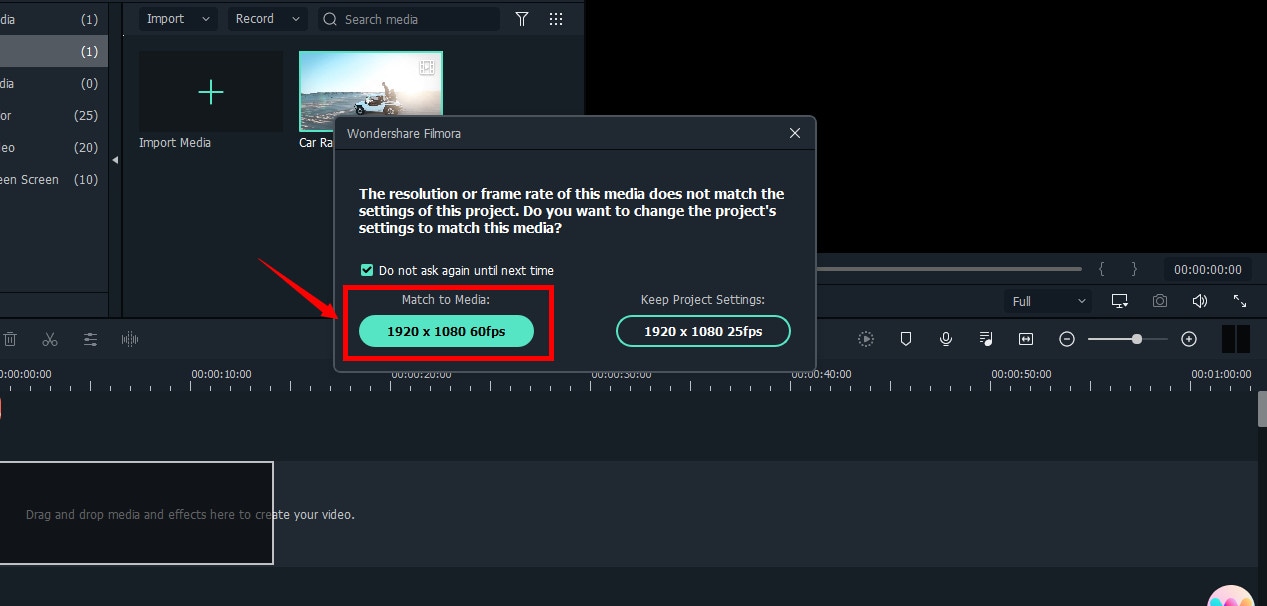
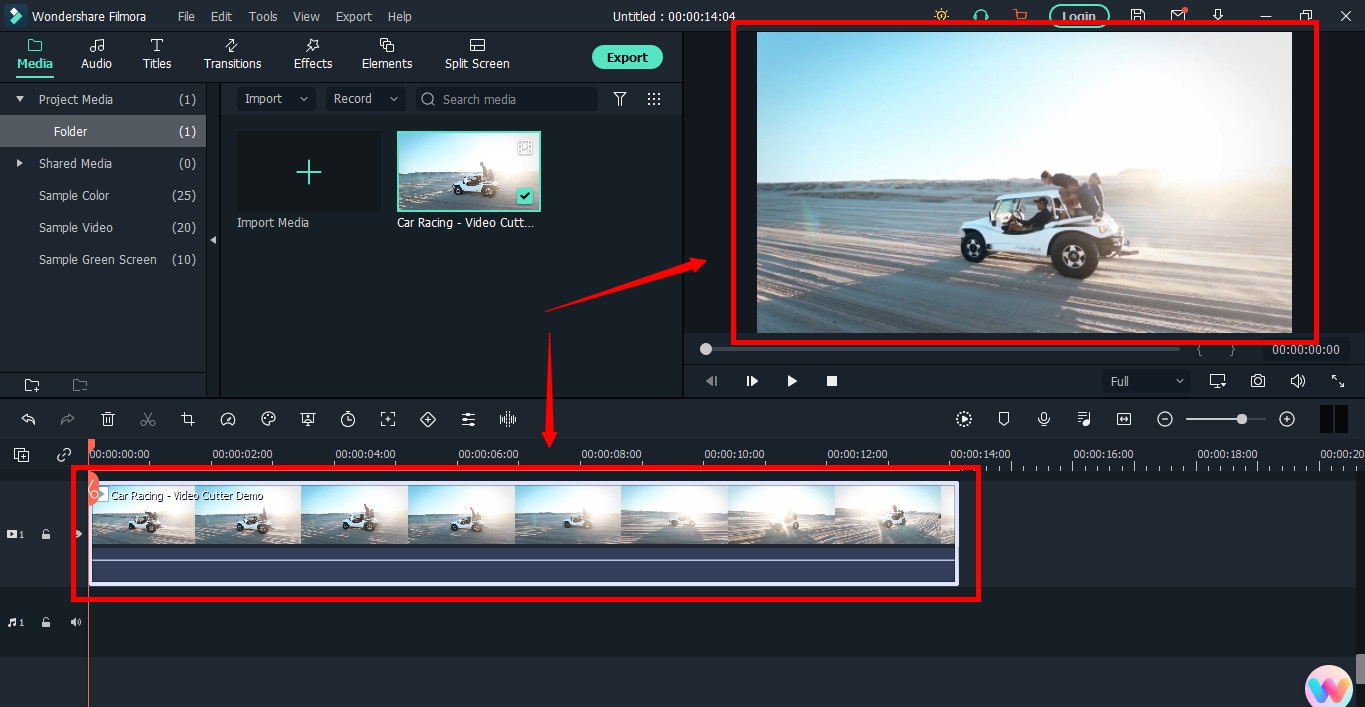
You will see the video on the timeline with its preview on the “Preview Screen” on the right side of the interface.
Step 4: Cutting Your Video in Filmora
Here comes the core step you have been waiting for. But before you go any further, you need to know about the “Playhead.”
Playhead is an orange-reddish marker you can find on the timeline.
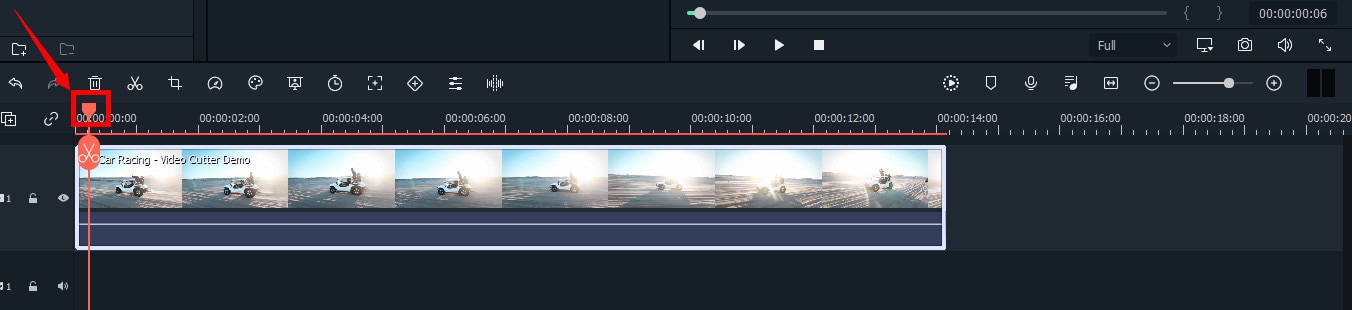
It has an important role in cutting your videos.
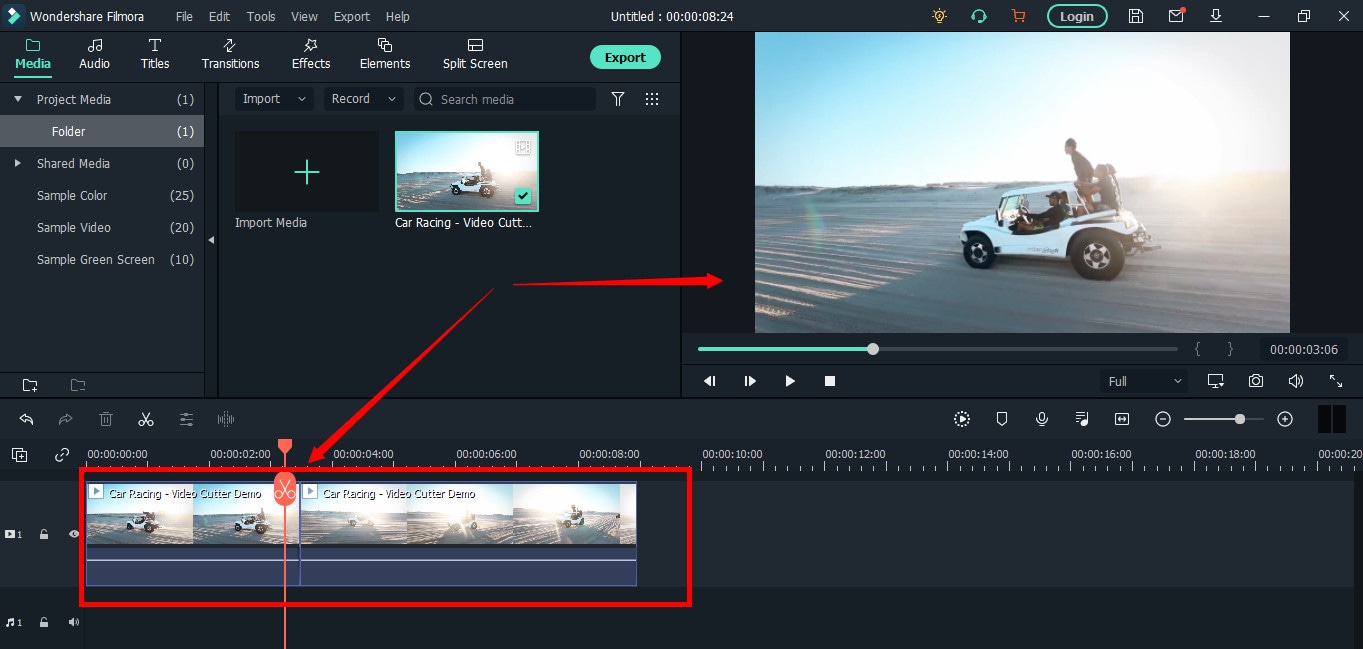
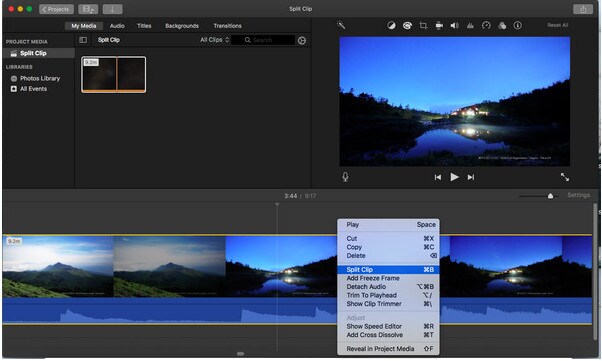
So, move the playhead to your desired frame and click on the “scissor” icon to make the “starting” cut.
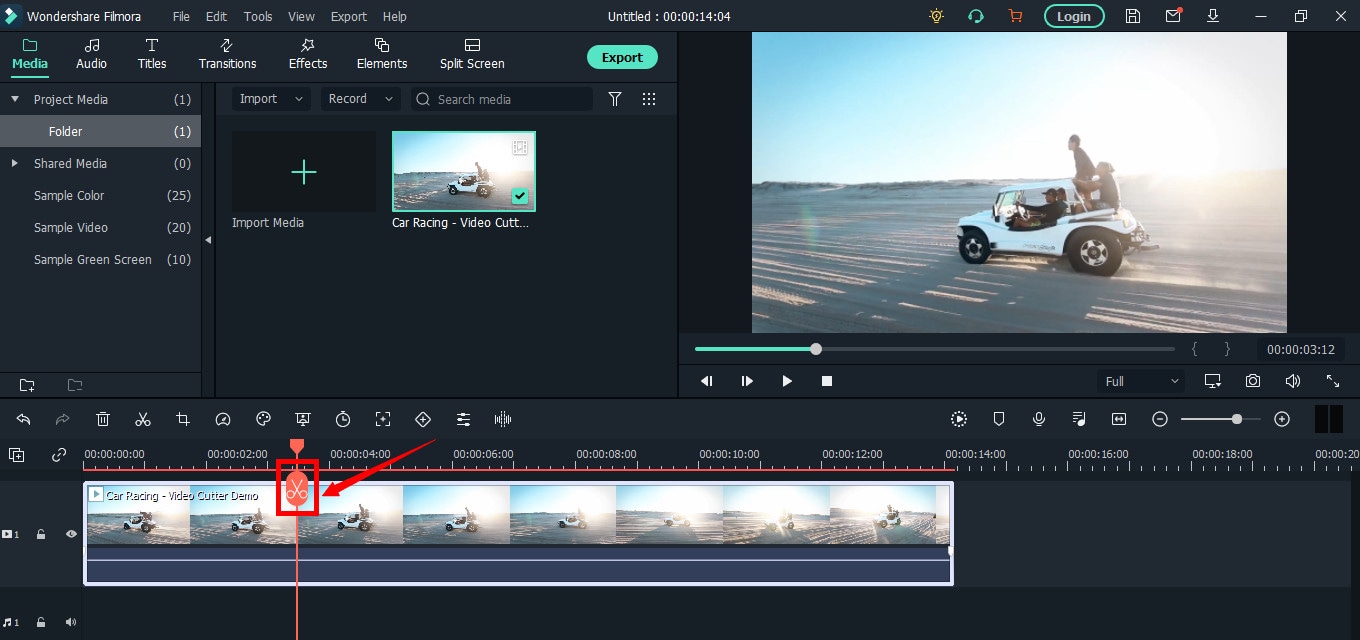
As soon as you do it, you will see that the single clip is now divided into two parts similar to this image.
The “Red” marked area in the above screenshot ensures a gap between the clips on the timeline. The “Yellow” arrows confirm two separate clips of the same video.
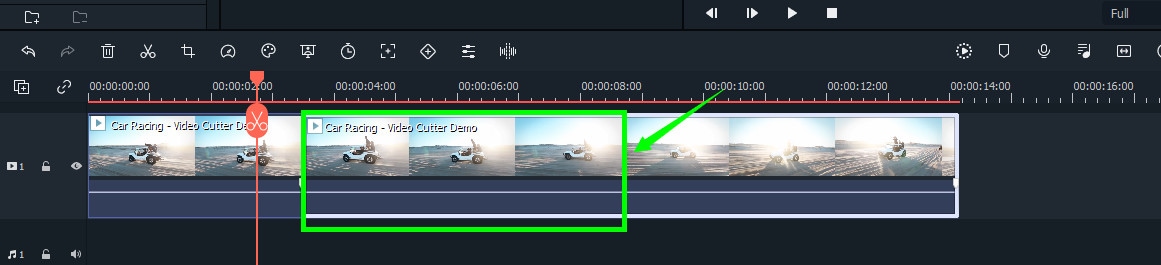
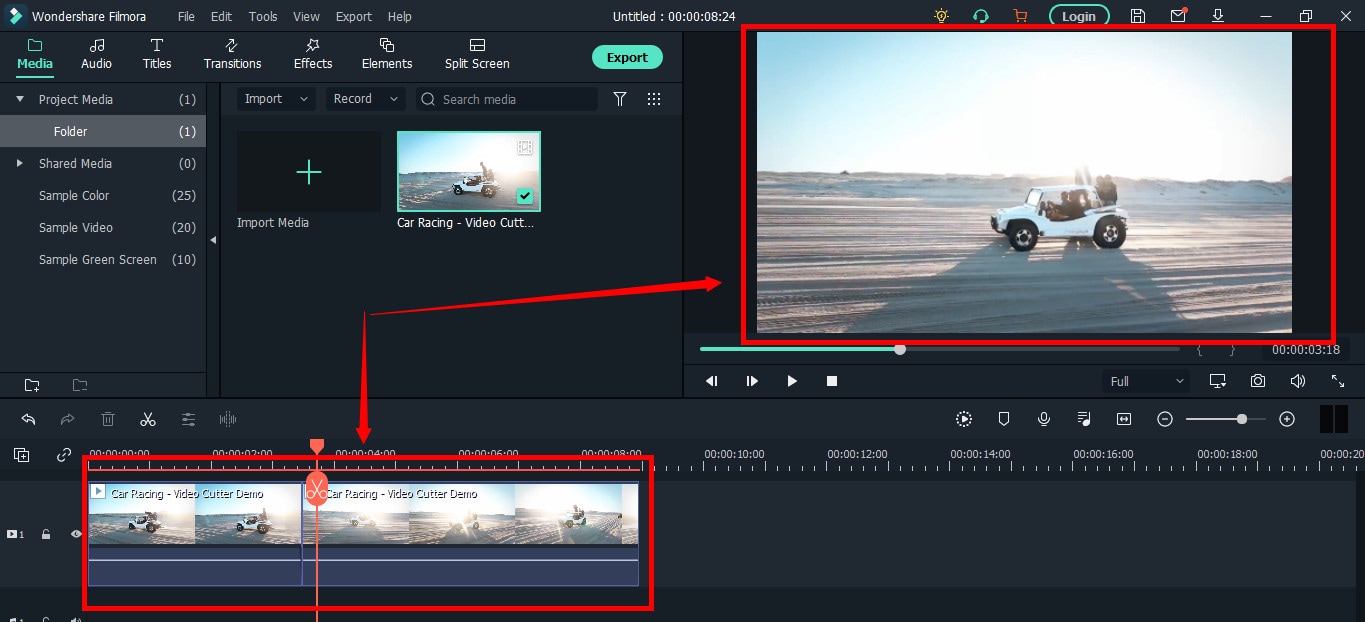
Place the two clips together as seen in this “Green” area.
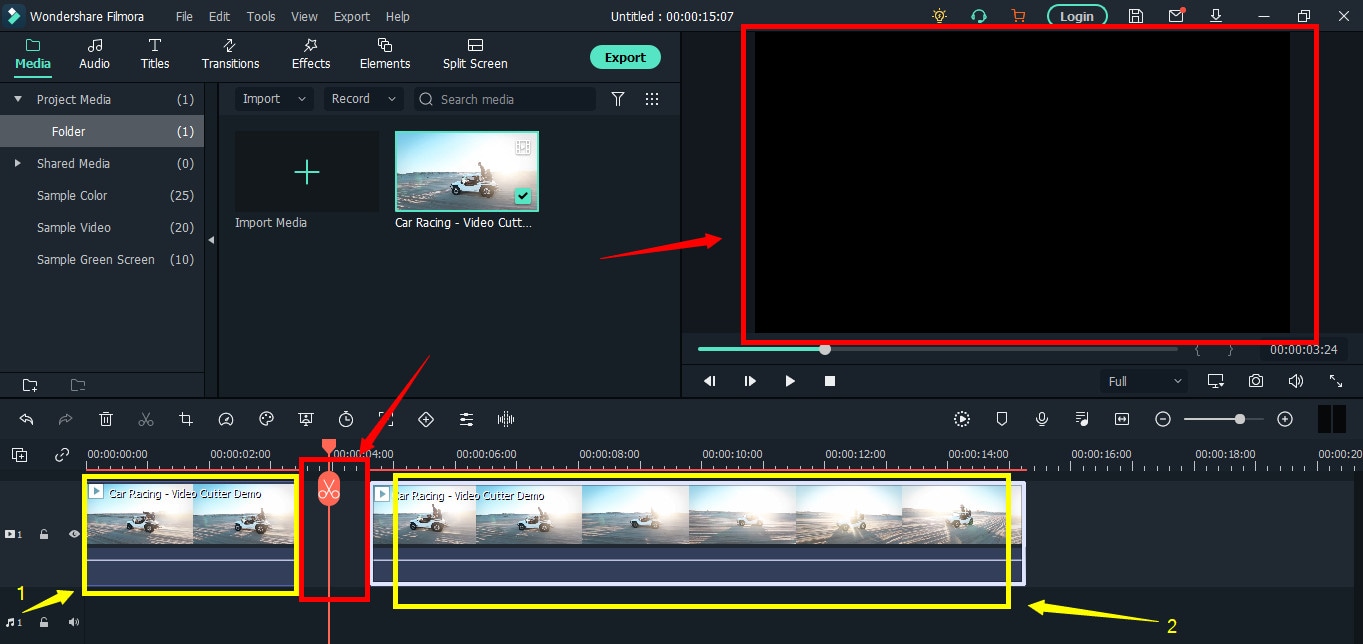
And place the playhead anywhere on the clip. And click on the “scissor” icon once again to make the “ending” cut (second cut).
If done correctly, there should be three clips now of the same video, as you can observe in this screenshot.
Again, the “Red” area in the above photo indicates the gap, and the “Yellow” area ensures a third segment of the video.
Note: The gaps you can see in the divided clips are made intentionally for understanding. Practically, Filmora doesn’t move the clip or make gaps in between after you have made the cuts.
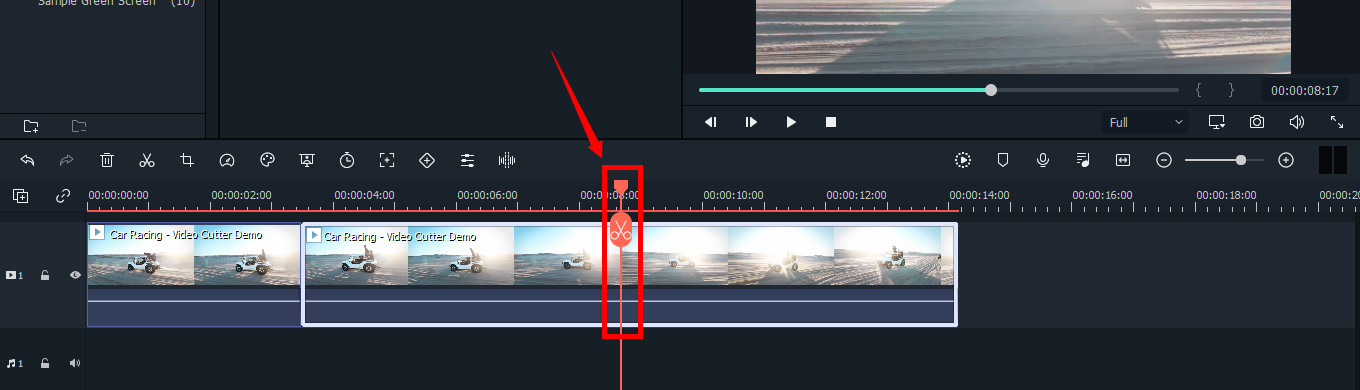
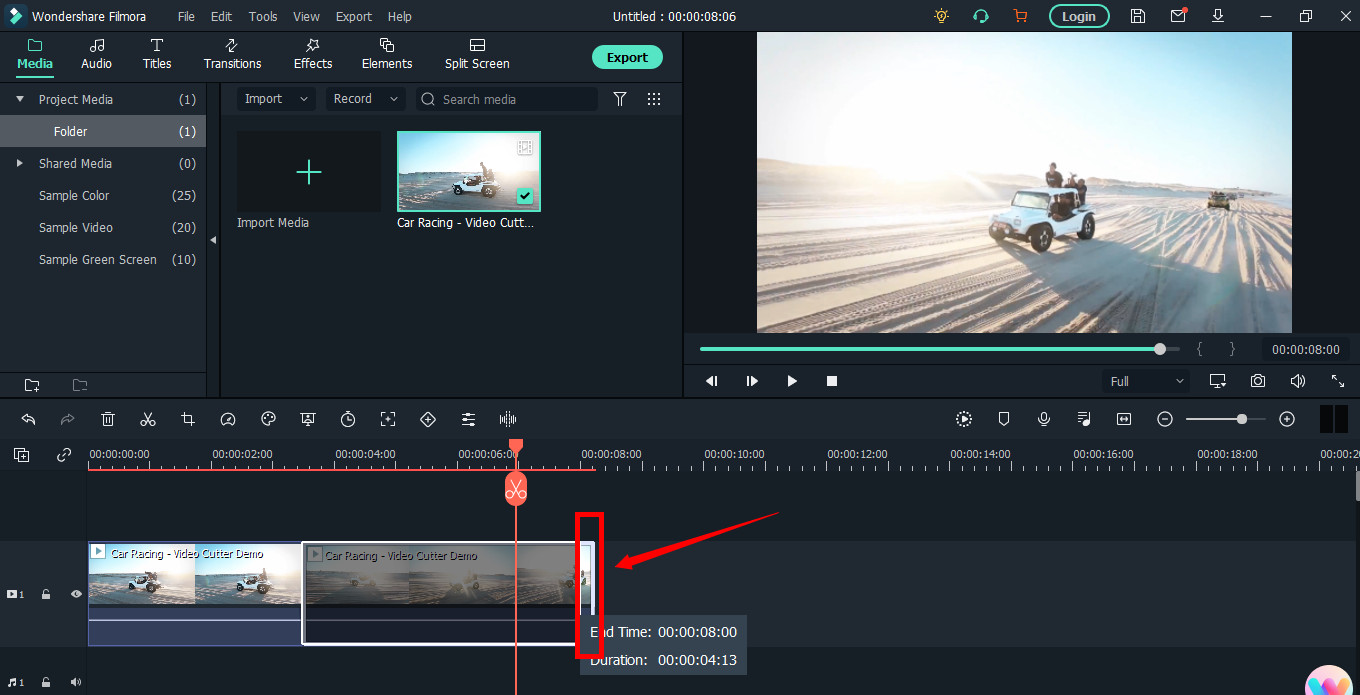
Keep in mind that there are three clips on the timeline. Now, if you want to remove the second clip from the video, you need to select that portion first by clicking on it.
Then, right-click on the mouse and choose “Cut” from the menu.
Within a semi-second, the selected portion will be removed from the timeline. And you will be able to see the remaining parts of the video. Now, pull the second clip using your mouse and place it at the end of the first clip without leaving a gap in between.
Then, click the “Play” button under the preview screen to see the results.
You can see in the above two screenshots that there’s a jump between the scenes due to cuts, confirming that video has been cut significantly.
Step 5: Trimming Your Video in Filmora
Remember that cutting and trimming in Filmora are two different things. Trimming allows you to remove a particular video part from visibility without deleting the portion.
So feel free to skip this step if you’re happy learning the cutting technique. But if you’re interested in trimming, here’s how you do it.
Take your mouse cursor at the beginning or end of the clip you want to trim. Keep holding the clip’s corner and slide the mouse back or front to trim the part
Note: Since the trim tool doesn’t delete the video, the final project based on trimming will be of a larger size. Therefore, it is advised to cut videos rather than trimming for fast rendering, better results, and small video size.
Step 6: Save Project and Export Your Cut/Trimmed AVI Video
Choose “Save Project” from the “File” menu.
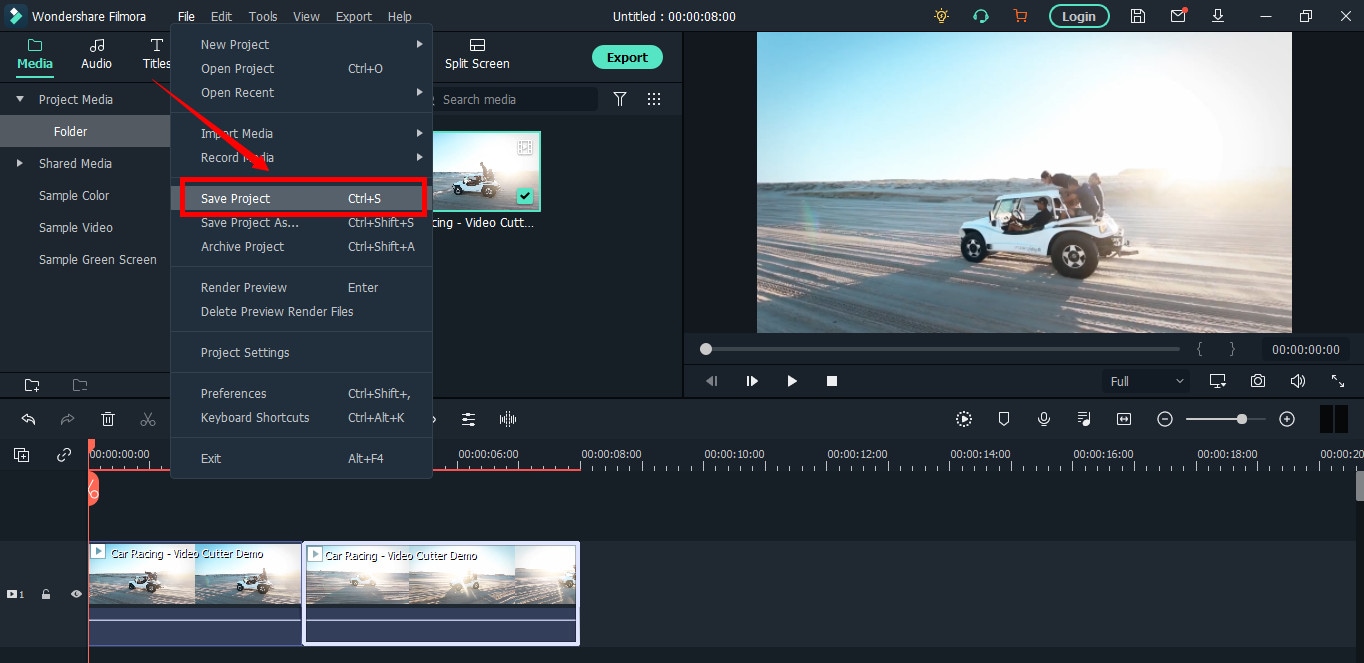
Select the directory to save the project, rename the new video, and click the “Save” button.

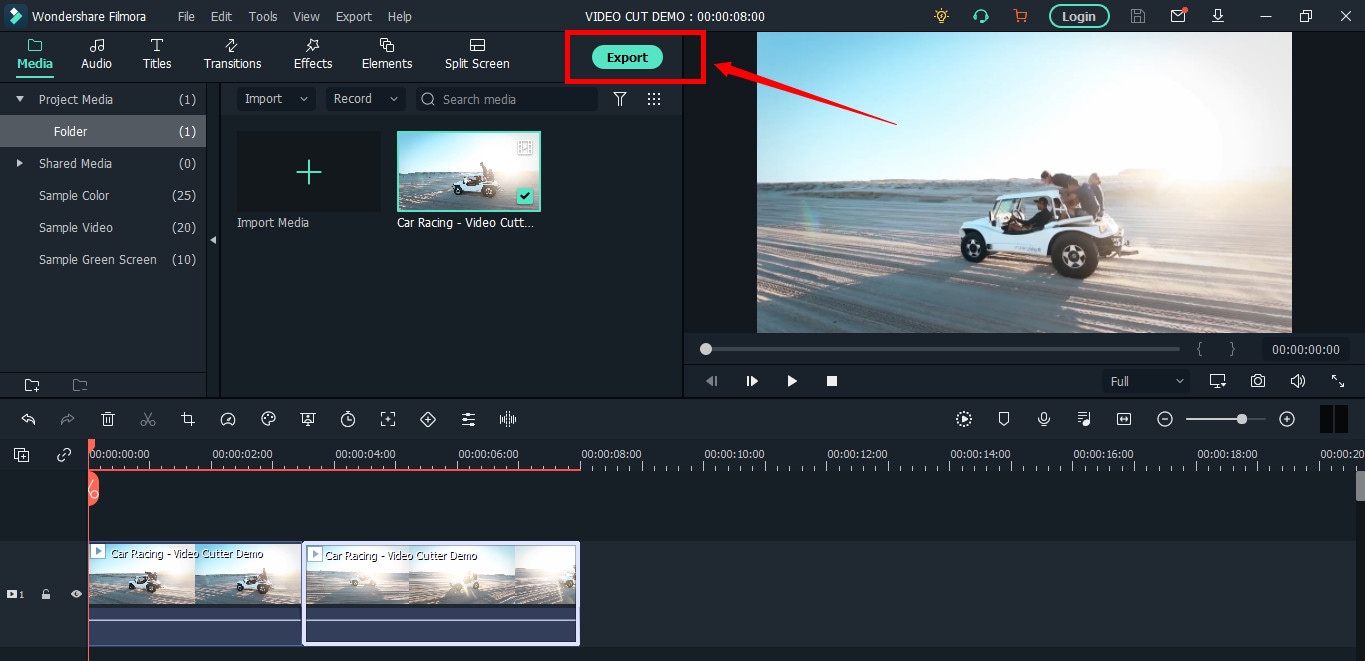
Click on the “Export” button to save the video in AVI or any other video format of your choice on your computer.
Part 2: Top 3 Free AVI Video Cutter on Windows
As a Windows user, finding an excellent video cutter is relatively easy. However, not all software permits importing AVI videos. In the same way, some video trimmers come at a price. So if you really don’t want to pay and enjoy cutting your AVI files, try using these three video cutting tools.
Microsoft Photos (Windows 10)
Microsoft Photos or Photo App is a free photo viewer and editor with your Windows 10. It offers incredible photo editing and enhancement along with different tools for organizing and editing videos in a very friendly way. Likewise, you can create drawings over the videos and add 3D effects and background music to your clips.
You can also trim AVI videos with Microsoft Photos quickly. All you need to do is open your clip with the Photo App, choose the “Trim” option, select a portion of the video you want to trim, and go ahead.
That’s it!
Features
- Quick video trimming
- Cool text effects
- 3D library and effects
- It has a clear interface
- You can find and tag people’s faces
- The program has 15+ filters for editing
- Motion tracking option for drawing on videos
- Allows you to view and organize your files easily
Pros
- Microsoft Photos is free for Windows users
- It automatically creates albums
- The program has a touch-friendly interface
- You can integrate your OneDrive with the software
Cons
- Lacks before and after view
- Not included in older Windows versions
- It doesn’t support selective focus or panorama stitching
Handbrake
Handbrake is best-known for its video transcoding traits. Unlike typical video editors, this open-source tool includes limited options to rip Blu-rays and DVDs. Moreover, you can mix the 5.1 soundtracks and convert them to stereo to make the audio compatible with your TV speakers.
But the exciting thing about Handbrake is that you can use this software on your macOS 10.13 or later versions to cut AVI videos for free. However, it’s a bit technical process, as there’s no timeline to help you trim or make cuts on the clips directly with the help of your mouse.
You are required to mention a time range (seconds, minutes, or hours) to keep a specific part of the video while the software removes the non-ranged parts of the clip. For instance, you have a video of 10 seconds. You start the range from 5 seconds and end it at 10 seconds. So, the first four seconds of the video will be cut from the entire clip.
Features
- Video cutting, cropping, and resizing
- Low-quality and old video restoration
- Video conversion from any format to MKV or MP4
Pros
- Handbrake is free
- You can convert batch videos with ease
- It supports MAC, Windows, and Linux OS
- Allows you to import video files in all major formats
- The software comes with various video conversion presets
Cons
- Handbrake is not a user-friendly tool
- The video file output is limited to two formats (MKV and MP4) only
Gihosoft Video Cutter
Gihosoft is a clean, free, lossless video cutter on your Windows PC. It’s a simple tool that helps you cut video files into various output formats. So be it AVI, MPEG, or any other file, with Gihosoft, everything becomes handy.
Another fascinating fact about this software is that it allows you to cut videos in three simple steps without losing the quality. So right after installing the program, you simply need to import your file, choose the start and end time, and click the “Cut” button to remove the part of the video.
Features
- Fast video and audio cutting
- Easy drag and drop audio/video files
- It supports most audio and video formats
Pros
- Free for both Windows and MAC operating systems
- The cutter saves video in original quality
Cons
- It does not include basic video editing features
Part 3: Top 3 Free AVI Video Cutter on MAC
Are you looking for a great AVI video cutter for your MAC? Sadly, you have limited product choices as compared to Windows users. But to ensure you don’t waste time looking for a suitable tool, here’s a list of three AVI video cutting programs you can use on your Macintosh.
iMovie
The first and foremost recommended software for free video cutting on MAC is Apple’s own tool, iMovie . It is a built-in program that comes with your system, so there is no need to spend extra on a video editor. iMovie allows you to browse and import most video files, including AVI, right from your computer. Also, this tool is equipped with multiple functions, such as audio editing, video quality enhancement, and much more.
This MAC’s video editor is ideal for beginners. Many home users and small business owners find this tool extremely simple, as they don’t like to be confused with complex features. So, if you want to make cuts to your video clips, start working on iMovie. And within a few clicks, you can trim or cut your videos for free.
Features
- Video cutting and trimming
- Cropping and rotation
- Effects and transitions
- Built-in themes
- HD and 4K video support
- Movie sharing
- Audio adjustments
- Chroma screen controls
- Character tracking
Pros
- Free to use for MAC users
- Clean timeline
- One-click video cutting and trimming
- Easy-to-remember keyboard shortcuts
- Direct share projects to your social media, like YouTube
Cons
- It takes a lot of time to export videos
- iMovie needs high HDD storage space
VideoPad by NCH

VideoPad by NCH is a beginner-level video editor with all the basic features. The software is specifically designed for home movie makers. That is why VideoPad is easy to understand and use.
VideoPad is entirely free of cost for non-commercial purposes, but it has limited features. On the other hand, if you want to enjoy full traits, you can purchase the tool.
VideoPad supports video files, including AVI, WMV, MPEG, MOV, MP4, ASF, and XviD. Likewise, you can also burn movies to Blu-ray, DVD, HD-DVD, or CD. And most importantly, you can easily cut or trim AVI videos on your MAC, as the software is available on both MAC and Windows systems.
Features
- Audio tools
- Video rotation
- Video sharing
- Visual effects
- Video transitions
- 3D Video editing
- Color correction
- Overlays and texts
- Video optimization
- Great plugin support
- Direct video uploading
- Multiple video resolutions
- Video cutting and trimming
- Files exportation to various devices
- Stereoscopic conversion from 2D to 3D
Pros
- You can use the basic tools for free
- Allows 360-degree video production
- It supports a wide range of video formats
- Compatible with MAC and Windows computers
Cons
- The auto speech feature performs poorly
- The free version has annoying notifications
Xilisoft Video Cutter
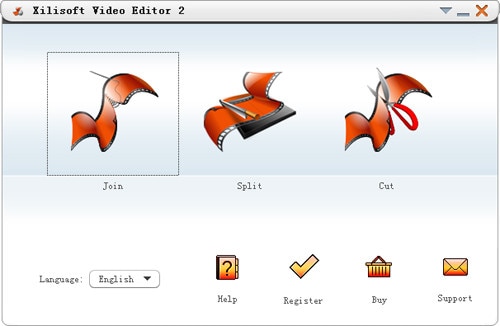
Xilisoft Video Cutter is the simplest tool to cut videos on MAC. This software has a straightforward option to cut the clip after importing it to the timeline. The program is fast and has a user-friendly interface.
Moreover, you can polish your videos by merging multiple clips or increasing the video quality once you’re done with the cutting process. At the same time, this video cutter allows you to import all video formats, including XviD, DivX, MOV, FLV, MP4, MPEG-4/, MKV, MPEG, WMV, and AVI.
Features
- Video joining
- Support multiple output video formats, including HD
Pros
- Easy video cutting and merging
- It doesn’t require a large storage space
- Extremely uncomplicated interface
- Real-time preview to make better cuts
- Available on both MAC and Windows systems
Cons
- The trial version is free to use but limits you from enjoying extra features
Part 4: Top 3 Free AVI Video Cutter on Android
After capturing nice videos with your Android mobile phone, you may need to cut unnecessary scenes to make your clips look professional. While there are numerous Android cutters, not all support the AVI format. So below, you will find the 3 best AVI video cutters for Android, which are free to use.
Quick – Video Editor & Maker
Quick – Video Editor & Maker is a free video editor with PRO results. Many photographers and vloggers love using this app to cut clips immediately. Furthermore, the application offers a wide range of options to assure you don’t have to look to any other tool to rotate or compress video. Quick – Video Editor & Maker lets you import videos in all major formats, including AVI, MPEG, WMA, and more.
Features
- Video cutting, fading, and rotation
- Speed control tools
- Conversion from video to GIF
Pros
- Free app
- Simple interface
Cons
- Lack of updates
- Some users complain about app crash
Funimate Video Editor & Maker
If you want to make some professional-grade video edits quickly, you are welcome to download and use Funimate Video Editor & Maker on your Android device. It’s a free tool to cut videos. It has an easy procedure, and you can cut AVI videos in a few seconds.
Plus, you can use the app to add custom animations, effects, and many other exciting elements. You can share your makes on social media like TikTok, Instagram, and other platforms. Contrarily, the app itself is a community with millions of Funimate-users who share their creations daily. You can also join or watch videos from other creators to learn more about new techniques and trends in video editing.
Features
- Video trimming and splitting
- Animation and cropping
- Filters and AI effects
- Speed adjustment
- Keyframing and video merging
Pros
- Free Android application with several editing tools
- Easy trimming, splitting, and cropping
- Aspect ratio, border, and color customization
- Direct social media sharing
Cons
- Free users cannot use templates
- The free version stamps watermarks on each project
Part 5: Top 3 Free AVI Video Cutter on iPhone
No wonder iPhone’s camera captures high-quality videos. But the problem begins when there’s no free app to cut AVI videos. So if you’re recording great spots, but deep inside, you really want to remove some parts, then these 3 free AVI video cutters will work smoothly on your iPhone.
Cut, Trim, Split Video Editor
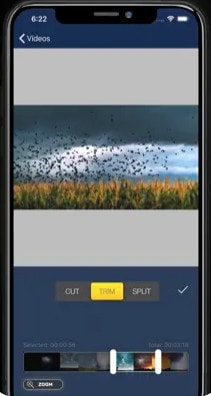
Download Cut, Trim, Split Video Editor on your iPhone to delete/cut unwanted portions of your video clips. The tool is also best for trimming iPhone-recorded clips without messing with the frames. Or, if you just want to split the video into multiple parts for your next WhatsApp status, this iPhone app can do that job for you.
The app supports multiple video file types, including MOV, MP4, AVI, MPEG, MPEG-2, and 3GPP
Features
- Easy trimming and cutting video clips
- Splitting big-sized videos into two smaller clips
- Import video from file-sharing platforms, like iCloud, using Wi-Fi
Pros
- Free app for fast video cutting and sharing
- Simple UI interface
Cons
- The free version shows advertisements
Splice - Video Editor & Maker
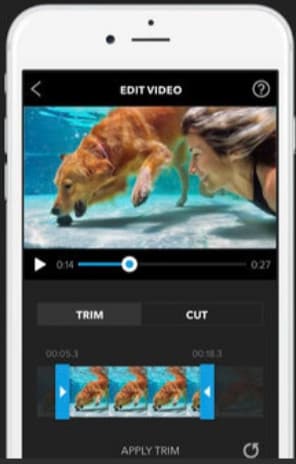
Splice is an extraordinary video editor that makes it easy to make fully customized and professional videos from your iPhone. The app is also best for video cutting. Besides, it has many interesting features, which you can use from your device.
Features
- Cutting, trimming, and cropping your videos
- Exposure, saturation, and exposure adjustment
- Slow and fast motion with speed ramping option
- Video masking and overlay
- Color correction and text overlays
Pros
- Free basic features, such as video cutting
- iTunes integration
- Supports AVI video input
- User-friendly application
- Access to the music library
- Quick and simple social sharing
Cons
- Output videos require high mobile storage space
Part 6: Top 3 Free AVI Video Cutter Online
Don’t want to install video cutters on your MAC, Windows, smartphone, or any other device? No problem! You can use online video cutters and trimmers to split, cut, or trim your clips for free.
However, the problem still exists in online tools, as not all web-based editors allow importing AVI files. So to save your time and energy, you can directly go to the following online AVI cutters to complete your tasks.
Kapwing
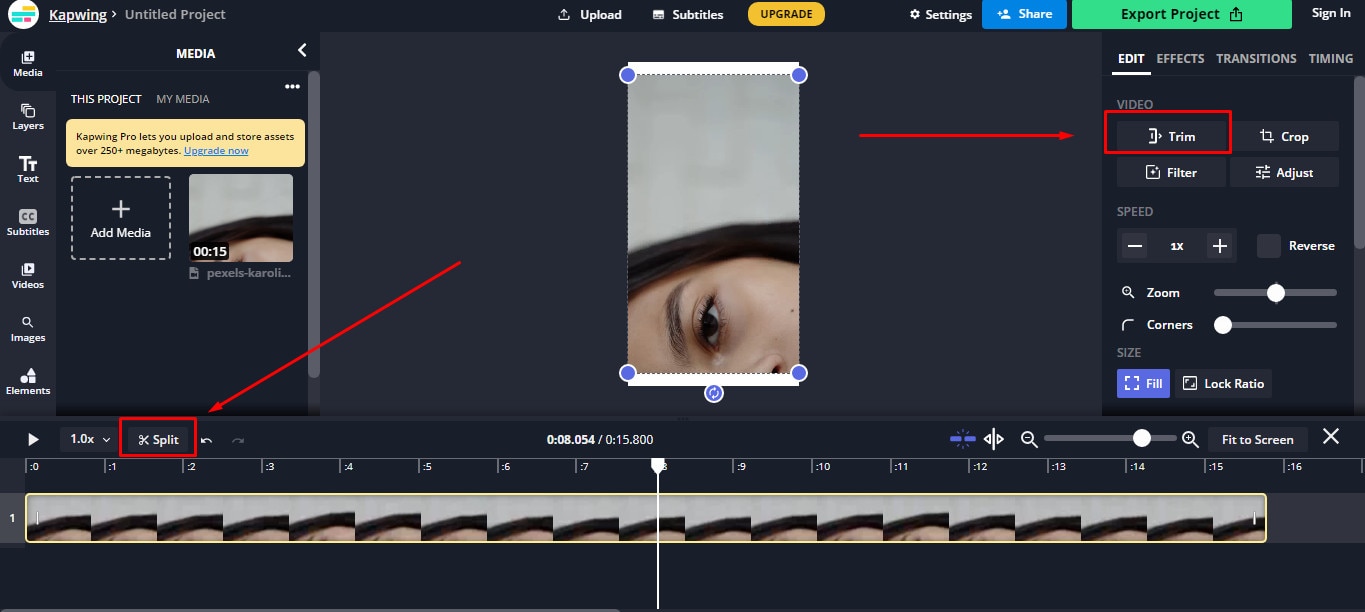
Kapwing is an online video editor best for casual creatives, such as Vloggers and YouTubers. You can use this web-based platform to cut your videos. Gladly, Kapwing supports all AVI incomings. You can upload your AVI video files to this platform and use its trim or split feature. To do that, you need to upload your AVI video and choose the “Trim” or “Split” tool to see the magic. Once done with the trimming process, you can explore Kapwing’s other incredible traits and apply them to your project.
Features
- Video splitting, trimming, and merging
- Audio capturing
- Speed adjustment
- Image and video library
- Text editing and overlay
- Auto-generated subtitles
- Several collaboration tools
- Video creation from scratch
- Templates, shapes, and emojis
- Simple drag-and-drop interface
- Video transitions, plugins, and elements
Pros
- Free online video trimmer
- User-friendly interface
- You can export 30-minutes long projects
- Allows you to export unlimited videos with a watermark
- One watermark-free video export is available each month
Cons
- Cannot export long videos with a free account
- Only 10 minutes transcription limit is available for free users
- You need to purchase a monthly or annual subscription to remove the watermark from multiple videos
Clideo
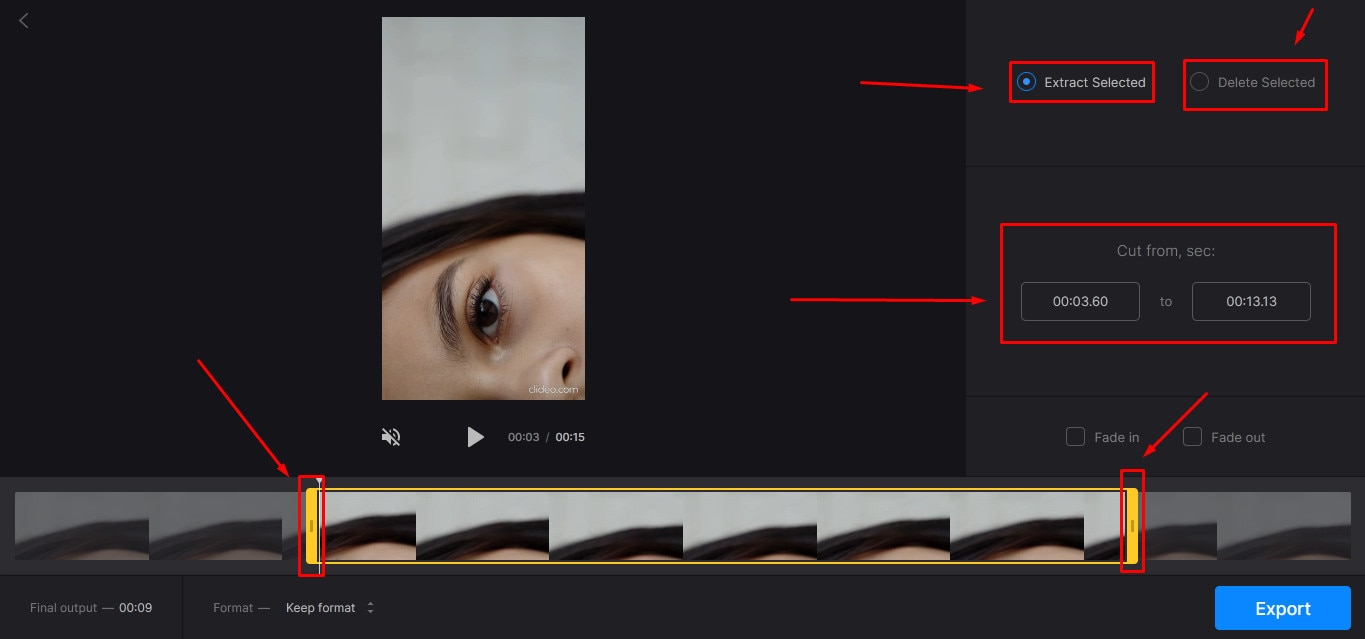
Clideo is not just a video cutter but an online solution to all your video editing problems. The tool is super popular, with 4 million+ users a month. And why not? This is one of those web-based platforms that allow AVI video files to be imported and exported without converting them into any other formats.
Nevertheless, if you’re only looking for video cutting options, this tool makes your life easy. Simply upload your video, and select the portion of it by setting start and end times. Choose whether you want to delete or extract the selected part from the clip, and hit the “Export” button.
And within a few moments, you can enjoy a trimmed video clip. And if you plan to be more creative, you can look for other Clideo features to make videos more fascinating.
Features
- Video combining and cutting
- Resize and crop clips
- Compress your videos
- Add text and subtitles
- Add music to your video files
- Filters and color correction tools
- Audio mute, cutting, and muting
- Video rotation, flipping, and speed adjustment
Pros
- Basic tools can be used for free
- Best for beginners and intermediate users
- Ideal for AVI videos and also supports other video formats
Cons
- You cannot use the free version regularly
Aspose
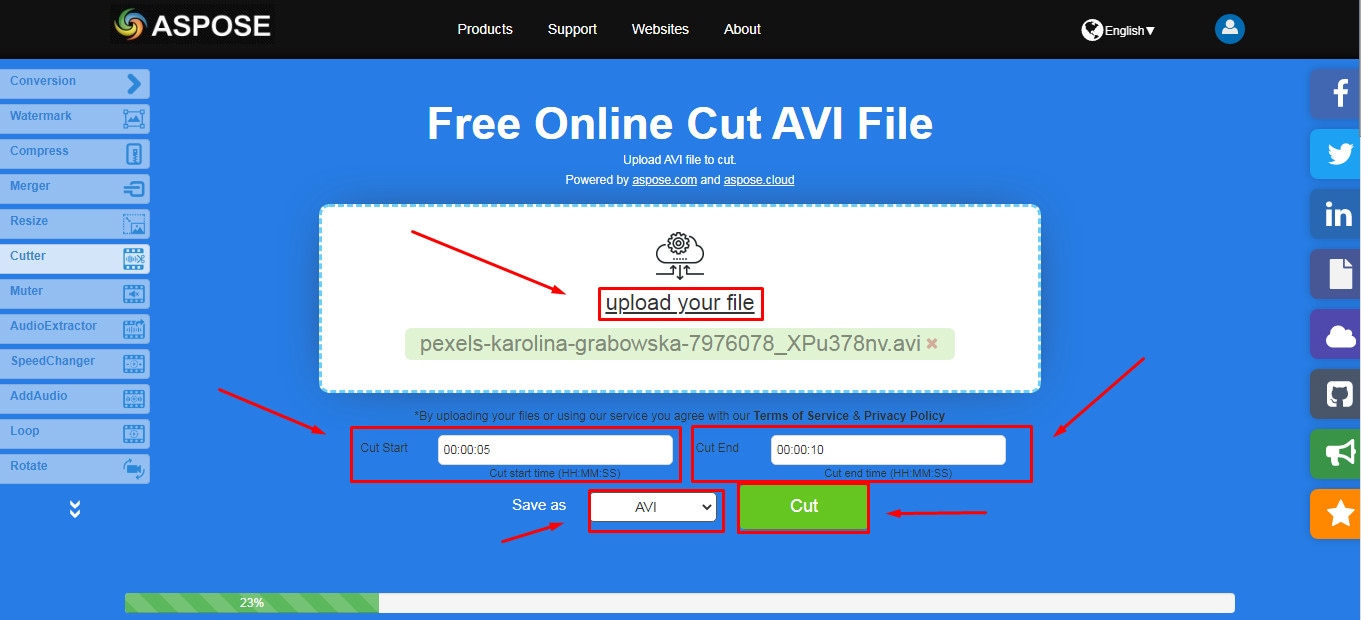
Aspose is a free web-based application to cut clips. You can use this tool on any operating system. It supports all major video file formats, including AVI, MKV, MOV, MP4, FLV, WMV, WEBM, and GIF. Additionally, you can use Aspose for various other reasons, such as audio extraction, video resizing, and more.
Features
- Video cutting and compressing
- Looping, rotation, and video merging
- Adding watermarks on videos
- Sound muting
- Speed change and audio addition
Pros
- Aspose is a free online tool
- It offers straightforward options to cut and edit videos
Cons
- No color correction option
- Slow video cutting process
- Lacks timeline and other valuable features
Part 7: Bottom Line
Tired of finding AVI cutters? Relax and try these top 16 AVI video cutters for Windows, MAC, iPhone, Android, and online. Almost all these tools are free to use and are extremely handy. On the other hand, if you want to cut and trim videos professionally, download Filmora and follow the step-by-step guide in this article for making clean cuts.
Part 8: FAQs
Q1. How do I trim an AVI video?
To trim an AVI video file, ensure that the software or tool you use supports AVI input. Generally, you need to upload or import a clip on the program, select the portion of the video, and apply the cut/trim feature to make it happen.
Q2. Which is the best online video cutter?
Kapwing and Clideo are the two best online video cutters you can use for free. Both web-based tools also allow you to cut your AVI videos.
Q3. Which is the best video cutter and joiner software?
Filmora, iMovie, and Kapwing are some of the best video cutters and joiner tools. These video editors are also free to use and come with different features.
Q4. How do I trim an AVI file in Windows 10?
Trimming an AVI video file in Windows 10 is very simple. Launch the Microsoft Photos (Photo App) application on your computer, add clip, and select the “Trim” tool to trim a specific video part.
Q5. How can I cut a video on my computer for free?
MAC and Windows users can download Filmora to cut videos for free. Filmora also offers a wide range of other features to make your clips exciting. Contrarily, Windows users can use the built-in Photo App in Windows 10 or download Gihosoft or Handbrake software to cut clips. Likewise, MAC users can download VideoPad, Xilisoft Video Cutter, or iMovie for free.
With the growing fame of video-sharing and social media applications like Twitter, Instagram, and TikTok, the demand for simple and fast video cutting and trimming tools has dramatically increased. Nowadays, you don’t have to play with complex video editing tools to produce high-quality videos.
Thanks to several user-friendly editing software to make things easy for everybody. However, finding the right programs to trim/cut videos is still challenging, especially in AVI format.
But, guess what? These top 16 AVI video cutters for Windows, MAC, Android, iPhone, and online will make video cutting and trimming fun, especially when you learn to do it using Filmora.
In this Article
Part 1: Best AVI Video Cutter to Trim/Cut AVI Video on Windows and MAC – Filmora Video Cutter [with steps}
Part 2: Top 3 Free AVI Video Cutter on Windows
Part 3: Top 3 Free AVI Video Cutter on MAC
Part 4: Top 3 Free AVI Video Cutter on Android
Part 5: Top 3 Free AVI Video Cutter on iPhone
Part 6: Top 3 Free AVI Video Cutter Online
Part 7: Bottom Line
Part 8: FAQs
Part 1: Best AVI Video Cutter to Trim/Cut AVI Video on Windows and MAC – Filmora Video Cutter [with steps]
Filmora by Wondershare is a star video editor with outstanding outcomes. Whether you have a MAC or Windows PC, you can download Filmora regardless of your operating system. The program best serves those who intend to make high-quality videos. The software provides editing support for all video formats, including AVI.
Although Filmora is an affordable editor with tons of audio and video editing options, you can still download the software for free and create projects if watermarks don’t bother you. Moreover, you can count this tool’s capabilities in cropping, resizing, and Chroma screen support. But that’s not the only sweet fruit.
In fact, Filmora is equipped with many jaw-dropping features, including preset templates, auto beat sync, split-screen, speed ramping, motion tracking, keyframing, creative transitions, titles, filters, and much more. And the best part is, you can learn and understand Filmora in no time. That’s why the program is loved and supported by all types of users.
So does Filmora helps cut and trim AVI videos? Yes! It does if you follow these steps correctly.
Step 1: Download Filmora Video Editor
First, download Filmora Video Editor by choosing your operating system, as seen in the screenshot below.
Run the setup and let it finish without any pause or break.
Step 2: Import Your Video to Filmora Video Editor
Importing your AVI video is a very simple process. Just click on the “Film Clip” icon.
It will open a new window screen on your computer to select the video from the directory. Find the clip you want to import and cut. Use your mouse to select it and click the “Open” button.
The video will be loaded in the “Media” folder of Filmora. The clip’s thumbnail should be visible to assure you have done everything correctly.
If you can see that, let’s go to the next step.
Step 3: Drag and Drop Video to Filmora’s Timeline
Select the video in the media folder by clicking over it once. Now, without leaving the hold of the left button of your mouse, slide the video down to the track in the timeline.
After that, a message will pop up, asking about your preference for the project settings. It is recommended to choose the “Match to Media” option unless you’re an experienced video editor who knows how to play with the resolution and frame rates.
You will see the video on the timeline with its preview on the “Preview Screen” on the right side of the interface.
Step 4: Cutting Your Video in Filmora
Here comes the core step you have been waiting for. But before you go any further, you need to know about the “Playhead.”
Playhead is an orange-reddish marker you can find on the timeline.
It has an important role in cutting your videos.
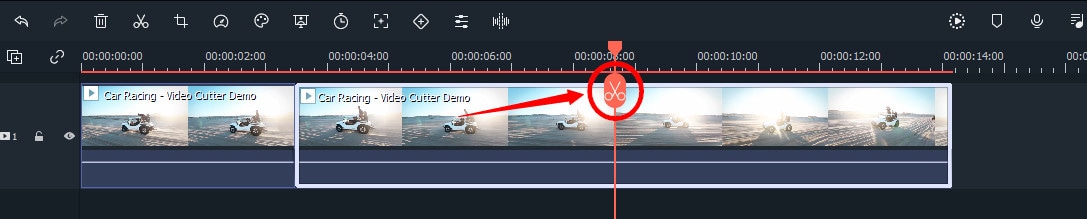
So, move the playhead to your desired frame and click on the “scissor” icon to make the “starting” cut.
As soon as you do it, you will see that the single clip is now divided into two parts similar to this image.
The “Red” marked area in the above screenshot ensures a gap between the clips on the timeline. The “Yellow” arrows confirm two separate clips of the same video.
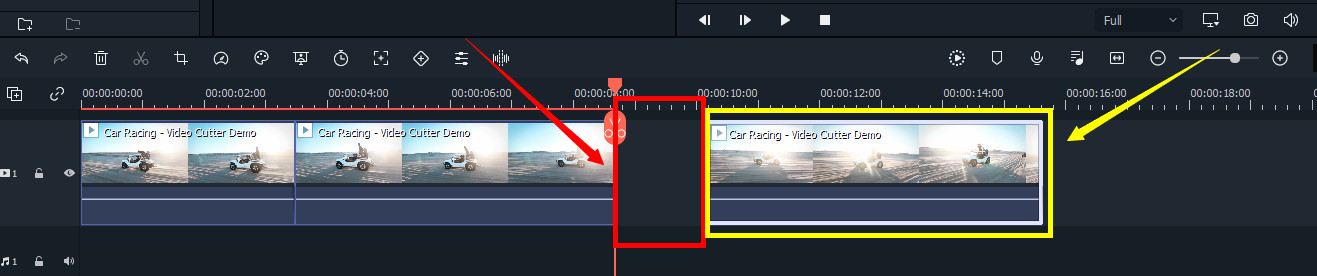
Place the two clips together as seen in this “Green” area.
And place the playhead anywhere on the clip. And click on the “scissor” icon once again to make the “ending” cut (second cut).
If done correctly, there should be three clips now of the same video, as you can observe in this screenshot.
Again, the “Red” area in the above photo indicates the gap, and the “Yellow” area ensures a third segment of the video.
Note: The gaps you can see in the divided clips are made intentionally for understanding. Practically, Filmora doesn’t move the clip or make gaps in between after you have made the cuts.
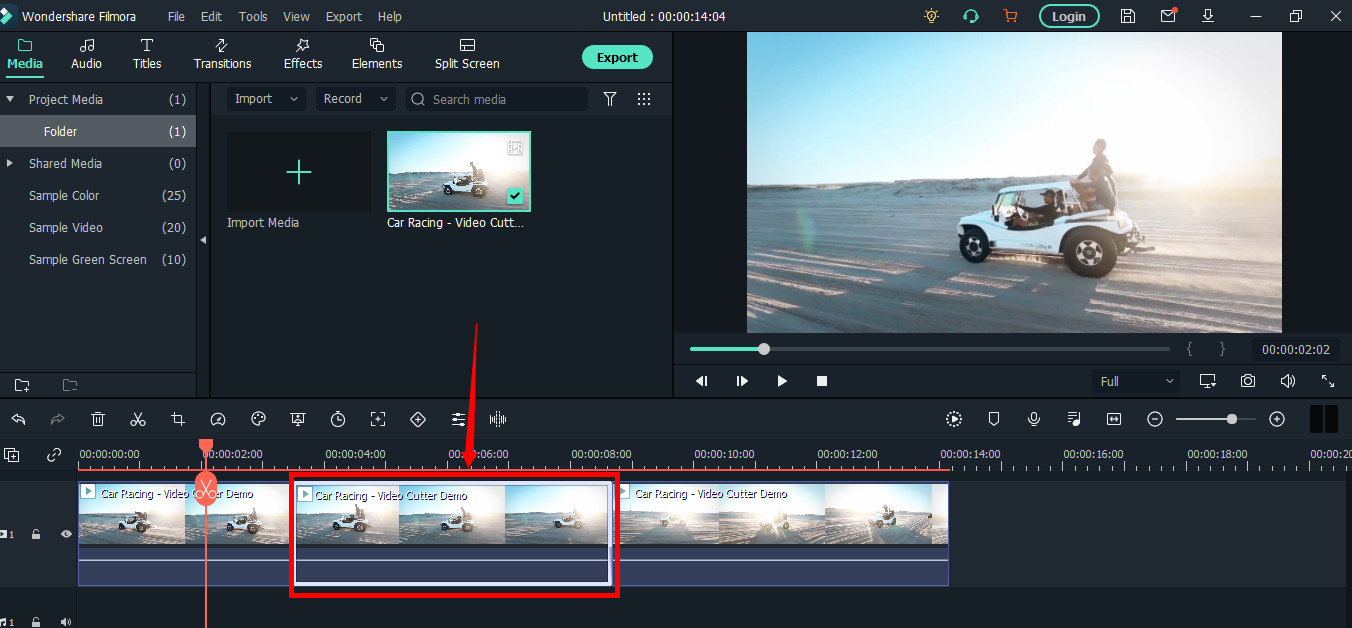
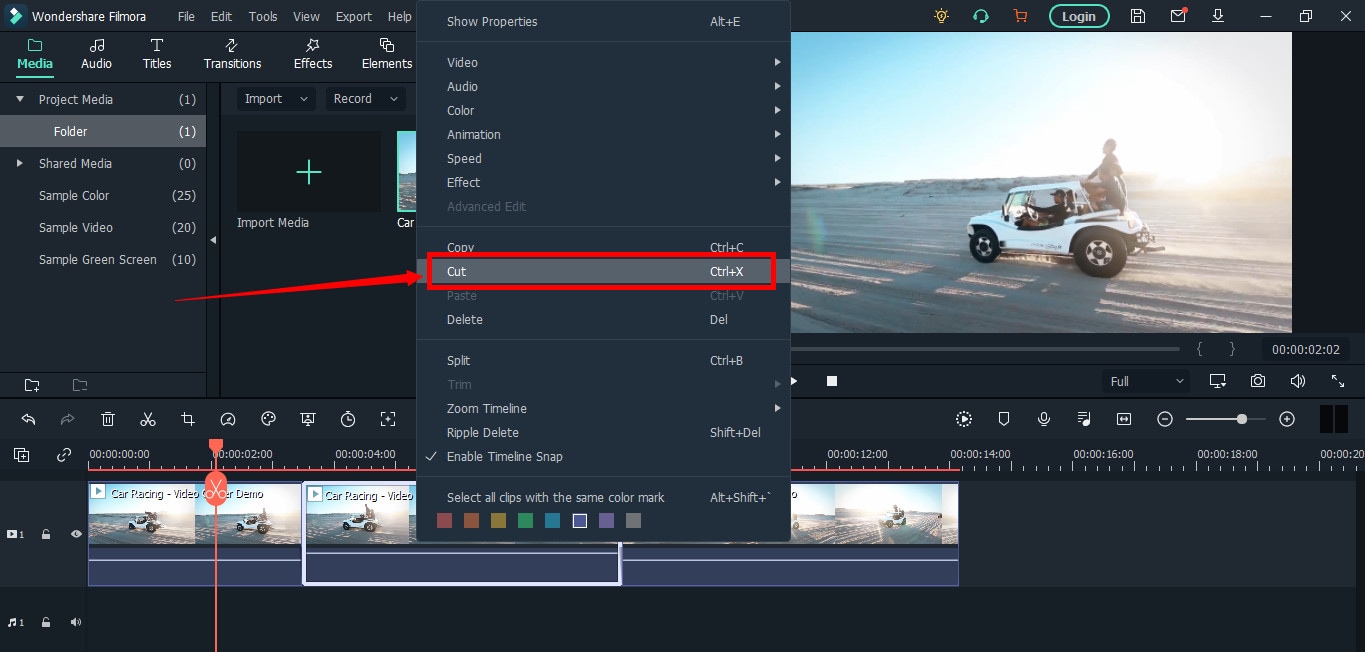
Keep in mind that there are three clips on the timeline. Now, if you want to remove the second clip from the video, you need to select that portion first by clicking on it.
Then, right-click on the mouse and choose “Cut” from the menu.
Within a semi-second, the selected portion will be removed from the timeline. And you will be able to see the remaining parts of the video. Now, pull the second clip using your mouse and place it at the end of the first clip without leaving a gap in between.
Then, click the “Play” button under the preview screen to see the results.
You can see in the above two screenshots that there’s a jump between the scenes due to cuts, confirming that video has been cut significantly.
Step 5: Trimming Your Video in Filmora
Remember that cutting and trimming in Filmora are two different things. Trimming allows you to remove a particular video part from visibility without deleting the portion.
So feel free to skip this step if you’re happy learning the cutting technique. But if you’re interested in trimming, here’s how you do it.
Take your mouse cursor at the beginning or end of the clip you want to trim. Keep holding the clip’s corner and slide the mouse back or front to trim the part
Note: Since the trim tool doesn’t delete the video, the final project based on trimming will be of a larger size. Therefore, it is advised to cut videos rather than trimming for fast rendering, better results, and small video size.
Step 6: Save Project and Export Your Cut/Trimmed AVI Video
Choose “Save Project” from the “File” menu.
Select the directory to save the project, rename the new video, and click the “Save” button.
Click on the “Export” button to save the video in AVI or any other video format of your choice on your computer.
Part 2: Top 3 Free AVI Video Cutter on Windows
As a Windows user, finding an excellent video cutter is relatively easy. However, not all software permits importing AVI videos. In the same way, some video trimmers come at a price. So if you really don’t want to pay and enjoy cutting your AVI files, try using these three video cutting tools.
Microsoft Photos (Windows 10)
Microsoft Photos or Photo App is a free photo viewer and editor with your Windows 10. It offers incredible photo editing and enhancement along with different tools for organizing and editing videos in a very friendly way. Likewise, you can create drawings over the videos and add 3D effects and background music to your clips.
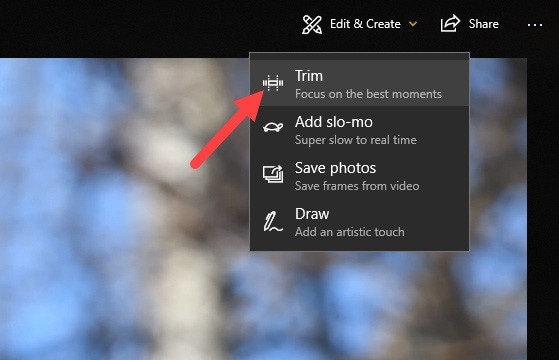
You can also trim AVI videos with Microsoft Photos quickly. All you need to do is open your clip with the Photo App, choose the “Trim” option, select a portion of the video you want to trim, and go ahead.
That’s it!
Features
- Quick video trimming
- Cool text effects
- 3D library and effects
- It has a clear interface
- You can find and tag people’s faces
- The program has 15+ filters for editing
- Motion tracking option for drawing on videos
- Allows you to view and organize your files easily
Pros
- Microsoft Photos is free for Windows users
- It automatically creates albums
- The program has a touch-friendly interface
- You can integrate your OneDrive with the software
Cons
- Lacks before and after view
- Not included in older Windows versions
- It doesn’t support selective focus or panorama stitching
Handbrake
Handbrake is best-known for its video transcoding traits. Unlike typical video editors, this open-source tool includes limited options to rip Blu-rays and DVDs. Moreover, you can mix the 5.1 soundtracks and convert them to stereo to make the audio compatible with your TV speakers.
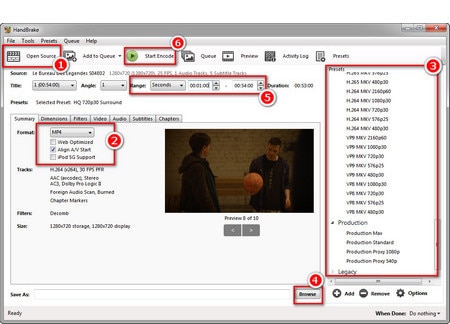
But the exciting thing about Handbrake is that you can use this software on your macOS 10.13 or later versions to cut AVI videos for free. However, it’s a bit technical process, as there’s no timeline to help you trim or make cuts on the clips directly with the help of your mouse.
You are required to mention a time range (seconds, minutes, or hours) to keep a specific part of the video while the software removes the non-ranged parts of the clip. For instance, you have a video of 10 seconds. You start the range from 5 seconds and end it at 10 seconds. So, the first four seconds of the video will be cut from the entire clip.
Features
- Video cutting, cropping, and resizing
- Low-quality and old video restoration
- Video conversion from any format to MKV or MP4
Pros
- Handbrake is free
- You can convert batch videos with ease
- It supports MAC, Windows, and Linux OS
- Allows you to import video files in all major formats
- The software comes with various video conversion presets
Cons
- Handbrake is not a user-friendly tool
- The video file output is limited to two formats (MKV and MP4) only
Gihosoft Video Cutter
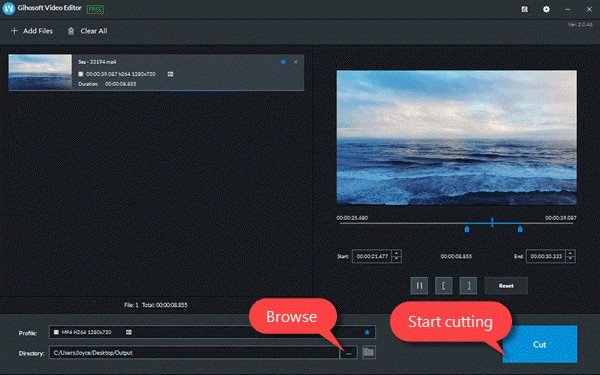
Gihosoft is a clean, free, lossless video cutter on your Windows PC. It’s a simple tool that helps you cut video files into various output formats. So be it AVI, MPEG, or any other file, with Gihosoft, everything becomes handy.
Another fascinating fact about this software is that it allows you to cut videos in three simple steps without losing the quality. So right after installing the program, you simply need to import your file, choose the start and end time, and click the “Cut” button to remove the part of the video.
Features
- Fast video and audio cutting
- Easy drag and drop audio/video files
- It supports most audio and video formats
Pros
- Free for both Windows and MAC operating systems
- The cutter saves video in original quality
Cons
- It does not include basic video editing features
Part 3: Top 3 Free AVI Video Cutter on MAC
Are you looking for a great AVI video cutter for your MAC? Sadly, you have limited product choices as compared to Windows users. But to ensure you don’t waste time looking for a suitable tool, here’s a list of three AVI video cutting programs you can use on your Macintosh.
iMovie
The first and foremost recommended software for free video cutting on MAC is Apple’s own tool, iMovie . It is a built-in program that comes with your system, so there is no need to spend extra on a video editor. iMovie allows you to browse and import most video files, including AVI, right from your computer. Also, this tool is equipped with multiple functions, such as audio editing, video quality enhancement, and much more.
This MAC’s video editor is ideal for beginners. Many home users and small business owners find this tool extremely simple, as they don’t like to be confused with complex features. So, if you want to make cuts to your video clips, start working on iMovie. And within a few clicks, you can trim or cut your videos for free.
Features
- Video cutting and trimming
- Cropping and rotation
- Effects and transitions
- Built-in themes
- HD and 4K video support
- Movie sharing
- Audio adjustments
- Chroma screen controls
- Character tracking
Pros
- Free to use for MAC users
- Clean timeline
- One-click video cutting and trimming
- Easy-to-remember keyboard shortcuts
- Direct share projects to your social media, like YouTube
Cons
- It takes a lot of time to export videos
- iMovie needs high HDD storage space
VideoPad by NCH
VideoPad by NCH is a beginner-level video editor with all the basic features. The software is specifically designed for home movie makers. That is why VideoPad is easy to understand and use.
VideoPad is entirely free of cost for non-commercial purposes, but it has limited features. On the other hand, if you want to enjoy full traits, you can purchase the tool.
VideoPad supports video files, including AVI, WMV, MPEG, MOV, MP4, ASF, and XviD. Likewise, you can also burn movies to Blu-ray, DVD, HD-DVD, or CD. And most importantly, you can easily cut or trim AVI videos on your MAC, as the software is available on both MAC and Windows systems.
Features
- Audio tools
- Video rotation
- Video sharing
- Visual effects
- Video transitions
- 3D Video editing
- Color correction
- Overlays and texts
- Video optimization
- Great plugin support
- Direct video uploading
- Multiple video resolutions
- Video cutting and trimming
- Files exportation to various devices
- Stereoscopic conversion from 2D to 3D
Pros
- You can use the basic tools for free
- Allows 360-degree video production
- It supports a wide range of video formats
- Compatible with MAC and Windows computers
Cons
- The auto speech feature performs poorly
- The free version has annoying notifications
Xilisoft Video Cutter
Xilisoft Video Cutter is the simplest tool to cut videos on MAC. This software has a straightforward option to cut the clip after importing it to the timeline. The program is fast and has a user-friendly interface.
Moreover, you can polish your videos by merging multiple clips or increasing the video quality once you’re done with the cutting process. At the same time, this video cutter allows you to import all video formats, including XviD, DivX, MOV, FLV, MP4, MPEG-4/, MKV, MPEG, WMV, and AVI.
Features
- Video joining
- Support multiple output video formats, including HD
Pros
- Easy video cutting and merging
- It doesn’t require a large storage space
- Extremely uncomplicated interface
- Real-time preview to make better cuts
- Available on both MAC and Windows systems
Cons
- The trial version is free to use but limits you from enjoying extra features
Part 4: Top 3 Free AVI Video Cutter on Android
After capturing nice videos with your Android mobile phone, you may need to cut unnecessary scenes to make your clips look professional. While there are numerous Android cutters, not all support the AVI format. So below, you will find the 3 best AVI video cutters for Android, which are free to use.
Quick – Video Editor & Maker
Quick – Video Editor & Maker is a free video editor with PRO results. Many photographers and vloggers love using this app to cut clips immediately. Furthermore, the application offers a wide range of options to assure you don’t have to look to any other tool to rotate or compress video. Quick – Video Editor & Maker lets you import videos in all major formats, including AVI, MPEG, WMA, and more.
Features
- Video cutting, fading, and rotation
- Speed control tools
- Conversion from video to GIF
Pros
- Free app
- Simple interface
Cons
- Lack of updates
- Some users complain about app crash
Funimate Video Editor & Maker
If you want to make some professional-grade video edits quickly, you are welcome to download and use Funimate Video Editor & Maker on your Android device. It’s a free tool to cut videos. It has an easy procedure, and you can cut AVI videos in a few seconds.
Plus, you can use the app to add custom animations, effects, and many other exciting elements. You can share your makes on social media like TikTok, Instagram, and other platforms. Contrarily, the app itself is a community with millions of Funimate-users who share their creations daily. You can also join or watch videos from other creators to learn more about new techniques and trends in video editing.
Features
- Video trimming and splitting
- Animation and cropping
- Filters and AI effects
- Speed adjustment
- Keyframing and video merging
Pros
- Free Android application with several editing tools
- Easy trimming, splitting, and cropping
- Aspect ratio, border, and color customization
- Direct social media sharing
Cons
- Free users cannot use templates
- The free version stamps watermarks on each project
Part 5: Top 3 Free AVI Video Cutter on iPhone
No wonder iPhone’s camera captures high-quality videos. But the problem begins when there’s no free app to cut AVI videos. So if you’re recording great spots, but deep inside, you really want to remove some parts, then these 3 free AVI video cutters will work smoothly on your iPhone.
Cut, Trim, Split Video Editor
Download Cut, Trim, Split Video Editor on your iPhone to delete/cut unwanted portions of your video clips. The tool is also best for trimming iPhone-recorded clips without messing with the frames. Or, if you just want to split the video into multiple parts for your next WhatsApp status, this iPhone app can do that job for you.
The app supports multiple video file types, including MOV, MP4, AVI, MPEG, MPEG-2, and 3GPP
Features
- Easy trimming and cutting video clips
- Splitting big-sized videos into two smaller clips
- Import video from file-sharing platforms, like iCloud, using Wi-Fi
Pros
- Free app for fast video cutting and sharing
- Simple UI interface
Cons
- The free version shows advertisements
Splice - Video Editor & Maker
Splice is an extraordinary video editor that makes it easy to make fully customized and professional videos from your iPhone. The app is also best for video cutting. Besides, it has many interesting features, which you can use from your device.
Features
- Cutting, trimming, and cropping your videos
- Exposure, saturation, and exposure adjustment
- Slow and fast motion with speed ramping option
- Video masking and overlay
- Color correction and text overlays
Pros
- Free basic features, such as video cutting
- iTunes integration
- Supports AVI video input
- User-friendly application
- Access to the music library
- Quick and simple social sharing
Cons
- Output videos require high mobile storage space
Part 6: Top 3 Free AVI Video Cutter Online
Don’t want to install video cutters on your MAC, Windows, smartphone, or any other device? No problem! You can use online video cutters and trimmers to split, cut, or trim your clips for free.
However, the problem still exists in online tools, as not all web-based editors allow importing AVI files. So to save your time and energy, you can directly go to the following online AVI cutters to complete your tasks.
Kapwing
Kapwing is an online video editor best for casual creatives, such as Vloggers and YouTubers. You can use this web-based platform to cut your videos. Gladly, Kapwing supports all AVI incomings. You can upload your AVI video files to this platform and use its trim or split feature. To do that, you need to upload your AVI video and choose the “Trim” or “Split” tool to see the magic. Once done with the trimming process, you can explore Kapwing’s other incredible traits and apply them to your project.
Features
- Video splitting, trimming, and merging
- Audio capturing
- Speed adjustment
- Image and video library
- Text editing and overlay
- Auto-generated subtitles
- Several collaboration tools
- Video creation from scratch
- Templates, shapes, and emojis
- Simple drag-and-drop interface
- Video transitions, plugins, and elements
Pros
- Free online video trimmer
- User-friendly interface
- You can export 30-minutes long projects
- Allows you to export unlimited videos with a watermark
- One watermark-free video export is available each month
Cons
- Cannot export long videos with a free account
- Only 10 minutes transcription limit is available for free users
- You need to purchase a monthly or annual subscription to remove the watermark from multiple videos
Clideo
Clideo is not just a video cutter but an online solution to all your video editing problems. The tool is super popular, with 4 million+ users a month. And why not? This is one of those web-based platforms that allow AVI video files to be imported and exported without converting them into any other formats.
Nevertheless, if you’re only looking for video cutting options, this tool makes your life easy. Simply upload your video, and select the portion of it by setting start and end times. Choose whether you want to delete or extract the selected part from the clip, and hit the “Export” button.
And within a few moments, you can enjoy a trimmed video clip. And if you plan to be more creative, you can look for other Clideo features to make videos more fascinating.
Features
- Video combining and cutting
- Resize and crop clips
- Compress your videos
- Add text and subtitles
- Add music to your video files
- Filters and color correction tools
- Audio mute, cutting, and muting
- Video rotation, flipping, and speed adjustment
Pros
- Basic tools can be used for free
- Best for beginners and intermediate users
- Ideal for AVI videos and also supports other video formats
Cons
- You cannot use the free version regularly
Aspose
Aspose is a free web-based application to cut clips. You can use this tool on any operating system. It supports all major video file formats, including AVI, MKV, MOV, MP4, FLV, WMV, WEBM, and GIF. Additionally, you can use Aspose for various other reasons, such as audio extraction, video resizing, and more.
Features
- Video cutting and compressing
- Looping, rotation, and video merging
- Adding watermarks on videos
- Sound muting
- Speed change and audio addition
Pros
- Aspose is a free online tool
- It offers straightforward options to cut and edit videos
Cons
- No color correction option
- Slow video cutting process
- Lacks timeline and other valuable features
Part 7: Bottom Line
Tired of finding AVI cutters? Relax and try these top 16 AVI video cutters for Windows, MAC, iPhone, Android, and online. Almost all these tools are free to use and are extremely handy. On the other hand, if you want to cut and trim videos professionally, download Filmora and follow the step-by-step guide in this article for making clean cuts.
Part 8: FAQs
Q1. How do I trim an AVI video?
To trim an AVI video file, ensure that the software or tool you use supports AVI input. Generally, you need to upload or import a clip on the program, select the portion of the video, and apply the cut/trim feature to make it happen.
Q2. Which is the best online video cutter?
Kapwing and Clideo are the two best online video cutters you can use for free. Both web-based tools also allow you to cut your AVI videos.
Q3. Which is the best video cutter and joiner software?
Filmora, iMovie, and Kapwing are some of the best video cutters and joiner tools. These video editors are also free to use and come with different features.
Q4. How do I trim an AVI file in Windows 10?
Trimming an AVI video file in Windows 10 is very simple. Launch the Microsoft Photos (Photo App) application on your computer, add clip, and select the “Trim” tool to trim a specific video part.
Q5. How can I cut a video on my computer for free?
MAC and Windows users can download Filmora to cut videos for free. Filmora also offers a wide range of other features to make your clips exciting. Contrarily, Windows users can use the built-in Photo App in Windows 10 or download Gihosoft or Handbrake software to cut clips. Likewise, MAC users can download VideoPad, Xilisoft Video Cutter, or iMovie for free.
With the growing fame of video-sharing and social media applications like Twitter, Instagram, and TikTok, the demand for simple and fast video cutting and trimming tools has dramatically increased. Nowadays, you don’t have to play with complex video editing tools to produce high-quality videos.
Thanks to several user-friendly editing software to make things easy for everybody. However, finding the right programs to trim/cut videos is still challenging, especially in AVI format.
But, guess what? These top 16 AVI video cutters for Windows, MAC, Android, iPhone, and online will make video cutting and trimming fun, especially when you learn to do it using Filmora.
In this Article
Part 1: Best AVI Video Cutter to Trim/Cut AVI Video on Windows and MAC – Filmora Video Cutter [with steps}
Part 2: Top 3 Free AVI Video Cutter on Windows
Part 3: Top 3 Free AVI Video Cutter on MAC
Part 4: Top 3 Free AVI Video Cutter on Android
Part 5: Top 3 Free AVI Video Cutter on iPhone
Part 6: Top 3 Free AVI Video Cutter Online
Part 7: Bottom Line
Part 8: FAQs
Part 1: Best AVI Video Cutter to Trim/Cut AVI Video on Windows and MAC – Filmora Video Cutter [with steps]
Filmora by Wondershare is a star video editor with outstanding outcomes. Whether you have a MAC or Windows PC, you can download Filmora regardless of your operating system. The program best serves those who intend to make high-quality videos. The software provides editing support for all video formats, including AVI.
Although Filmora is an affordable editor with tons of audio and video editing options, you can still download the software for free and create projects if watermarks don’t bother you. Moreover, you can count this tool’s capabilities in cropping, resizing, and Chroma screen support. But that’s not the only sweet fruit.
In fact, Filmora is equipped with many jaw-dropping features, including preset templates, auto beat sync, split-screen, speed ramping, motion tracking, keyframing, creative transitions, titles, filters, and much more. And the best part is, you can learn and understand Filmora in no time. That’s why the program is loved and supported by all types of users.
So does Filmora helps cut and trim AVI videos? Yes! It does if you follow these steps correctly.
Step 1: Download Filmora Video Editor
First, download Filmora Video Editor by choosing your operating system, as seen in the screenshot below.
Run the setup and let it finish without any pause or break.
Step 2: Import Your Video to Filmora Video Editor
Importing your AVI video is a very simple process. Just click on the “Film Clip” icon.
It will open a new window screen on your computer to select the video from the directory. Find the clip you want to import and cut. Use your mouse to select it and click the “Open” button.
The video will be loaded in the “Media” folder of Filmora. The clip’s thumbnail should be visible to assure you have done everything correctly.
If you can see that, let’s go to the next step.
Step 3: Drag and Drop Video to Filmora’s Timeline
Select the video in the media folder by clicking over it once. Now, without leaving the hold of the left button of your mouse, slide the video down to the track in the timeline.
After that, a message will pop up, asking about your preference for the project settings. It is recommended to choose the “Match to Media” option unless you’re an experienced video editor who knows how to play with the resolution and frame rates.
You will see the video on the timeline with its preview on the “Preview Screen” on the right side of the interface.
Step 4: Cutting Your Video in Filmora
Here comes the core step you have been waiting for. But before you go any further, you need to know about the “Playhead.”
Playhead is an orange-reddish marker you can find on the timeline.
It has an important role in cutting your videos.
So, move the playhead to your desired frame and click on the “scissor” icon to make the “starting” cut.
As soon as you do it, you will see that the single clip is now divided into two parts similar to this image.
The “Red” marked area in the above screenshot ensures a gap between the clips on the timeline. The “Yellow” arrows confirm two separate clips of the same video.
Place the two clips together as seen in this “Green” area.
And place the playhead anywhere on the clip. And click on the “scissor” icon once again to make the “ending” cut (second cut).
If done correctly, there should be three clips now of the same video, as you can observe in this screenshot.
Again, the “Red” area in the above photo indicates the gap, and the “Yellow” area ensures a third segment of the video.
Note: The gaps you can see in the divided clips are made intentionally for understanding. Practically, Filmora doesn’t move the clip or make gaps in between after you have made the cuts.
Keep in mind that there are three clips on the timeline. Now, if you want to remove the second clip from the video, you need to select that portion first by clicking on it.
Then, right-click on the mouse and choose “Cut” from the menu.
Within a semi-second, the selected portion will be removed from the timeline. And you will be able to see the remaining parts of the video. Now, pull the second clip using your mouse and place it at the end of the first clip without leaving a gap in between.
Then, click the “Play” button under the preview screen to see the results.
You can see in the above two screenshots that there’s a jump between the scenes due to cuts, confirming that video has been cut significantly.
Step 5: Trimming Your Video in Filmora
Remember that cutting and trimming in Filmora are two different things. Trimming allows you to remove a particular video part from visibility without deleting the portion.
So feel free to skip this step if you’re happy learning the cutting technique. But if you’re interested in trimming, here’s how you do it.
Take your mouse cursor at the beginning or end of the clip you want to trim. Keep holding the clip’s corner and slide the mouse back or front to trim the part
Note: Since the trim tool doesn’t delete the video, the final project based on trimming will be of a larger size. Therefore, it is advised to cut videos rather than trimming for fast rendering, better results, and small video size.
Step 6: Save Project and Export Your Cut/Trimmed AVI Video
Choose “Save Project” from the “File” menu.
Select the directory to save the project, rename the new video, and click the “Save” button.
Click on the “Export” button to save the video in AVI or any other video format of your choice on your computer.
Part 2: Top 3 Free AVI Video Cutter on Windows
As a Windows user, finding an excellent video cutter is relatively easy. However, not all software permits importing AVI videos. In the same way, some video trimmers come at a price. So if you really don’t want to pay and enjoy cutting your AVI files, try using these three video cutting tools.
Microsoft Photos (Windows 10)
Microsoft Photos or Photo App is a free photo viewer and editor with your Windows 10. It offers incredible photo editing and enhancement along with different tools for organizing and editing videos in a very friendly way. Likewise, you can create drawings over the videos and add 3D effects and background music to your clips.
You can also trim AVI videos with Microsoft Photos quickly. All you need to do is open your clip with the Photo App, choose the “Trim” option, select a portion of the video you want to trim, and go ahead.
That’s it!
Features
- Quick video trimming
- Cool text effects
- 3D library and effects
- It has a clear interface
- You can find and tag people’s faces
- The program has 15+ filters for editing
- Motion tracking option for drawing on videos
- Allows you to view and organize your files easily
Pros
- Microsoft Photos is free for Windows users
- It automatically creates albums
- The program has a touch-friendly interface
- You can integrate your OneDrive with the software
Cons
- Lacks before and after view
- Not included in older Windows versions
- It doesn’t support selective focus or panorama stitching
Handbrake
Handbrake is best-known for its video transcoding traits. Unlike typical video editors, this open-source tool includes limited options to rip Blu-rays and DVDs. Moreover, you can mix the 5.1 soundtracks and convert them to stereo to make the audio compatible with your TV speakers.
But the exciting thing about Handbrake is that you can use this software on your macOS 10.13 or later versions to cut AVI videos for free. However, it’s a bit technical process, as there’s no timeline to help you trim or make cuts on the clips directly with the help of your mouse.
You are required to mention a time range (seconds, minutes, or hours) to keep a specific part of the video while the software removes the non-ranged parts of the clip. For instance, you have a video of 10 seconds. You start the range from 5 seconds and end it at 10 seconds. So, the first four seconds of the video will be cut from the entire clip.
Features
- Video cutting, cropping, and resizing
- Low-quality and old video restoration
- Video conversion from any format to MKV or MP4
Pros
- Handbrake is free
- You can convert batch videos with ease
- It supports MAC, Windows, and Linux OS
- Allows you to import video files in all major formats
- The software comes with various video conversion presets
Cons
- Handbrake is not a user-friendly tool
- The video file output is limited to two formats (MKV and MP4) only
Gihosoft Video Cutter
Gihosoft is a clean, free, lossless video cutter on your Windows PC. It’s a simple tool that helps you cut video files into various output formats. So be it AVI, MPEG, or any other file, with Gihosoft, everything becomes handy.
Another fascinating fact about this software is that it allows you to cut videos in three simple steps without losing the quality. So right after installing the program, you simply need to import your file, choose the start and end time, and click the “Cut” button to remove the part of the video.
Features
- Fast video and audio cutting
- Easy drag and drop audio/video files
- It supports most audio and video formats
Pros
- Free for both Windows and MAC operating systems
- The cutter saves video in original quality
Cons
- It does not include basic video editing features
Part 3: Top 3 Free AVI Video Cutter on MAC
Are you looking for a great AVI video cutter for your MAC? Sadly, you have limited product choices as compared to Windows users. But to ensure you don’t waste time looking for a suitable tool, here’s a list of three AVI video cutting programs you can use on your Macintosh.
iMovie
The first and foremost recommended software for free video cutting on MAC is Apple’s own tool, iMovie . It is a built-in program that comes with your system, so there is no need to spend extra on a video editor. iMovie allows you to browse and import most video files, including AVI, right from your computer. Also, this tool is equipped with multiple functions, such as audio editing, video quality enhancement, and much more.
This MAC’s video editor is ideal for beginners. Many home users and small business owners find this tool extremely simple, as they don’t like to be confused with complex features. So, if you want to make cuts to your video clips, start working on iMovie. And within a few clicks, you can trim or cut your videos for free.
Features
- Video cutting and trimming
- Cropping and rotation
- Effects and transitions
- Built-in themes
- HD and 4K video support
- Movie sharing
- Audio adjustments
- Chroma screen controls
- Character tracking
Pros
- Free to use for MAC users
- Clean timeline
- One-click video cutting and trimming
- Easy-to-remember keyboard shortcuts
- Direct share projects to your social media, like YouTube
Cons
- It takes a lot of time to export videos
- iMovie needs high HDD storage space
VideoPad by NCH
VideoPad by NCH is a beginner-level video editor with all the basic features. The software is specifically designed for home movie makers. That is why VideoPad is easy to understand and use.
VideoPad is entirely free of cost for non-commercial purposes, but it has limited features. On the other hand, if you want to enjoy full traits, you can purchase the tool.
VideoPad supports video files, including AVI, WMV, MPEG, MOV, MP4, ASF, and XviD. Likewise, you can also burn movies to Blu-ray, DVD, HD-DVD, or CD. And most importantly, you can easily cut or trim AVI videos on your MAC, as the software is available on both MAC and Windows systems.
Features
- Audio tools
- Video rotation
- Video sharing
- Visual effects
- Video transitions
- 3D Video editing
- Color correction
- Overlays and texts
- Video optimization
- Great plugin support
- Direct video uploading
- Multiple video resolutions
- Video cutting and trimming
- Files exportation to various devices
- Stereoscopic conversion from 2D to 3D
Pros
- You can use the basic tools for free
- Allows 360-degree video production
- It supports a wide range of video formats
- Compatible with MAC and Windows computers
Cons
- The auto speech feature performs poorly
- The free version has annoying notifications
Xilisoft Video Cutter
Xilisoft Video Cutter is the simplest tool to cut videos on MAC. This software has a straightforward option to cut the clip after importing it to the timeline. The program is fast and has a user-friendly interface.
Moreover, you can polish your videos by merging multiple clips or increasing the video quality once you’re done with the cutting process. At the same time, this video cutter allows you to import all video formats, including XviD, DivX, MOV, FLV, MP4, MPEG-4/, MKV, MPEG, WMV, and AVI.
Features
- Video joining
- Support multiple output video formats, including HD
Pros
- Easy video cutting and merging
- It doesn’t require a large storage space
- Extremely uncomplicated interface
- Real-time preview to make better cuts
- Available on both MAC and Windows systems
Cons
- The trial version is free to use but limits you from enjoying extra features
Part 4: Top 3 Free AVI Video Cutter on Android
After capturing nice videos with your Android mobile phone, you may need to cut unnecessary scenes to make your clips look professional. While there are numerous Android cutters, not all support the AVI format. So below, you will find the 3 best AVI video cutters for Android, which are free to use.
Quick – Video Editor & Maker
Quick – Video Editor & Maker is a free video editor with PRO results. Many photographers and vloggers love using this app to cut clips immediately. Furthermore, the application offers a wide range of options to assure you don’t have to look to any other tool to rotate or compress video. Quick – Video Editor & Maker lets you import videos in all major formats, including AVI, MPEG, WMA, and more.
Features
- Video cutting, fading, and rotation
- Speed control tools
- Conversion from video to GIF
Pros
- Free app
- Simple interface
Cons
- Lack of updates
- Some users complain about app crash
Funimate Video Editor & Maker
If you want to make some professional-grade video edits quickly, you are welcome to download and use Funimate Video Editor & Maker on your Android device. It’s a free tool to cut videos. It has an easy procedure, and you can cut AVI videos in a few seconds.
Plus, you can use the app to add custom animations, effects, and many other exciting elements. You can share your makes on social media like TikTok, Instagram, and other platforms. Contrarily, the app itself is a community with millions of Funimate-users who share their creations daily. You can also join or watch videos from other creators to learn more about new techniques and trends in video editing.
Features
- Video trimming and splitting
- Animation and cropping
- Filters and AI effects
- Speed adjustment
- Keyframing and video merging
Pros
- Free Android application with several editing tools
- Easy trimming, splitting, and cropping
- Aspect ratio, border, and color customization
- Direct social media sharing
Cons
- Free users cannot use templates
- The free version stamps watermarks on each project
Part 5: Top 3 Free AVI Video Cutter on iPhone
No wonder iPhone’s camera captures high-quality videos. But the problem begins when there’s no free app to cut AVI videos. So if you’re recording great spots, but deep inside, you really want to remove some parts, then these 3 free AVI video cutters will work smoothly on your iPhone.
Cut, Trim, Split Video Editor
Download Cut, Trim, Split Video Editor on your iPhone to delete/cut unwanted portions of your video clips. The tool is also best for trimming iPhone-recorded clips without messing with the frames. Or, if you just want to split the video into multiple parts for your next WhatsApp status, this iPhone app can do that job for you.
The app supports multiple video file types, including MOV, MP4, AVI, MPEG, MPEG-2, and 3GPP
Features
- Easy trimming and cutting video clips
- Splitting big-sized videos into two smaller clips
- Import video from file-sharing platforms, like iCloud, using Wi-Fi
Pros
- Free app for fast video cutting and sharing
- Simple UI interface
Cons
- The free version shows advertisements
Splice - Video Editor & Maker
Splice is an extraordinary video editor that makes it easy to make fully customized and professional videos from your iPhone. The app is also best for video cutting. Besides, it has many interesting features, which you can use from your device.
Features
- Cutting, trimming, and cropping your videos
- Exposure, saturation, and exposure adjustment
- Slow and fast motion with speed ramping option
- Video masking and overlay
- Color correction and text overlays
Pros
- Free basic features, such as video cutting
- iTunes integration
- Supports AVI video input
- User-friendly application
- Access to the music library
- Quick and simple social sharing
Cons
- Output videos require high mobile storage space
Part 6: Top 3 Free AVI Video Cutter Online
Don’t want to install video cutters on your MAC, Windows, smartphone, or any other device? No problem! You can use online video cutters and trimmers to split, cut, or trim your clips for free.
However, the problem still exists in online tools, as not all web-based editors allow importing AVI files. So to save your time and energy, you can directly go to the following online AVI cutters to complete your tasks.
Kapwing
Kapwing is an online video editor best for casual creatives, such as Vloggers and YouTubers. You can use this web-based platform to cut your videos. Gladly, Kapwing supports all AVI incomings. You can upload your AVI video files to this platform and use its trim or split feature. To do that, you need to upload your AVI video and choose the “Trim” or “Split” tool to see the magic. Once done with the trimming process, you can explore Kapwing’s other incredible traits and apply them to your project.
Features
- Video splitting, trimming, and merging
- Audio capturing
- Speed adjustment
- Image and video library
- Text editing and overlay
- Auto-generated subtitles
- Several collaboration tools
- Video creation from scratch
- Templates, shapes, and emojis
- Simple drag-and-drop interface
- Video transitions, plugins, and elements
Pros
- Free online video trimmer
- User-friendly interface
- You can export 30-minutes long projects
- Allows you to export unlimited videos with a watermark
- One watermark-free video export is available each month
Cons
- Cannot export long videos with a free account
- Only 10 minutes transcription limit is available for free users
- You need to purchase a monthly or annual subscription to remove the watermark from multiple videos
Clideo
Clideo is not just a video cutter but an online solution to all your video editing problems. The tool is super popular, with 4 million+ users a month. And why not? This is one of those web-based platforms that allow AVI video files to be imported and exported without converting them into any other formats.
Nevertheless, if you’re only looking for video cutting options, this tool makes your life easy. Simply upload your video, and select the portion of it by setting start and end times. Choose whether you want to delete or extract the selected part from the clip, and hit the “Export” button.
And within a few moments, you can enjoy a trimmed video clip. And if you plan to be more creative, you can look for other Clideo features to make videos more fascinating.
Features
- Video combining and cutting
- Resize and crop clips
- Compress your videos
- Add text and subtitles
- Add music to your video files
- Filters and color correction tools
- Audio mute, cutting, and muting
- Video rotation, flipping, and speed adjustment
Pros
- Basic tools can be used for free
- Best for beginners and intermediate users
- Ideal for AVI videos and also supports other video formats
Cons
- You cannot use the free version regularly
Aspose
Aspose is a free web-based application to cut clips. You can use this tool on any operating system. It supports all major video file formats, including AVI, MKV, MOV, MP4, FLV, WMV, WEBM, and GIF. Additionally, you can use Aspose for various other reasons, such as audio extraction, video resizing, and more.
Features
- Video cutting and compressing
- Looping, rotation, and video merging
- Adding watermarks on videos
- Sound muting
- Speed change and audio addition
Pros
- Aspose is a free online tool
- It offers straightforward options to cut and edit videos
Cons
- No color correction option
- Slow video cutting process
- Lacks timeline and other valuable features
Part 7: Bottom Line
Tired of finding AVI cutters? Relax and try these top 16 AVI video cutters for Windows, MAC, iPhone, Android, and online. Almost all these tools are free to use and are extremely handy. On the other hand, if you want to cut and trim videos professionally, download Filmora and follow the step-by-step guide in this article for making clean cuts.
Part 8: FAQs
Q1. How do I trim an AVI video?
To trim an AVI video file, ensure that the software or tool you use supports AVI input. Generally, you need to upload or import a clip on the program, select the portion of the video, and apply the cut/trim feature to make it happen.
Q2. Which is the best online video cutter?
Kapwing and Clideo are the two best online video cutters you can use for free. Both web-based tools also allow you to cut your AVI videos.
Q3. Which is the best video cutter and joiner software?
Filmora, iMovie, and Kapwing are some of the best video cutters and joiner tools. These video editors are also free to use and come with different features.
Q4. How do I trim an AVI file in Windows 10?
Trimming an AVI video file in Windows 10 is very simple. Launch the Microsoft Photos (Photo App) application on your computer, add clip, and select the “Trim” tool to trim a specific video part.
Q5. How can I cut a video on my computer for free?
MAC and Windows users can download Filmora to cut videos for free. Filmora also offers a wide range of other features to make your clips exciting. Contrarily, Windows users can use the built-in Photo App in Windows 10 or download Gihosoft or Handbrake software to cut clips. Likewise, MAC users can download VideoPad, Xilisoft Video Cutter, or iMovie for free.
The Animation Artist’s Toolkit: 7 Best Drawing Software for Exceptional Results
How to Create Animation Drawing with 7 Best Software

Shanoon Cox
Mar 27, 2024• Proven solutions
We can’t deny the fact that hand drawn animation is always adorable and will always be, no matter how much 3D animation gets the limelight. The animations have always given us pleasure, not only in childhood but at our adult times too. And, the animation drawing can be so enthralling.
It feels great to think that we can ourselves perform animation drawing process effortlessly via some easy-to-use animation software . So, if you’re a newcomer to this animation field or a skilled one, you’ll always need very helpful software for the purpose. This article will help you in making animation with the help of some animation drawing software ultimately giving that delightful experience.
Recommended animation drawing editor - Filmora
Here we recommend using Filmora . You can use it to make drawing animation video by adding keyframes, so the animation will be smooth and natural. You just need to build a white plane to easily start making animation. Besides, color correction and audio mixer will raise up your video to a new level. Download it to have a try (Free)!
 Download Mac Version ](https://tools.techidaily.com/wondershare/filmora/download/ )
7 best software to animate your drawing
1. Adobe Animate
Adobe Animate is one of the leading 2D animation software in this animation industry that many designers use. For better results, it is suggested that you combine it with Capture so that you can capture various interesting color schemes or transforming the image into vector and other things before starting animation with Adobe Animate. This will create an effective hand drawn animation.
Pros:
- Always working on new features regularly.
- Contains powerful timeline showing time and frame numbers.
Cons:
- The software requires a higher technical skillset to learn.

2. SketchBook Motion
SketchBook Motion is for iPad users to make their animations.With the help of this app, you can drag and drop into a document easily. You can instantly share your animation drawings as iMessage stickers, animated GIFs or MP4s.
Pros:
- Available in multiple languages including English, French, German.
- Can make characters live with applying simple gestures.
Cons:
- Many in-app purchases.
- Up to 3 scenes can be saved without subscription.
- Full version is free only for 7 days.

3. Animation & Drawing by Do Ink
It is an easy to use and one of the best hand drawn animation apps for iPad users. This app has a large number of features and drawing editing options. For example, you can make frame-by-frame or single frame animations, create motion paths just by dragging fingers, and enjoy custom color palette and more.
Pros:
- Offers up to 30 FPS.
- Show support to HD (16x9), square (1x1) and standard definition (4x3) aspect ratios.
Cons:
- Doesn’t work with devices having iOS less than 9.0.

4. Animation Paper
Here is the next animation drawing software named as Animation Paper. It is simple to use and offers a lot of features. It can be considered as one of the most effective software to create animations. From layers to cutouts to paint features, it has all that pro software and a pro designer needs.
Pros:
- Provides super responsive interface enabling the users to get prompt workflow.
- Can work with Windows and Mac easily and pencil planned for Linux, Android and iPad Pro.
Cons:
- Not suitable for beginners who wish to start off their work with this tool.

5. Pencil2D
Pencil2D is next in the list and is one of the lightweight software. It is an open source software and completely free to use. You can simply and smoothly sketch, ink or paint by switching between raster and vector workflows. The animated file can be exported to MP4, animated GIF or AVI when using this software. There are many drawing tools given by this animation drawing software like fast hand tool, dotted cursor etc.
Pros:
- It is a cross platform software that can run on Windows, Mac and Linux.
- Very easy and simple to use.
- Available in 12 languages.
Cons:
- Eraser tool lacks perfection and can’t do detail work.

6. Toonator
Toonator is an online tool that can help you making your own animations. It lets you draw your own imagination on the screen and turn it into animated effect. It’s an easy to use online platform to help you draw animation online. Here are the positives and negative of this tool.
Pros:
- The interface is really simple.
- People can share their work on this platform and connect with each other.
Cons:
- Animated drawing can only be done in red and black color.
- Functions are limited.
- No name on the icons making it difficult to understand the functionality of each icon.

7. FlipAnim
Here is the last option you can try for animation drawing. This also lets you draw animation online in an easy way. You get different color options to draw as well as set animation speed. It is fun to use FlipAnim and you can share your work on this tool as well similar to the above one.
Pros:
- Interface is really creative to use.
- Offers a grid area to draw that helps in perfect drawing.
- Zoom option is icing on cake since it lets you draw everything accurately and in detailed way.
Cons:
- You can only create animation of up to 100 frames with this tool.

Final Verdict
Animation drawing is a way to show your creativity and is fun at the same time. We have mentioned you 7 best software through which you can make your own masterpiece and share with your friends and share globally. We hope now you are satisfied with this article and whether you are a beginner or expert, you have started animation with Filmora. Download it now to have a try! Thanks for reading.
Download Mac Version ](https://tools.techidaily.com/wondershare/filmora/download/ )
Shanoon Cox
Shanoon Cox is a writer and a lover of all things video.
Follow @Shanoon Cox
Shanoon Cox
Mar 27, 2024• Proven solutions
We can’t deny the fact that hand drawn animation is always adorable and will always be, no matter how much 3D animation gets the limelight. The animations have always given us pleasure, not only in childhood but at our adult times too. And, the animation drawing can be so enthralling.
It feels great to think that we can ourselves perform animation drawing process effortlessly via some easy-to-use animation software . So, if you’re a newcomer to this animation field or a skilled one, you’ll always need very helpful software for the purpose. This article will help you in making animation with the help of some animation drawing software ultimately giving that delightful experience.
Recommended animation drawing editor - Filmora
Here we recommend using Filmora . You can use it to make drawing animation video by adding keyframes, so the animation will be smooth and natural. You just need to build a white plane to easily start making animation. Besides, color correction and audio mixer will raise up your video to a new level. Download it to have a try (Free)!
Download Mac Version ](https://tools.techidaily.com/wondershare/filmora/download/ )
7 best software to animate your drawing
1. Adobe Animate
Adobe Animate is one of the leading 2D animation software in this animation industry that many designers use. For better results, it is suggested that you combine it with Capture so that you can capture various interesting color schemes or transforming the image into vector and other things before starting animation with Adobe Animate. This will create an effective hand drawn animation.
Pros:
- Always working on new features regularly.
- Contains powerful timeline showing time and frame numbers.
Cons:
- The software requires a higher technical skillset to learn.
2. SketchBook Motion
SketchBook Motion is for iPad users to make their animations.With the help of this app, you can drag and drop into a document easily. You can instantly share your animation drawings as iMessage stickers, animated GIFs or MP4s.
Pros:
- Available in multiple languages including English, French, German.
- Can make characters live with applying simple gestures.
Cons:
- Many in-app purchases.
- Up to 3 scenes can be saved without subscription.
- Full version is free only for 7 days.
3. Animation & Drawing by Do Ink
It is an easy to use and one of the best hand drawn animation apps for iPad users. This app has a large number of features and drawing editing options. For example, you can make frame-by-frame or single frame animations, create motion paths just by dragging fingers, and enjoy custom color palette and more.
Pros:
- Offers up to 30 FPS.
- Show support to HD (16x9), square (1x1) and standard definition (4x3) aspect ratios.
Cons:
- Doesn’t work with devices having iOS less than 9.0.
4. Animation Paper
Here is the next animation drawing software named as Animation Paper. It is simple to use and offers a lot of features. It can be considered as one of the most effective software to create animations. From layers to cutouts to paint features, it has all that pro software and a pro designer needs.
Pros:
- Provides super responsive interface enabling the users to get prompt workflow.
- Can work with Windows and Mac easily and pencil planned for Linux, Android and iPad Pro.
Cons:
- Not suitable for beginners who wish to start off their work with this tool.
5. Pencil2D
Pencil2D is next in the list and is one of the lightweight software. It is an open source software and completely free to use. You can simply and smoothly sketch, ink or paint by switching between raster and vector workflows. The animated file can be exported to MP4, animated GIF or AVI when using this software. There are many drawing tools given by this animation drawing software like fast hand tool, dotted cursor etc.
Pros:
- It is a cross platform software that can run on Windows, Mac and Linux.
- Very easy and simple to use.
- Available in 12 languages.
Cons:
- Eraser tool lacks perfection and can’t do detail work.
6. Toonator
Toonator is an online tool that can help you making your own animations. It lets you draw your own imagination on the screen and turn it into animated effect. It’s an easy to use online platform to help you draw animation online. Here are the positives and negative of this tool.
Pros:
- The interface is really simple.
- People can share their work on this platform and connect with each other.
Cons:
- Animated drawing can only be done in red and black color.
- Functions are limited.
- No name on the icons making it difficult to understand the functionality of each icon.
7. FlipAnim
Here is the last option you can try for animation drawing. This also lets you draw animation online in an easy way. You get different color options to draw as well as set animation speed. It is fun to use FlipAnim and you can share your work on this tool as well similar to the above one.
Pros:
- Interface is really creative to use.
- Offers a grid area to draw that helps in perfect drawing.
- Zoom option is icing on cake since it lets you draw everything accurately and in detailed way.
Cons:
- You can only create animation of up to 100 frames with this tool.
Final Verdict
Animation drawing is a way to show your creativity and is fun at the same time. We have mentioned you 7 best software through which you can make your own masterpiece and share with your friends and share globally. We hope now you are satisfied with this article and whether you are a beginner or expert, you have started animation with Filmora. Download it now to have a try! Thanks for reading.
Download Mac Version ](https://tools.techidaily.com/wondershare/filmora/download/ )
Shanoon Cox
Shanoon Cox is a writer and a lover of all things video.
Follow @Shanoon Cox
QuickTime Video Editing Essentials for Mac Beginners
Edit Videos with QuickTime Player on Mac

Ollie Mattison
Jan 23, 2024• Proven solutions
There is no doubt that one of the most underrated components of the consumer Mac software that comes built into every Mac is Apple’s QuickTime Player. The reason for this, of course, is that QuickTime, in addition to being a simple video player that edits mp4 Mac, also allows users to do some basic video trimming. This can come in handy for average users, especially when you consider how expensive, bloated, and complex video editing software can be. In this article, we will show you that how QuickTime edit videos on Mac.
Part1: Quicktime is More Than a Player
QuickTime Player is a simple yet powerful video editing program available for Mac. It includes features for casual video editors and professionals alike, so whatever your reason for looking for good edit mp4 Mac software, QuickTime Player has to cover you.
The QuickTime player was originally designed to play almost all types of multimedia files, but it has since been expanded to include a number of functions. For example, you can use it to quickly trim a video or record screen content for use in a tutorial or as a helpful example when troubleshooting. Follow these steps to edit a movie with QuickTime edit video Player for Mac.
Main features of QuickTime Player for Mac
- Support key media formats, such as MOV, MPEG, MP3, 3GPP, etc.
- Provide QuickTime Web plug-in together with the player.
- Play online streaming content vial URL.
- Edit video files, such as trimming and splitting.
- Control subtitles, languages and more options.
- Includes picture viewers for JPEG, BMP and PNG.
1. Trim Video With QuickTime Player on Mac
Trimming Videos in QuickTime video player is another simple feature. You can delete the beginning or end, or simply shorten the movie or clip.
Step1: Click on “Open File” and select the video or movie to be edited.

Step2: Click here to edit > trim from the menu bar.

Step3: Use a handle on both sides to resist the part of the film that you want to trim. The rest of the film will remain yellow. Everything except yellow will be removed.

Step4: When you have done, click on “Trim”.

2. Split Video With QuickTime Player on Mac
You can easily split your movie into separate clips if you want to. Then, if desired, you can modify these clips.
To split your movie into clips, use one of these methods.
Step1: Click the Play button to jump to the part of the clip where you want to split, and then pause it.
Step2: Move the playhead where you want to split the position, then select Edit > Split Clip.
Step3: If you want to make more splits, drag the playhead to the location where you want to split, and then perform step 2 again.
3. Rotate Video with QuickTime Player on Mac
You can easily rotate video clips with QuickTime Player. Just follow these steps:
Step1: Open the movie or clip in the QuickTime Player app on your Mac.
Step2: Select the clip by going to View > Show Clips.
Step3: Choose to rotate the clip left or right, or flip it horizontally or vertically, from the Edit menu.
Step4: When you’re done, click Done.
Part2: Edit Video with Wondershare Filmora for Mac
Filmora for Mac is an easy-to-use video editor. Wondershare Filmora Mac version has powerful functions and rich functions. Using Wondershare Filmora Mac software, you can make high-quality videos. By using Filmora you will easily Create professional-like movies from video files, audio files, and photo files with transitions, effects and titles.
You can easily trim and adjust your video clip with Filmora. Once you’ve got a clip added to your timeline, it’s easy to adjust it. Filmora makes it very easy to change the speed of the video. Simply double-click on the video in your timeline to access the Speed option. Now, move your cursor to the right to speed up the video, or to the left to slow it down.
Filmora supports almost all popular video formats as well as audio and video formats. It also includes support for 4K video and GIF files. In addition, Filmora allows you to import photos and clips from social networks such as Facebook.
Wondershare Filmora is also equipped with many advanced editing tools. Keyframe animation feature that lets you add custom animations that combine with settings to improve visual interaction and overall aesthetics.
Motion tracking function that allows you to capture the movement of a specific moving person or object in the frame and add captions, effects, text, etc., edit, crop and merge video footage.
Video stabilization to help correct image distortion due to camera shake, and pan and zoom objects for added effect. Colour correction function for video recording. It can be applied to multiple clips at the same time.


Is Wondershare Filmora Worth for Trying?
As we mentioned above, Wondershare Filmora is an elegant, full-featured video editing software that includes a variety of basic and advanced video editing tools. It has an easy-to-use interface that allows you to easily add effects, transitions, and edit your videos. You can use it to create random videos or professional videos using the software. So yes, this video editing software is for everyone. Well, you should try the free version and you won’t regret.
Ollie Mattison
Ollie Mattison is a writer and a lover of all things video.
Follow @Ollie Mattison
Ollie Mattison
Jan 23, 2024• Proven solutions
There is no doubt that one of the most underrated components of the consumer Mac software that comes built into every Mac is Apple’s QuickTime Player. The reason for this, of course, is that QuickTime, in addition to being a simple video player that edits mp4 Mac, also allows users to do some basic video trimming. This can come in handy for average users, especially when you consider how expensive, bloated, and complex video editing software can be. In this article, we will show you that how QuickTime edit videos on Mac.
Part1: Quicktime is More Than a Player
QuickTime Player is a simple yet powerful video editing program available for Mac. It includes features for casual video editors and professionals alike, so whatever your reason for looking for good edit mp4 Mac software, QuickTime Player has to cover you.
The QuickTime player was originally designed to play almost all types of multimedia files, but it has since been expanded to include a number of functions. For example, you can use it to quickly trim a video or record screen content for use in a tutorial or as a helpful example when troubleshooting. Follow these steps to edit a movie with QuickTime edit video Player for Mac.
Main features of QuickTime Player for Mac
- Support key media formats, such as MOV, MPEG, MP3, 3GPP, etc.
- Provide QuickTime Web plug-in together with the player.
- Play online streaming content vial URL.
- Edit video files, such as trimming and splitting.
- Control subtitles, languages and more options.
- Includes picture viewers for JPEG, BMP and PNG.
1. Trim Video With QuickTime Player on Mac
Trimming Videos in QuickTime video player is another simple feature. You can delete the beginning or end, or simply shorten the movie or clip.
Step1: Click on “Open File” and select the video or movie to be edited.
Step2: Click here to edit > trim from the menu bar.
Step3: Use a handle on both sides to resist the part of the film that you want to trim. The rest of the film will remain yellow. Everything except yellow will be removed.
Step4: When you have done, click on “Trim”.
2. Split Video With QuickTime Player on Mac
You can easily split your movie into separate clips if you want to. Then, if desired, you can modify these clips.
To split your movie into clips, use one of these methods.
Step1: Click the Play button to jump to the part of the clip where you want to split, and then pause it.
Step2: Move the playhead where you want to split the position, then select Edit > Split Clip.
Step3: If you want to make more splits, drag the playhead to the location where you want to split, and then perform step 2 again.
3. Rotate Video with QuickTime Player on Mac
You can easily rotate video clips with QuickTime Player. Just follow these steps:
Step1: Open the movie or clip in the QuickTime Player app on your Mac.
Step2: Select the clip by going to View > Show Clips.
Step3: Choose to rotate the clip left or right, or flip it horizontally or vertically, from the Edit menu.
Step4: When you’re done, click Done.
Part2: Edit Video with Wondershare Filmora for Mac
Filmora for Mac is an easy-to-use video editor. Wondershare Filmora Mac version has powerful functions and rich functions. Using Wondershare Filmora Mac software, you can make high-quality videos. By using Filmora you will easily Create professional-like movies from video files, audio files, and photo files with transitions, effects and titles.
You can easily trim and adjust your video clip with Filmora. Once you’ve got a clip added to your timeline, it’s easy to adjust it. Filmora makes it very easy to change the speed of the video. Simply double-click on the video in your timeline to access the Speed option. Now, move your cursor to the right to speed up the video, or to the left to slow it down.
Filmora supports almost all popular video formats as well as audio and video formats. It also includes support for 4K video and GIF files. In addition, Filmora allows you to import photos and clips from social networks such as Facebook.
Wondershare Filmora is also equipped with many advanced editing tools. Keyframe animation feature that lets you add custom animations that combine with settings to improve visual interaction and overall aesthetics.
Motion tracking function that allows you to capture the movement of a specific moving person or object in the frame and add captions, effects, text, etc., edit, crop and merge video footage.
Video stabilization to help correct image distortion due to camera shake, and pan and zoom objects for added effect. Colour correction function for video recording. It can be applied to multiple clips at the same time.
Is Wondershare Filmora Worth for Trying?
As we mentioned above, Wondershare Filmora is an elegant, full-featured video editing software that includes a variety of basic and advanced video editing tools. It has an easy-to-use interface that allows you to easily add effects, transitions, and edit your videos. You can use it to create random videos or professional videos using the software. So yes, this video editing software is for everyone. Well, you should try the free version and you won’t regret.
Ollie Mattison
Ollie Mattison is a writer and a lover of all things video.
Follow @Ollie Mattison
Best Websites to Download Public Domain Videos
Best Websites to Download Public Domain Videos

Liza Brown
Mar 27, 2024• Proven solutions
In historic terms, cinema is still a relatively new art, and yet the amount of footage that has been filmed since the Lumière brothers released their first film is staggering. Capturing unique materials that were never seen by the world before has become the question of prestige among the filmmakers. Nonetheless, certain genres of film are almost entirely dependent on the public domain footage. Documentaries about historic events, space or any other topic that is impossible to stage rely on the videos that entered the public domain for one reason or the other. That’s why in this article, we are going to take you through some of the best websites that let you download public domain videos.
What is Public Domain Video?
Any video that is not subject to copyright can be considered a public domain video. This means that anyone can use this footage for free without having to ask for permission to do so. Videos can enter the public domain under the following circumstances:
- If the footage was produced by a government because governments are obligated by the law to offer the footage to the public domain.
- In case the author of the footage has forfeited his or her copyrights and dedicated the footage to the public domain
- A film or any other work of art becomes public domain 70 years after the death of the copyright holder. The expiration date of the copyrights is not the same in all the countries around the world, which is why you must make sure that the video you want to use is, in fact, a public domain video.
In addition, you should avoid using the footage that contains art or music that can be described as third-party intellectual property because you may unintentionally infringe copyrights.
Best Online Websites Where You Can Download Public Domain Videos
Finding free public domain footage or public movies on the Internet has never been too difficult, as you can watch thousands of public domain movies on YouTube, but you cannot download them. Over the course of the last couple of decades, the websites where you can download public domain footage have grown in number, which makes it somewhat easier to find the video clips you can use in your projects for free. Here are some of the best online destinations where you can download public domain videos.
1. Prelinger Archive

With more than 17,000 items in the collection, the Prelinger Archive is probably one of the largest public domain video libraries on the Internet. The archive was founded in 1983 by Rick Prelinger, but by 2002 it became a part of the Library of Congress Motion Picture Broadcasting and Recorded Sound Divison’s collection. You can download public domain video clips created by educational institutions, advertising companies, trade associations or corporations from this impressive collection. There are different download options available for each file, so you can choose the size of a file and the method you’re going to use to download a file to your computer.
2. The Public Domain Review

This is an excellent resource for researchers looking for essays, books, audio recordings, images or old films. The movies are divided into different categories such as Animals&Beasts, Politics, War or Sports which makes locating and downloading public domain videos faster and easier. The Public Domain Review offers footage that is available within different public domain licenses, so you must make sure that the film you want to download can be used for the purpose you have in mind. The vast majority of the films in this archive are from the last decade of the 19th and the first half of the 20th century. That’s why The Public Domain Review’s selection of films can only be useful if you are researching a topic from that era.
3. The National Screening Room

The National Screening Room is a project created by the Library of Congress National Audio-Visual Conservation Center with the aim of making the videos from their collection available to the viewers around the world. The vast majority of the videos in the collection were filmed during the 20th century, but there are only a few videos available that are produced outside of the United States. The National Screening Room can be a valuable asset if you are looking for videos you can use for educational or research videos that cover topics that range from the development of the arms industry to the daily life of great American inventors.
4. Pond5’s Public Domain Project

Industry professionals don’t need an introduction to the Pond5 platform, because it is probably the largest online marketplace for royalty-free media at the moment. Their Public Domain Project contains a thousand public videos that can be downloaded for free, but the duration of these videos is limited to just two minutes To make things worse, most of these public domain videos don’t have audio, so you can only use them if you already have a soundtrack for the video you’re making. The platform offers powerful search tools that enable you to look for videos based on different parameters. You can download public domain videos in HD resolution, but you must create an account on Pond5 before you can save them to your computer.
5. Pexels

Free public domain stock footage can be used on different types of projects, and it is usually a great choice if you’re looking for some extra shots that will make a scene in your video more cinematic. Pexels offers an impressive collection of free public domain stock videos, so you just have to insert a search term and pick a video clip that best fits your needs. The duration of the free videos you can find on Pexels rarely exceeds thirty seconds, which makes it difficult to make an entire video exclusively from free public domain stock footage. Hence it is better to use Pexels as a complementary source of shots in case you can’t go back to the filming location.
6. Vidsplay
All video clips you can find on this platform are free, so you just have to select one of the categories and start browsing through the available public domain stock footage. The only condition to use the stock footage on private or commercial projects for free is to credit the Vidsplay platform in the end credits, on the website or in the description of the videos you upload to your social media channels. All stock videos on Vidsplay are available in HD or 4K resolution, and you simply have to click on the Download button below a particular video to save it.
7. The Moving Image Archive
This is yet another archive of public domain videos you can find on the Arhive.org that features countless collections of texts, images, and videos. Within the Moving Image Archive, you can find different collections that contain full feature movies, art videos, animations, cartoons or television footage. The public domain videos hosted on The Moving Image Archive cover a broad range of topics, but some of them can be in poor resolution. The Moving Image Archive can be an excellent source of footage for anyone who wants to download public domain video clips and use them in their commercial or non-commercial projects.
8. PublicDomainFootage
BBC, National Geographics or NBC are just a few among many famous television networks that use the services of PublicDomainFootage. All content on the platform is divided into Archival Footage and Historic Newsreels sections that contain categories like Atomic Age, Civil Rights or Pop Culture. You can also use PublicDomainFootage to research a particular topic and request content that is not uploaded to the website. You can download a public domain video after you pay a one time fee that enables you to use that video as many times as you want. The platform’s YouTube channel provides an easy way of searching for public domain videos you are going to use in your next documentary film.
9. NASA’s Video Gallery
Space exploration is undoubtedly one of the hottest topics of our era, so if you are looking for some space public domain videos NASA’s website is the best place to start. Like all other government institutions, NASA is obligated by the law to offer all images and videos to the public domain. This means that all content you download from their website is free to use. Simply insert the search term and browse the results until you find the video clip you want to save to your computer. However, most public domain videos you can download from NASA’s website last only a couple of minutes.
10. Motion Elements
The collection of free public domain stock footage, this website offers contains more than 4,000 clips. Categories like Cityscape, Animals or Water contain hundreds of stock videos, so you just have to open one of the available categories and locate the video clip you want to download. However, you must first create an account on Motion Elements before you can save video files to your computer. In addition, the platform doesn’t allow you to make more than five downloads per week and you must invite your friends to join the platform if you want to increase the weekly number of downloads. Even so, Motion Elements is a great source of stock footage you can use without any restrictions.
Is It Okay to Use Public Domain Videos for Commercial Purposes?
All public domain videos can be used for both commercial and non-commercial projects, but you must approach using public domain videos for commercial purposes with caution. Crediting the author or providing the source from which you acquired the footage will reduce the likelihood of legal complications. The public domain videos that feature famous actors or third party intellectual property can also be a subject of legal disputes, which is why it is better to avoid using them on commercial projects.
What Should You Do If You Can’t Find Public Domain Footage for Your Project?
Opting for videos that are protected by the Creative Commons licenses is probably the safest option if you’re struggling to find the public domain footage you’d like to use in your project. Respecting the terms of the license under which a video is protected is of utmost importance, since failing to properly credit the author of the video, for instance, can have legal consequences. There are several different types of Creative Commons licenses and you must find out which one covers the video you’d like to use, before publishing your video. You can find more information about Creative Commons licenses at the FAQ .
Conclusion
Public domain videos cover very different topics, which means that the nature of your project determines the source from which you’ll acquire the footage. If you are researching the early days of cinema, then you’ll have no trouble downloading the public domain videos, but if the topic you’re exploring is more contemporary, finding the content you can use without any restrictions can prove to be troublesome. Which website do you like to use the most to download public domain videos? Leave a comment and share your opinions with us.
Liza Brown
Liza Brown is a writer and a lover of all things video.
Follow @Liza Brown
Liza Brown
Mar 27, 2024• Proven solutions
In historic terms, cinema is still a relatively new art, and yet the amount of footage that has been filmed since the Lumière brothers released their first film is staggering. Capturing unique materials that were never seen by the world before has become the question of prestige among the filmmakers. Nonetheless, certain genres of film are almost entirely dependent on the public domain footage. Documentaries about historic events, space or any other topic that is impossible to stage rely on the videos that entered the public domain for one reason or the other. That’s why in this article, we are going to take you through some of the best websites that let you download public domain videos.
What is Public Domain Video?
Any video that is not subject to copyright can be considered a public domain video. This means that anyone can use this footage for free without having to ask for permission to do so. Videos can enter the public domain under the following circumstances:
- If the footage was produced by a government because governments are obligated by the law to offer the footage to the public domain.
- In case the author of the footage has forfeited his or her copyrights and dedicated the footage to the public domain
- A film or any other work of art becomes public domain 70 years after the death of the copyright holder. The expiration date of the copyrights is not the same in all the countries around the world, which is why you must make sure that the video you want to use is, in fact, a public domain video.
In addition, you should avoid using the footage that contains art or music that can be described as third-party intellectual property because you may unintentionally infringe copyrights.
Best Online Websites Where You Can Download Public Domain Videos
Finding free public domain footage or public movies on the Internet has never been too difficult, as you can watch thousands of public domain movies on YouTube, but you cannot download them. Over the course of the last couple of decades, the websites where you can download public domain footage have grown in number, which makes it somewhat easier to find the video clips you can use in your projects for free. Here are some of the best online destinations where you can download public domain videos.
1. Prelinger Archive
With more than 17,000 items in the collection, the Prelinger Archive is probably one of the largest public domain video libraries on the Internet. The archive was founded in 1983 by Rick Prelinger, but by 2002 it became a part of the Library of Congress Motion Picture Broadcasting and Recorded Sound Divison’s collection. You can download public domain video clips created by educational institutions, advertising companies, trade associations or corporations from this impressive collection. There are different download options available for each file, so you can choose the size of a file and the method you’re going to use to download a file to your computer.
2. The Public Domain Review
This is an excellent resource for researchers looking for essays, books, audio recordings, images or old films. The movies are divided into different categories such as Animals&Beasts, Politics, War or Sports which makes locating and downloading public domain videos faster and easier. The Public Domain Review offers footage that is available within different public domain licenses, so you must make sure that the film you want to download can be used for the purpose you have in mind. The vast majority of the films in this archive are from the last decade of the 19th and the first half of the 20th century. That’s why The Public Domain Review’s selection of films can only be useful if you are researching a topic from that era.
3. The National Screening Room
The National Screening Room is a project created by the Library of Congress National Audio-Visual Conservation Center with the aim of making the videos from their collection available to the viewers around the world. The vast majority of the videos in the collection were filmed during the 20th century, but there are only a few videos available that are produced outside of the United States. The National Screening Room can be a valuable asset if you are looking for videos you can use for educational or research videos that cover topics that range from the development of the arms industry to the daily life of great American inventors.
4. Pond5’s Public Domain Project
Industry professionals don’t need an introduction to the Pond5 platform, because it is probably the largest online marketplace for royalty-free media at the moment. Their Public Domain Project contains a thousand public videos that can be downloaded for free, but the duration of these videos is limited to just two minutes To make things worse, most of these public domain videos don’t have audio, so you can only use them if you already have a soundtrack for the video you’re making. The platform offers powerful search tools that enable you to look for videos based on different parameters. You can download public domain videos in HD resolution, but you must create an account on Pond5 before you can save them to your computer.
5. Pexels
Free public domain stock footage can be used on different types of projects, and it is usually a great choice if you’re looking for some extra shots that will make a scene in your video more cinematic. Pexels offers an impressive collection of free public domain stock videos, so you just have to insert a search term and pick a video clip that best fits your needs. The duration of the free videos you can find on Pexels rarely exceeds thirty seconds, which makes it difficult to make an entire video exclusively from free public domain stock footage. Hence it is better to use Pexels as a complementary source of shots in case you can’t go back to the filming location.
6. Vidsplay
All video clips you can find on this platform are free, so you just have to select one of the categories and start browsing through the available public domain stock footage. The only condition to use the stock footage on private or commercial projects for free is to credit the Vidsplay platform in the end credits, on the website or in the description of the videos you upload to your social media channels. All stock videos on Vidsplay are available in HD or 4K resolution, and you simply have to click on the Download button below a particular video to save it.
7. The Moving Image Archive
This is yet another archive of public domain videos you can find on the Arhive.org that features countless collections of texts, images, and videos. Within the Moving Image Archive, you can find different collections that contain full feature movies, art videos, animations, cartoons or television footage. The public domain videos hosted on The Moving Image Archive cover a broad range of topics, but some of them can be in poor resolution. The Moving Image Archive can be an excellent source of footage for anyone who wants to download public domain video clips and use them in their commercial or non-commercial projects.
8. PublicDomainFootage
BBC, National Geographics or NBC are just a few among many famous television networks that use the services of PublicDomainFootage. All content on the platform is divided into Archival Footage and Historic Newsreels sections that contain categories like Atomic Age, Civil Rights or Pop Culture. You can also use PublicDomainFootage to research a particular topic and request content that is not uploaded to the website. You can download a public domain video after you pay a one time fee that enables you to use that video as many times as you want. The platform’s YouTube channel provides an easy way of searching for public domain videos you are going to use in your next documentary film.
9. NASA’s Video Gallery
Space exploration is undoubtedly one of the hottest topics of our era, so if you are looking for some space public domain videos NASA’s website is the best place to start. Like all other government institutions, NASA is obligated by the law to offer all images and videos to the public domain. This means that all content you download from their website is free to use. Simply insert the search term and browse the results until you find the video clip you want to save to your computer. However, most public domain videos you can download from NASA’s website last only a couple of minutes.
10. Motion Elements
The collection of free public domain stock footage, this website offers contains more than 4,000 clips. Categories like Cityscape, Animals or Water contain hundreds of stock videos, so you just have to open one of the available categories and locate the video clip you want to download. However, you must first create an account on Motion Elements before you can save video files to your computer. In addition, the platform doesn’t allow you to make more than five downloads per week and you must invite your friends to join the platform if you want to increase the weekly number of downloads. Even so, Motion Elements is a great source of stock footage you can use without any restrictions.
Is It Okay to Use Public Domain Videos for Commercial Purposes?
All public domain videos can be used for both commercial and non-commercial projects, but you must approach using public domain videos for commercial purposes with caution. Crediting the author or providing the source from which you acquired the footage will reduce the likelihood of legal complications. The public domain videos that feature famous actors or third party intellectual property can also be a subject of legal disputes, which is why it is better to avoid using them on commercial projects.
What Should You Do If You Can’t Find Public Domain Footage for Your Project?
Opting for videos that are protected by the Creative Commons licenses is probably the safest option if you’re struggling to find the public domain footage you’d like to use in your project. Respecting the terms of the license under which a video is protected is of utmost importance, since failing to properly credit the author of the video, for instance, can have legal consequences. There are several different types of Creative Commons licenses and you must find out which one covers the video you’d like to use, before publishing your video. You can find more information about Creative Commons licenses at the FAQ .
Conclusion
Public domain videos cover very different topics, which means that the nature of your project determines the source from which you’ll acquire the footage. If you are researching the early days of cinema, then you’ll have no trouble downloading the public domain videos, but if the topic you’re exploring is more contemporary, finding the content you can use without any restrictions can prove to be troublesome. Which website do you like to use the most to download public domain videos? Leave a comment and share your opinions with us.
Liza Brown
Liza Brown is a writer and a lover of all things video.
Follow @Liza Brown
Also read:
- New Best Video Stabilizer Apps iPhone and Android
- The 5 Most Popular Hand-Drawn Whiteboard Animation Creators for 2024
- Updated Motion Blur Magic A Step-by-Step Guide for FCP Users for 2024
- New Top Video Smoothening Tools for Mobile for 2024
- New 2024 Approved Major Update Alert Filmora X Now Compatible with ARM Processors
- Updated 2024 Approved Erasing Identity The Most Effective Face Blur Video Editing Software
- New In 2024, Fast Track Your Videos How to Increase Playback Speed in QuickTime
- Elevate Your Soundtrack 2 Audio Fade Techniques in Final Cut Pro
- New 2024 Approved Get Animated Best Mobile Apps for Creating Cartoon-Like Images
- New 2024 Approved The Best of the Best Top 10 Mobile Video Editing Apps for iPhone and Android
- Updated S Hottest 2D Animation Software Reviews and Comparisons
- This Article Points Out the Key Differences Between After Effects and Premiere to Get a Clearer Understanding of What Is Best
- Updated In 2024, FCP Voice Over Essentials A Beginners Guide to Success
- Windows Video Editor Top iMovie Alternatives for PC
- In 2024, Top Video Highlight Creators Desktop and Mobile Options
- Beyond the Box The Creative Possibilities of YouTube Aspect Ratios
- Updated 2024 Approved Chromebooks Best Kept Secret Free Video Editing Software
- New 2024 Approved Calculate Aspect Ratios Like a Pro Best Online Tools
- New 2024 Approved Best Online Video Reversers
- New Text Motion Tracking Expert-Approved Software
- New Sound Effects on a Budget Finding and Adding Free Resources in Final Cut Pro
- Updated In 2024, How to Convert Digital Videos Into Cartoons?
- The Best Free Online Movie Making Platforms for 2024
- Updated In 2024, From Zero to Hero Top Gaming Intro Software for Windows and Mac Free & Paid
- Updated Windows Movie Maker Download Tutorial From Installation to Video Editing Mastery for 2024
- Updated In 2024, Best of the Best 5 Free AVI Video Rotation Tools
- Updated Sync Up! The Best Lip Sync Video Maker Apps
- In 2024, The Ultimate Guide to Video Collage Apps for iPhone and iPad
- Updated Best Free Online Video Cutters Top Picks and Reviews
- In 2024, Top WhatsApp Status Video Editing Apps Free & Premium
- Edit MP4 Files with Ease Best Windows 8 Video Editor for 2024
- New 2024 Approved Premiere Pro System Essentials What You Need to Know Before You Start
- Top-Rated Free Video Editing Tools for MP4 Files for 2024
- Elevate Your Game The 10 Best Online Intro Makers for Gamers for 2024
- Best Neon Sign Makers Online Top Picks for DIY Designers
- Updated Why This Mp3 Converter Windows Tutorial Stands Out From the Rest for 2024
- Updated FCPX Hacks and Workarounds Expert Advice for Smooth Editing
- New Get the Best Free 3GP Video Rotator for Your Needs Top Recommendations for 2024
- Updated In 2024, Dont Get Lost in Conversion MP3 to MP4 Best Practices
- 2024 Approved Top-Rated Video Editing Programs for Windows 10/11
- Updated In 2024, Best Free Video Cutting Software for MP4 Files
- New In 2024, High-Definition Heroes The Best 4K/8K Video Editing Software
- Updated Best AVI Video Trimmers Cut and Edit AVI Files on Any Device for 2024
- Updated The Ultimate Guide to Free 4K Video Editing Software
- Updated 2024 Approved Revolutionize Your Video Editing Top Free 4K Editors
- New Make a Lasting Impression How to Design Custom LinkedIn Video Thumbnails
- New Green Screen on a Mac Top Software Options Explored
- Updated From Still to Stunning How to Achieve the Ken Burns Effect for 2024
- Updated M4R Conversion Basics A Beginners Checklist for 2024
- Hassle-Free Ways to Remove FRP Lock on Nokia C110with/without a PC
- In 2024, How to use Pokemon Go Joystick on Vivo Y200e 5G? | Dr.fone
- In 2024, 6 Methods to Mirror Apple iPhone SE to your Windows PC | Dr.fone
- The Complete Guide to Lava Agni 2 5G FRP Bypass Everything You Need to Know
- In 2024, For People Wanting to Mock GPS on Oppo A79 5G Devices | Dr.fone
- In 2024, How to Change/Fake Your Samsung Galaxy A05s Location on Viber | Dr.fone
- Updated In 2024, Best Adobe Premiere Pro Extensions for Video Editing - Free & Paid
- List of Pokémon Go Joysticks On Honor X50i+ | Dr.fone
- 11 Best Location Changers for Lava Agni 2 5G | Dr.fone
- Updated Gimp Green Screen for 2024
- Video Fixer Software for all Corrupt Videos of Galaxy S24 Ultra
- Title: Updated 2024 Approved AVI Video Trimming Made Easy Top 16 Tools for Every Device
- Author: Charlotte
- Created at : 2024-04-29 06:32:08
- Updated at : 2024-04-30 06:32:08
- Link: https://smart-video-creator.techidaily.com/updated-2024-approved-avi-video-trimming-made-easy-top-16-tools-for-every-device/
- License: This work is licensed under CC BY-NC-SA 4.0.
