
:max_bytes(150000):strip_icc():format(webp)/GettyImages-1369568023-c596ac8d6b5a4f3682bda2fa0feb12bd.jpg)
Updated 2024 Approved Countdown in Minutes A 3-Part Guide to FCPX Timers
Countdown in Minutes: A 3-Part Guide to FCPX Timers
How to add a countdown timer in Final Cut Pro X?

Liza Brown
Mar 27, 2024• Proven solutions
The countdown timer runs simultaneously as you play the videos. It counts the duration of the videos. In the FCPX, you can insert the timers effortlessly. There are built-in options to satisfy the requirements. In the Final Cut Pro X app, you can find surplus plugins to meet your needs. Associated property window assists you to make the desired edits in no time. Customize the controls and retune their functionalities as per the needs. In this article, you will learn the usage of the timer in the videos and the procedure to include on in your video in the FCPX environment. You can also address facts related to the paid and free versions of plugin timers to add value to your video clips. A complete guide on how to add countdown timers in your video clips is available in this article. Surf the below content and get enlightening facts about it. An in-depth knowledge guides you to optimize the timer functionalities on your videos.
Part 1: Why a countdown timer is needed and when to clip one in?
Most of you must be wondering what is the sole purpose of the countdown timers on your videos. You would have come across many plugins in the FCPX environment. What is more special about this control? Does it provide you with any comforts on your video clips?

The Countdown timers add a feel of urgency to viewers. It starts to count the activities and excited the audience. It also defines the time required to complete a process running on the screen. Based on the video clippings, you can modify the countdown timers using the built-in functionalities. The countdown timers push the customers to make a purchase and thereby boost up the product sales. If you create a video for promoting your business products, then do not forget to include the countdown timers to highlight your product. It reveals to the audience about the new entry of fabulous goods in the digital space. In general, the timers trigger a feeling of excitement and persuades the audience in no time.
You can find the application of countdown timers on various platforms like
- Email Marketing
- Product Page
- Checkout page
- Website pages
- On landing pages
The code word for Timer is ‘Less is more. The lesser value of the timer creates more reaction from the audience’s perspective. Insert the timers for honest reasons while informing about the last sales during the festive seasons. When your customers witness only two products are available in the inventory with the timer running, surely it will excite them to make a purchase.
Use the timers on the videos for a purpose and place them rightly to capture the attention of the viewers. Go for a simple design and do not complex it by inserting more animations. You can pin the timers on the videos, websites to boost up your business sales rate.
Part 2: Step by step countdown timer adding tutorial
In this section, you will learn about the insights on adding timers to the videos using the Final Cut Pro X application. The procedure is simple and you can tap the appropriate clicks to establish the desired outcomes. The countdown timer is available as a plugin from various external sources. There are customizable options to personalize the timer as per your needs.
Step 1 In the FCPX application, go to the ‘Title’ option and add the Pixel Studio timers according to your requirement.

Step 2 Use the customizing icons to personalize the timers. The first icon on the top right helps you to find a better position for timers. Next icon, assist to rotate the timer to any angle. Finally, the last one performs the zoom in and zoom out an operation on the countdown timers.

Step 3 You can work on the Properties Window at the right side of the screen, to make necessary changes to the countdown timers.
Vary the timer’s positions to insert animations, blur them, focus out.
In the Timer control attributes, you can find options to enter the start and stop times according to your needs.
You can flawlessly format the countdown timers using this property window.

Now, you can insert the timer on your project using the FCPX in no time. Simple drag and drop actions are sufficient to complete the entire process.
Part 3: Free and paid countdown timer plugins recommendation
If you take a closer look at the digital space, you can find a wide range of free and paid collections of timer plugins to support the FCPX platform. You can download the perfect one that matches your requirements and upload it to your FCPX project in no time. Create your plugins and personalize them.
Pixel Film Studio – Paid version of Timers
The Pixel Film Studio website offers nearly 400 customizable timer plugin designs for your project. It is the best store to fulfil your FCPX needs. All the elements available in this environment have price tags and you must pay for them before the download action. You can also find Pomodoro timers combining the activities of timers and countdown. It has a circular design with break periods.
There are options to customize the appearance of the timer. This paid version plugin offers an incredible timer design with fully customizable options. It has an extremely creative design with 850 presets. Jaw-dropping animations overwhelm the viewers at the first sight. The countdown timers from Pixel Film Studio are stylish and trendy.
![]()
Time Pop- Free version of timers
There are 28 templates available for free to use. The first 3 timer plugin with a fully customizable option assist the editors to add them to your videos effectively. The remaining 25 templates carry a watermark when you insert them into your media files. It is a special platform to download the desired countdown timer design for your needs. The Time Pop supports the comfortable usage of the FCPX app to edit the videos professionally. If you want to use the plugins without watermarks and are fully customizable, then you must purchase them. Three timer designs are available for demo purposes and you can use them.
The collections are unique with this Time Pop templates and you can customize them precisely without any issues. Three templates are provided as a trial to get the feel of Time pop timers on your videos and triggers you to get back to this platform looking for more countdown timers for your needs. The animation attributes offer an incredible movement of the timers on the screen.

Motion Array – Paid version
In the Motion Array platform, you can find mind-blowing timer designs to suit the theme of your videos. There are egg timers to fit well with your cooking video and stopwatch timers to add value to your sports videos. Based on your needs, you can customize the timer templates effectively. The timers are available with eye-catchy designs and bright colors. Download the template and insert them on your videos using the FCPX platform.
The Motion Array environment supplies incredible plugins to support the FCPX needs without any compromises. When you step into the official webpage of Motion array, you will encounter immense collections of timers with impressive unique styles. You can tap the download button below the timer template to store it in your system for future use. The templates available in this environment is compatible with the FCPX platform and you can embed these timers on your videos effortlessly.

BretFX Clock Maker – Paid Version
An effective plugin for FCPX comes with a price tag. You can create a timer plugin based on your needs with animation effects and insert them on your videos using the FCPX ambience. This application embeds excellent animations on the timer plugins with the reverse feature. For a specific duration, the animation in the timer works in the reverse to excite the users. It allows the users to work with the font size to maintain consistency on your videos. The plugins have great compatibility with the FCPX environment and you can make a flawless download in no time.

The above-discussed plugins had given you a better idea of the available resource at the online space to make a quick insertion of the desired timer on your videos at the FCPX platform. They are reliable and you can visit its official website to enjoy a flawless download.
Conclusion
Thus, you had an enlightening discussion on the tips and tricks associated with the countdown timer plugins. Add the timers conveniently on the videos using the FCPX quickly. The above discussed stepwise instructions will help you to insert the timers perfectly on the videos.
The customizable options enhance the overall appearance of the timers. Use the external plugins and make the right download that satisfies your needs. Design your timers creatively and persuade the viewers quickly. Connect with this article to learn more about the amazing facts on the video edits using the Final Cut Pro X application.
Liza Brown
Liza Brown is a writer and a lover of all things video.
Follow @Liza Brown
Liza Brown
Mar 27, 2024• Proven solutions
The countdown timer runs simultaneously as you play the videos. It counts the duration of the videos. In the FCPX, you can insert the timers effortlessly. There are built-in options to satisfy the requirements. In the Final Cut Pro X app, you can find surplus plugins to meet your needs. Associated property window assists you to make the desired edits in no time. Customize the controls and retune their functionalities as per the needs. In this article, you will learn the usage of the timer in the videos and the procedure to include on in your video in the FCPX environment. You can also address facts related to the paid and free versions of plugin timers to add value to your video clips. A complete guide on how to add countdown timers in your video clips is available in this article. Surf the below content and get enlightening facts about it. An in-depth knowledge guides you to optimize the timer functionalities on your videos.
Part 1: Why a countdown timer is needed and when to clip one in?
Most of you must be wondering what is the sole purpose of the countdown timers on your videos. You would have come across many plugins in the FCPX environment. What is more special about this control? Does it provide you with any comforts on your video clips?
The Countdown timers add a feel of urgency to viewers. It starts to count the activities and excited the audience. It also defines the time required to complete a process running on the screen. Based on the video clippings, you can modify the countdown timers using the built-in functionalities. The countdown timers push the customers to make a purchase and thereby boost up the product sales. If you create a video for promoting your business products, then do not forget to include the countdown timers to highlight your product. It reveals to the audience about the new entry of fabulous goods in the digital space. In general, the timers trigger a feeling of excitement and persuades the audience in no time.
You can find the application of countdown timers on various platforms like
- Email Marketing
- Product Page
- Checkout page
- Website pages
- On landing pages
The code word for Timer is ‘Less is more. The lesser value of the timer creates more reaction from the audience’s perspective. Insert the timers for honest reasons while informing about the last sales during the festive seasons. When your customers witness only two products are available in the inventory with the timer running, surely it will excite them to make a purchase.
Use the timers on the videos for a purpose and place them rightly to capture the attention of the viewers. Go for a simple design and do not complex it by inserting more animations. You can pin the timers on the videos, websites to boost up your business sales rate.
Part 2: Step by step countdown timer adding tutorial
In this section, you will learn about the insights on adding timers to the videos using the Final Cut Pro X application. The procedure is simple and you can tap the appropriate clicks to establish the desired outcomes. The countdown timer is available as a plugin from various external sources. There are customizable options to personalize the timer as per your needs.
Step 1 In the FCPX application, go to the ‘Title’ option and add the Pixel Studio timers according to your requirement.
Step 2 Use the customizing icons to personalize the timers. The first icon on the top right helps you to find a better position for timers. Next icon, assist to rotate the timer to any angle. Finally, the last one performs the zoom in and zoom out an operation on the countdown timers.
Step 3 You can work on the Properties Window at the right side of the screen, to make necessary changes to the countdown timers.
Vary the timer’s positions to insert animations, blur them, focus out.
In the Timer control attributes, you can find options to enter the start and stop times according to your needs.
You can flawlessly format the countdown timers using this property window.
Now, you can insert the timer on your project using the FCPX in no time. Simple drag and drop actions are sufficient to complete the entire process.
Part 3: Free and paid countdown timer plugins recommendation
If you take a closer look at the digital space, you can find a wide range of free and paid collections of timer plugins to support the FCPX platform. You can download the perfect one that matches your requirements and upload it to your FCPX project in no time. Create your plugins and personalize them.
Pixel Film Studio – Paid version of Timers
The Pixel Film Studio website offers nearly 400 customizable timer plugin designs for your project. It is the best store to fulfil your FCPX needs. All the elements available in this environment have price tags and you must pay for them before the download action. You can also find Pomodoro timers combining the activities of timers and countdown. It has a circular design with break periods.
There are options to customize the appearance of the timer. This paid version plugin offers an incredible timer design with fully customizable options. It has an extremely creative design with 850 presets. Jaw-dropping animations overwhelm the viewers at the first sight. The countdown timers from Pixel Film Studio are stylish and trendy.
![]()
Time Pop- Free version of timers
There are 28 templates available for free to use. The first 3 timer plugin with a fully customizable option assist the editors to add them to your videos effectively. The remaining 25 templates carry a watermark when you insert them into your media files. It is a special platform to download the desired countdown timer design for your needs. The Time Pop supports the comfortable usage of the FCPX app to edit the videos professionally. If you want to use the plugins without watermarks and are fully customizable, then you must purchase them. Three timer designs are available for demo purposes and you can use them.
The collections are unique with this Time Pop templates and you can customize them precisely without any issues. Three templates are provided as a trial to get the feel of Time pop timers on your videos and triggers you to get back to this platform looking for more countdown timers for your needs. The animation attributes offer an incredible movement of the timers on the screen.
Motion Array – Paid version
In the Motion Array platform, you can find mind-blowing timer designs to suit the theme of your videos. There are egg timers to fit well with your cooking video and stopwatch timers to add value to your sports videos. Based on your needs, you can customize the timer templates effectively. The timers are available with eye-catchy designs and bright colors. Download the template and insert them on your videos using the FCPX platform.
The Motion Array environment supplies incredible plugins to support the FCPX needs without any compromises. When you step into the official webpage of Motion array, you will encounter immense collections of timers with impressive unique styles. You can tap the download button below the timer template to store it in your system for future use. The templates available in this environment is compatible with the FCPX platform and you can embed these timers on your videos effortlessly.
BretFX Clock Maker – Paid Version
An effective plugin for FCPX comes with a price tag. You can create a timer plugin based on your needs with animation effects and insert them on your videos using the FCPX ambience. This application embeds excellent animations on the timer plugins with the reverse feature. For a specific duration, the animation in the timer works in the reverse to excite the users. It allows the users to work with the font size to maintain consistency on your videos. The plugins have great compatibility with the FCPX environment and you can make a flawless download in no time.
The above-discussed plugins had given you a better idea of the available resource at the online space to make a quick insertion of the desired timer on your videos at the FCPX platform. They are reliable and you can visit its official website to enjoy a flawless download.
Conclusion
Thus, you had an enlightening discussion on the tips and tricks associated with the countdown timer plugins. Add the timers conveniently on the videos using the FCPX quickly. The above discussed stepwise instructions will help you to insert the timers perfectly on the videos.
The customizable options enhance the overall appearance of the timers. Use the external plugins and make the right download that satisfies your needs. Design your timers creatively and persuade the viewers quickly. Connect with this article to learn more about the amazing facts on the video edits using the Final Cut Pro X application.
Liza Brown
Liza Brown is a writer and a lover of all things video.
Follow @Liza Brown
How to Stabilize Shaky Videos in After Effects [3 Ways]
Stabilize Shaky Videos After Recording Easily
Wondershare Filmora is one of the most popular video editing software among YouTubers , which provides the video stabilization tool to remove shake from videos within one-click. Download and have a try now.
Video content is becoming increasingly popular; with the proliferation of online content, practically every product now needs its mini-documentary or video clip. Experienced filmmakers and VFX artists used to be the only ones who could get smooth footage. Those days, however, are over.
Adobe After Effects is an excellent tool for smoothing out video footage, in addition to being a great blending and motion animation software; although it’s usually preferable to maintain your film as seamless as possible on location, it’s not the end of the world if you take a seat to edit your video and decide it’s too shaky. In truth, there are several options available to you. In After Effects, there are three options for stabilizing footage. What are they – and how to use After Effects to stabilize footage? Let’s find out!
In this article
01 Stabilize Video with Built-in Warp Stabilizer in AE
02 Stabilize Shaky Video with Track Motion Feature in AE
03 Using Stabilization Plugins for Smoother Video in AE
Part 1: Stabilize Video with Built-in Warp Stabilizer in AE
The Warp Stabilizer effect is a new technique to cope with unsteady video. In this part, I will show you how to apply Warp Stabilizer to a layer, adjust the effect’s essential parameters, and demonstrate how they work briefly.
Step 1: The Warp Stabilizer is the most excellent built-in choice for After Effects. This may be found under the Distort tools section of the Effects & Presets panel. You may also go to the effects tab and look for “Warp“ in the search box.

Step 2: When you’ve identified Warp Stabilizer, you’ll have to add it to the layer you want to stabilize. You may accomplish this in one of three different ways. You may either drag and drop the filter into the chosen layer in the composing window, place it on the desired layer in the timeline, or double-tap on the effect while selecting your choice footage layer.

Step 3: Once you apply the warp stabilizer, it will start immediately. So now, all you have to do is lay back and let the stabilizer do its job.
(Note: The procedure should take no more than a few minutes, and a blue bar will appear across your composition window, indicating that the warp stabilizer is evaluating the film. The composition panel would then display an orange bar, indicating that the effect is applied).
Step 4: After stabilization, use the spacebar to begin a RAM peek. Choose the layer you added to and click to display the drop-down menu or go to the Effects Control panel whenever you need to tweak the stabilizing effect.
Part 2: Stabilize Shaky Video with Track Motion Feature in AE
Using Stabilize Motion feature to stabilize video is an old-school heritage function from the era of the Creative Suite, it will still be there in After Effects presently and performs admirably.
Step 1: The tracker panel is most likely open by default in your edition of After Effects, but if it isn’t, go to Window in the top menu to open it. Once you’ve arrived here, scroll to the bottom until you locate Tracker and double-check that it has a checkbox beside it.
![]()
Step 2: Select Stabilize Motion from the drop-down menu whenever the tracker panel is open. You’ll see that a tracker box appears in your Layer Panel once you’ve done this.
(Note: You’ll need to identify a proper location in your film for the tracker to operate at this stage. We’re monitoring a vehicle using a camera operator’s drone in the instance below).
![]()
Step 3: Let’s press the Play button on the tracker panel once we’ve set up the tracker box. The tracker box should adhere to the location or item you chose when you do this.
(Note: When your tracking points start to go astray, use the Pause button, personally modify the tracking point, and then push play to resume the journey).

Step 4: When the tracker is done and satisfied with the results, click Edit target to verify that the tracking data is transferred to the correct layer. Then proceed to the bottom of the page and click the Apply option.
(Note A dialogue window with choices for applying them. Usually, you’ll want to choose X and Y here).

Hit the spacebar to evaluate how well the stabilize motion tracker performed now when you’re back in the composition window. When you’re not pleased with the outcomes, you might have to go back to try again. Although this approach is best used for photos with a clear point of focus that doesn’t go out of frame, it could still be helpful in some situations.
Part 3: Using Stabilization Plugins for Smoother Video in AE
As a graphic and motion designer, animator, or 3D artist, After Effects plugins may completely change the way you operate. Since it can handle so much right out of the box, Adobe After Effects CC is already a go-to motion graphic and compositing program for many artists.
However, as with any good program, third-party plugins could only help you take your work to the next level by adding new features or streamlining your process.
It should be unsurprising that After Effects has many plugins for a program that is over 30 years old. Here are the best stabilization plugins for smoother video in AE:
1. Orb
Orb is focused on generating realistic planets and includes a range of unique features to make planetary creation easy. It utilizes a similar 3D engine to Video Copilot’s great Element 3D plugin, and it employs a similar 3D engine to Video Copilot’s outstanding Element 3D plugin.
You would believe that making planets in 3D is simple —create a circle, add textures, and you’re done! Getting a world to ‘look’ properly, on the other hand, might be more complicated than it appears.
For example, how can the line between night and day be altered in a model of a populated planet such that cities may be visible at night but not during the day?
Although Orb doesn’t work for every planetary picture, this would function for 90% of them and is a helpful previs tool. This is particularly true when used in conjunction with other After Effects plugins or paired with a 3D lens from a 3D program, which may be brought into After Effects with background plates for things like spacecraft.
2. Depth of Field Generator PRO (DOF PRO)
Richard Rosenman’s renowned Photoshop depth of field generator plugin, DOF PRO (Depth of Field Generator PRO), is now downloadable for After Effects. DOF PRO has become the industry’s professional option for an unprecedented and complex depth of field effects rapidly and effectively as a post-process.
This is thanks to almost a decade of discovery and application since the first launch in 2005. DOF PRO’s cutting-edge characteristics offer new and advanced technologies not found anywhere else, resulting in one of the industry’s most potent and sophisticated depth of field processors.
Capability for chromatic and achromatic aberration, focal plane bokeh distinction, astigmatism and vignetting effects, bespoke aperture maps, and noise recovery are among the advanced features.
There will also be compatibility with the alpha channel and transparency, 32-bit floating-point color, correct aperture displays, and an iris array display. A feature comparison between the plugin and After Effects’ Camera Lens Blur effect can be found here.
3. ReelSteady
ReelSteady for After Effects is a recent addition to the stabilization marketplace. ReelSteady is similar to After Effects’ warp stabilizer plugin. However, the stabilization in ReelSteady is far superior.
ReelSteady also has several other features that make it ideal for creating next-level tunes. Users may design filters to block off specific sections of your frame. This is useful for removing a subject that travels around the frame a lot.
In terms of performance, the After Effects plugin is pretty similar to the warp stabilizer but with a few more features. To begin with, ReelSteady includes a built-in rolling shutter repair tool that operates in tandem with its built-in stabilizer.
The ReelSteady effect is a two-pass effect. For instance, after the effect has been executed for the first time, you will likely wish to level out certain places. You’ll successfully isolate specific parts in the effect to “iron out” sections of the footage.
You would like to record your film at a more excellent resolution than your expected outcome to get the most out of ReelSteady. If you wish to output your video in 4K, you might capture it in 4.6K or 5K. You’ll have some leeway for ReelSteady to work its magic.
ReelSteady’s sole flaw is its high price ($399). ReelSteady is not available in After Effects, unlike some of the other choices on this list. ReelSteady, on the other hand, is the way to go if you would like the smoothest footage imaginable.
Conclusion
Shaky video footage would be the last thing any video creator wants unless it’s done intentionally for artistic or creative reasons. As a result, they employ methods and equipment to keep the camera safe from any undesired movement.
However, occasionally those tools aren’t available, and the outcome is questionable. That is why we decided to compile this article to add to the knowledge of our readers how they can use After Effects to stabilize videos to enhance their video content!
Video content is becoming increasingly popular; with the proliferation of online content, practically every product now needs its mini-documentary or video clip. Experienced filmmakers and VFX artists used to be the only ones who could get smooth footage. Those days, however, are over.
Adobe After Effects is an excellent tool for smoothing out video footage, in addition to being a great blending and motion animation software; although it’s usually preferable to maintain your film as seamless as possible on location, it’s not the end of the world if you take a seat to edit your video and decide it’s too shaky. In truth, there are several options available to you. In After Effects, there are three options for stabilizing footage. What are they – and how to use After Effects to stabilize footage? Let’s find out!
In this article
01 Stabilize Video with Built-in Warp Stabilizer in AE
02 Stabilize Shaky Video with Track Motion Feature in AE
03 Using Stabilization Plugins for Smoother Video in AE
Part 1: Stabilize Video with Built-in Warp Stabilizer in AE
The Warp Stabilizer effect is a new technique to cope with unsteady video. In this part, I will show you how to apply Warp Stabilizer to a layer, adjust the effect’s essential parameters, and demonstrate how they work briefly.
Step 1: The Warp Stabilizer is the most excellent built-in choice for After Effects. This may be found under the Distort tools section of the Effects & Presets panel. You may also go to the effects tab and look for “Warp“ in the search box.
Step 2: When you’ve identified Warp Stabilizer, you’ll have to add it to the layer you want to stabilize. You may accomplish this in one of three different ways. You may either drag and drop the filter into the chosen layer in the composing window, place it on the desired layer in the timeline, or double-tap on the effect while selecting your choice footage layer.
Step 3: Once you apply the warp stabilizer, it will start immediately. So now, all you have to do is lay back and let the stabilizer do its job.
(Note: The procedure should take no more than a few minutes, and a blue bar will appear across your composition window, indicating that the warp stabilizer is evaluating the film. The composition panel would then display an orange bar, indicating that the effect is applied).
Step 4: After stabilization, use the spacebar to begin a RAM peek. Choose the layer you added to and click to display the drop-down menu or go to the Effects Control panel whenever you need to tweak the stabilizing effect.
Part 2: Stabilize Shaky Video with Track Motion Feature in AE
Using Stabilize Motion feature to stabilize video is an old-school heritage function from the era of the Creative Suite, it will still be there in After Effects presently and performs admirably.
Step 1: The tracker panel is most likely open by default in your edition of After Effects, but if it isn’t, go to Window in the top menu to open it. Once you’ve arrived here, scroll to the bottom until you locate Tracker and double-check that it has a checkbox beside it.
![]()
Step 2: Select Stabilize Motion from the drop-down menu whenever the tracker panel is open. You’ll see that a tracker box appears in your Layer Panel once you’ve done this.
(Note: You’ll need to identify a proper location in your film for the tracker to operate at this stage. We’re monitoring a vehicle using a camera operator’s drone in the instance below).
![]()
Step 3: Let’s press the Play button on the tracker panel once we’ve set up the tracker box. The tracker box should adhere to the location or item you chose when you do this.
(Note: When your tracking points start to go astray, use the Pause button, personally modify the tracking point, and then push play to resume the journey).
Step 4: When the tracker is done and satisfied with the results, click Edit target to verify that the tracking data is transferred to the correct layer. Then proceed to the bottom of the page and click the Apply option.
(Note A dialogue window with choices for applying them. Usually, you’ll want to choose X and Y here).
Hit the spacebar to evaluate how well the stabilize motion tracker performed now when you’re back in the composition window. When you’re not pleased with the outcomes, you might have to go back to try again. Although this approach is best used for photos with a clear point of focus that doesn’t go out of frame, it could still be helpful in some situations.
Part 3: Using Stabilization Plugins for Smoother Video in AE
As a graphic and motion designer, animator, or 3D artist, After Effects plugins may completely change the way you operate. Since it can handle so much right out of the box, Adobe After Effects CC is already a go-to motion graphic and compositing program for many artists.
However, as with any good program, third-party plugins could only help you take your work to the next level by adding new features or streamlining your process.
It should be unsurprising that After Effects has many plugins for a program that is over 30 years old. Here are the best stabilization plugins for smoother video in AE:
1. Orb
Orb is focused on generating realistic planets and includes a range of unique features to make planetary creation easy. It utilizes a similar 3D engine to Video Copilot’s great Element 3D plugin, and it employs a similar 3D engine to Video Copilot’s outstanding Element 3D plugin.
You would believe that making planets in 3D is simple —create a circle, add textures, and you’re done! Getting a world to ‘look’ properly, on the other hand, might be more complicated than it appears.
For example, how can the line between night and day be altered in a model of a populated planet such that cities may be visible at night but not during the day?
Although Orb doesn’t work for every planetary picture, this would function for 90% of them and is a helpful previs tool. This is particularly true when used in conjunction with other After Effects plugins or paired with a 3D lens from a 3D program, which may be brought into After Effects with background plates for things like spacecraft.
2. Depth of Field Generator PRO (DOF PRO)
Richard Rosenman’s renowned Photoshop depth of field generator plugin, DOF PRO (Depth of Field Generator PRO), is now downloadable for After Effects. DOF PRO has become the industry’s professional option for an unprecedented and complex depth of field effects rapidly and effectively as a post-process.
This is thanks to almost a decade of discovery and application since the first launch in 2005. DOF PRO’s cutting-edge characteristics offer new and advanced technologies not found anywhere else, resulting in one of the industry’s most potent and sophisticated depth of field processors.
Capability for chromatic and achromatic aberration, focal plane bokeh distinction, astigmatism and vignetting effects, bespoke aperture maps, and noise recovery are among the advanced features.
There will also be compatibility with the alpha channel and transparency, 32-bit floating-point color, correct aperture displays, and an iris array display. A feature comparison between the plugin and After Effects’ Camera Lens Blur effect can be found here.
3. ReelSteady
ReelSteady for After Effects is a recent addition to the stabilization marketplace. ReelSteady is similar to After Effects’ warp stabilizer plugin. However, the stabilization in ReelSteady is far superior.
ReelSteady also has several other features that make it ideal for creating next-level tunes. Users may design filters to block off specific sections of your frame. This is useful for removing a subject that travels around the frame a lot.
In terms of performance, the After Effects plugin is pretty similar to the warp stabilizer but with a few more features. To begin with, ReelSteady includes a built-in rolling shutter repair tool that operates in tandem with its built-in stabilizer.
The ReelSteady effect is a two-pass effect. For instance, after the effect has been executed for the first time, you will likely wish to level out certain places. You’ll successfully isolate specific parts in the effect to “iron out” sections of the footage.
You would like to record your film at a more excellent resolution than your expected outcome to get the most out of ReelSteady. If you wish to output your video in 4K, you might capture it in 4.6K or 5K. You’ll have some leeway for ReelSteady to work its magic.
ReelSteady’s sole flaw is its high price ($399). ReelSteady is not available in After Effects, unlike some of the other choices on this list. ReelSteady, on the other hand, is the way to go if you would like the smoothest footage imaginable.
Conclusion
Shaky video footage would be the last thing any video creator wants unless it’s done intentionally for artistic or creative reasons. As a result, they employ methods and equipment to keep the camera safe from any undesired movement.
However, occasionally those tools aren’t available, and the outcome is questionable. That is why we decided to compile this article to add to the knowledge of our readers how they can use After Effects to stabilize videos to enhance their video content!
Top 16 AVI Video Cutters: Trim/Cut AVI Videos [Windows, MAC, Android
With the growing fame of video-sharing and social media applications like Twitter, Instagram, and TikTok, the demand for simple and fast video cutting and trimming tools has dramatically increased. Nowadays, you don’t have to play with complex video editing tools to produce high-quality videos.
Thanks to several user-friendly editing software to make things easy for everybody. However, finding the right programs to trim/cut videos is still challenging, especially in AVI format.
But, guess what? These top 16 AVI video cutters for Windows, MAC, Android, iPhone, and online will make video cutting and trimming fun, especially when you learn to do it using Filmora.
In this Article
Part 1: Best AVI Video Cutter to Trim/Cut AVI Video on Windows and MAC – Filmora Video Cutter [with steps}
Part 2: Top 3 Free AVI Video Cutter on Windows
Part 3: Top 3 Free AVI Video Cutter on MAC
Part 4: Top 3 Free AVI Video Cutter on Android
Part 5: Top 3 Free AVI Video Cutter on iPhone
Part 6: Top 3 Free AVI Video Cutter Online
Part 7: Bottom Line
Part 8: FAQs
Part 1: Best AVI Video Cutter to Trim/Cut AVI Video on Windows and MAC – Filmora Video Cutter [with steps]
Filmora by Wondershare is a star video editor with outstanding outcomes. Whether you have a MAC or Windows PC, you can download Filmora regardless of your operating system. The program best serves those who intend to make high-quality videos. The software provides editing support for all video formats, including AVI.
Although Filmora is an affordable editor with tons of audio and video editing options, you can still download the software for free and create projects if watermarks don’t bother you. Moreover, you can count this tool’s capabilities in cropping, resizing, and Chroma screen support. But that’s not the only sweet fruit.
In fact, Filmora is equipped with many jaw-dropping features, including preset templates, auto beat sync, split-screen, speed ramping, motion tracking, keyframing, creative transitions, titles, filters, and much more. And the best part is, you can learn and understand Filmora in no time. That’s why the program is loved and supported by all types of users.
So does Filmora helps cut and trim AVI videos? Yes! It does if you follow these steps correctly.
Step 1: Download Filmora Video Editor
First, download Filmora Video Editor by choosing your operating system, as seen in the screenshot below.
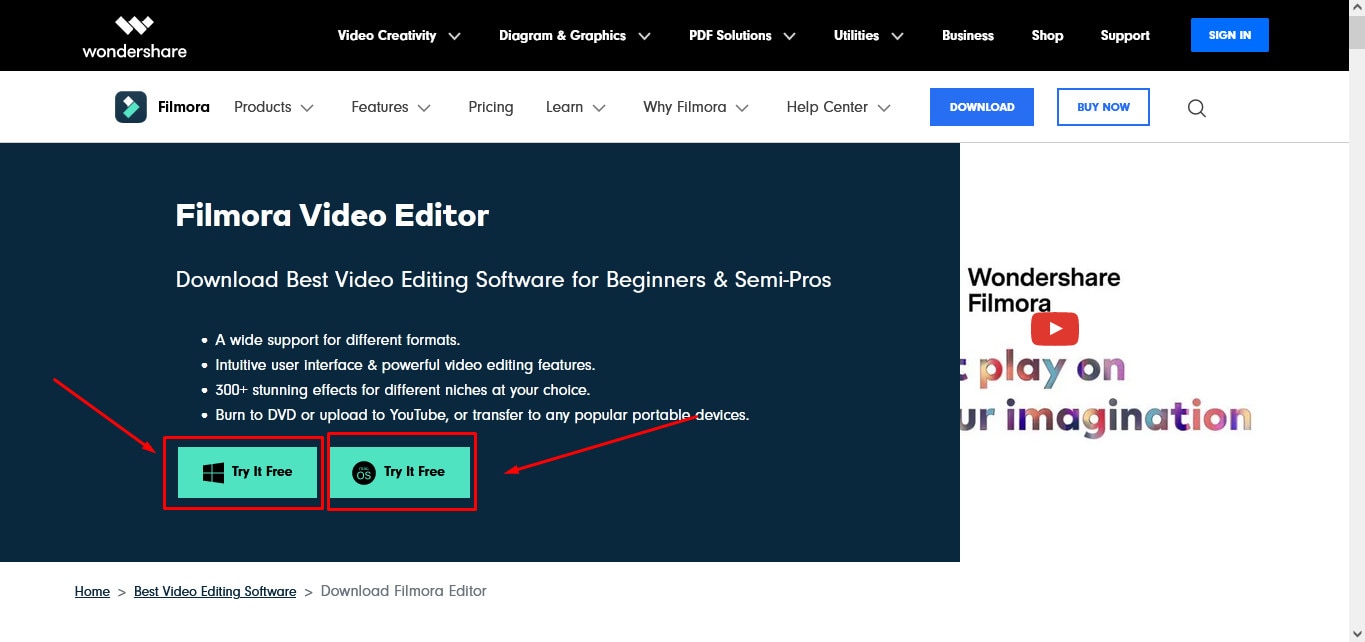
Run the setup and let it finish without any pause or break.
Step 2: Import Your Video to Filmora Video Editor
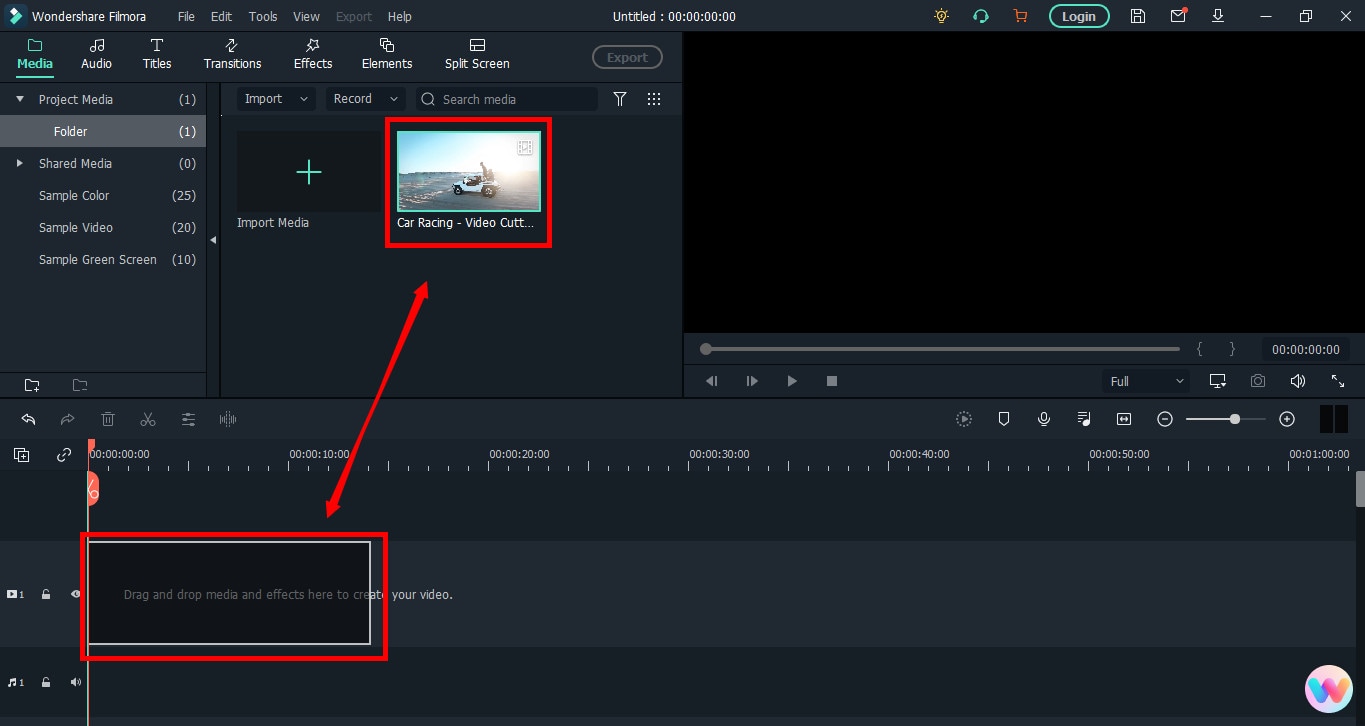
Importing your AVI video is a very simple process. Just click on the “Film Clip” icon.
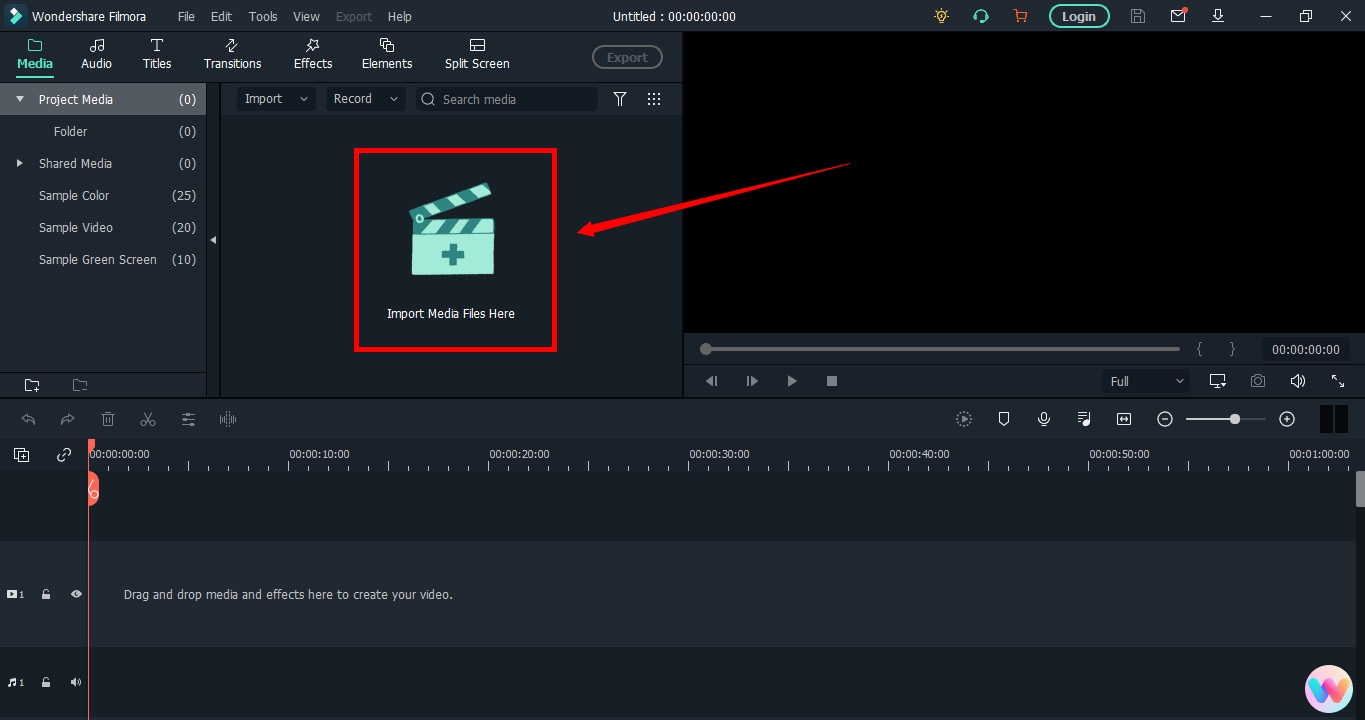
It will open a new window screen on your computer to select the video from the directory. Find the clip you want to import and cut. Use your mouse to select it and click the “Open” button.
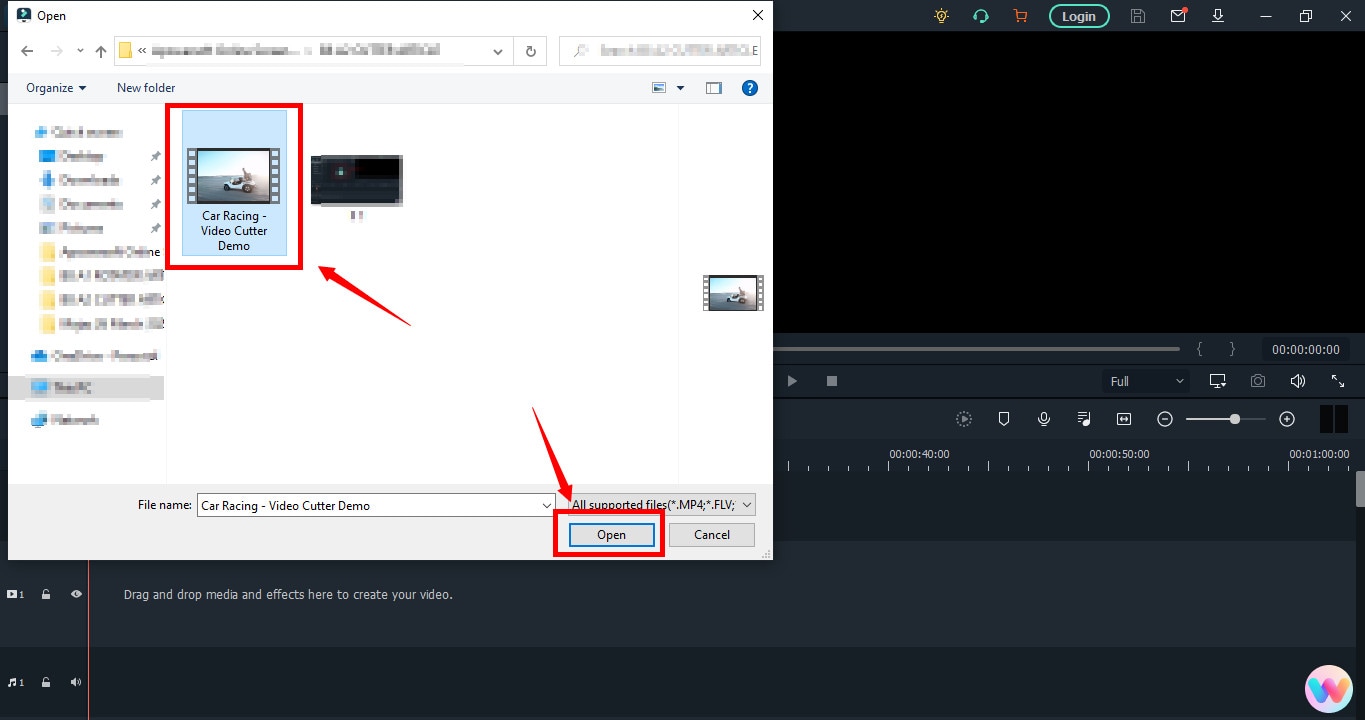
The video will be loaded in the “Media” folder of Filmora. The clip’s thumbnail should be visible to assure you have done everything correctly.
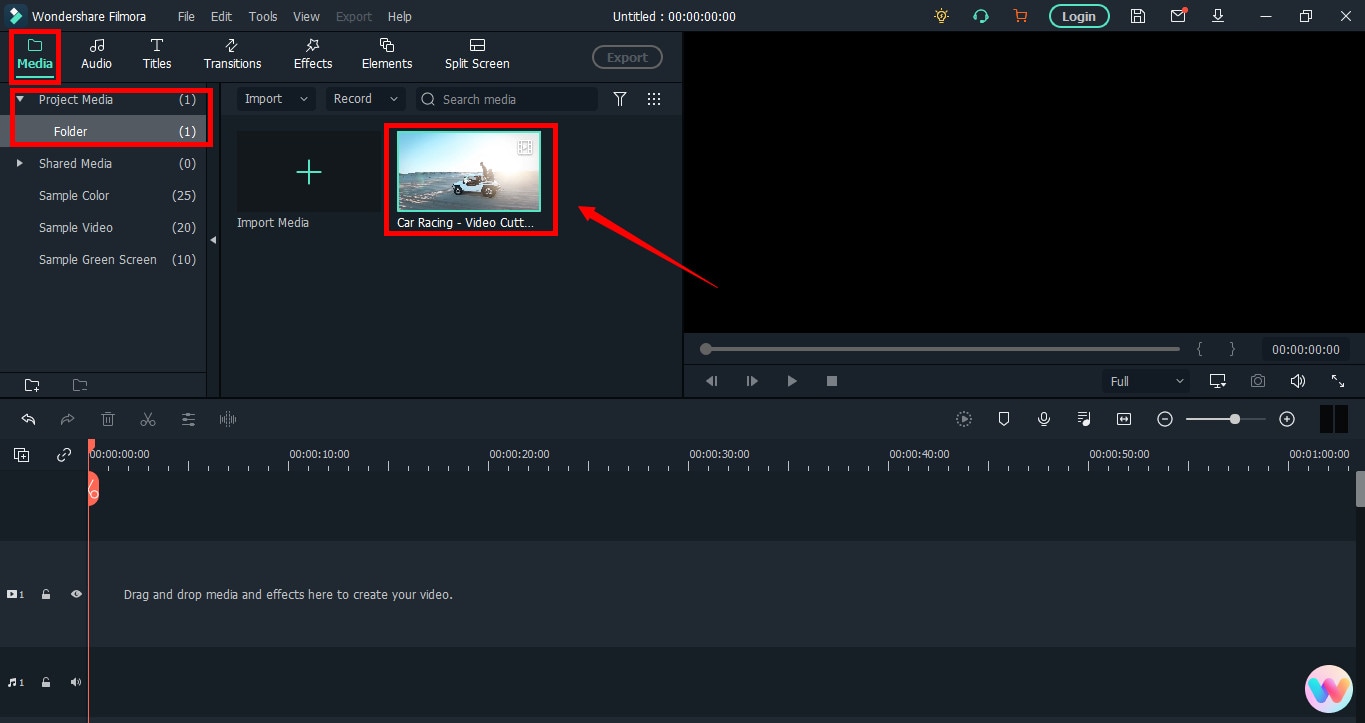
If you can see that, let’s go to the next step.
Step 3: Drag and Drop Video to Filmora’s Timeline
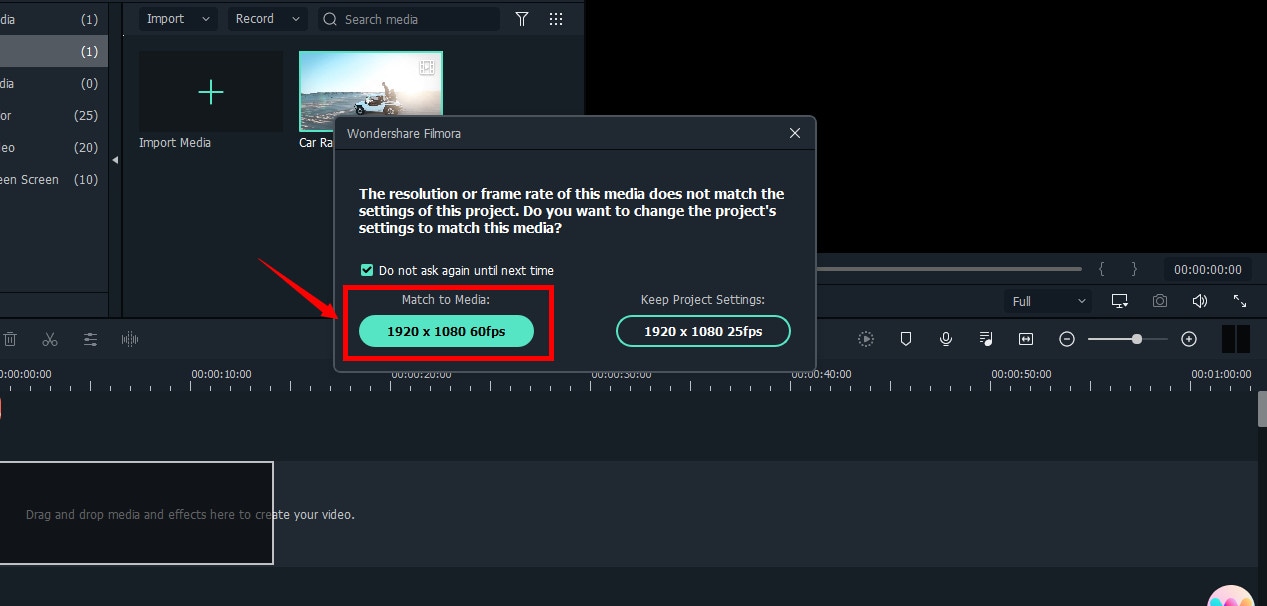
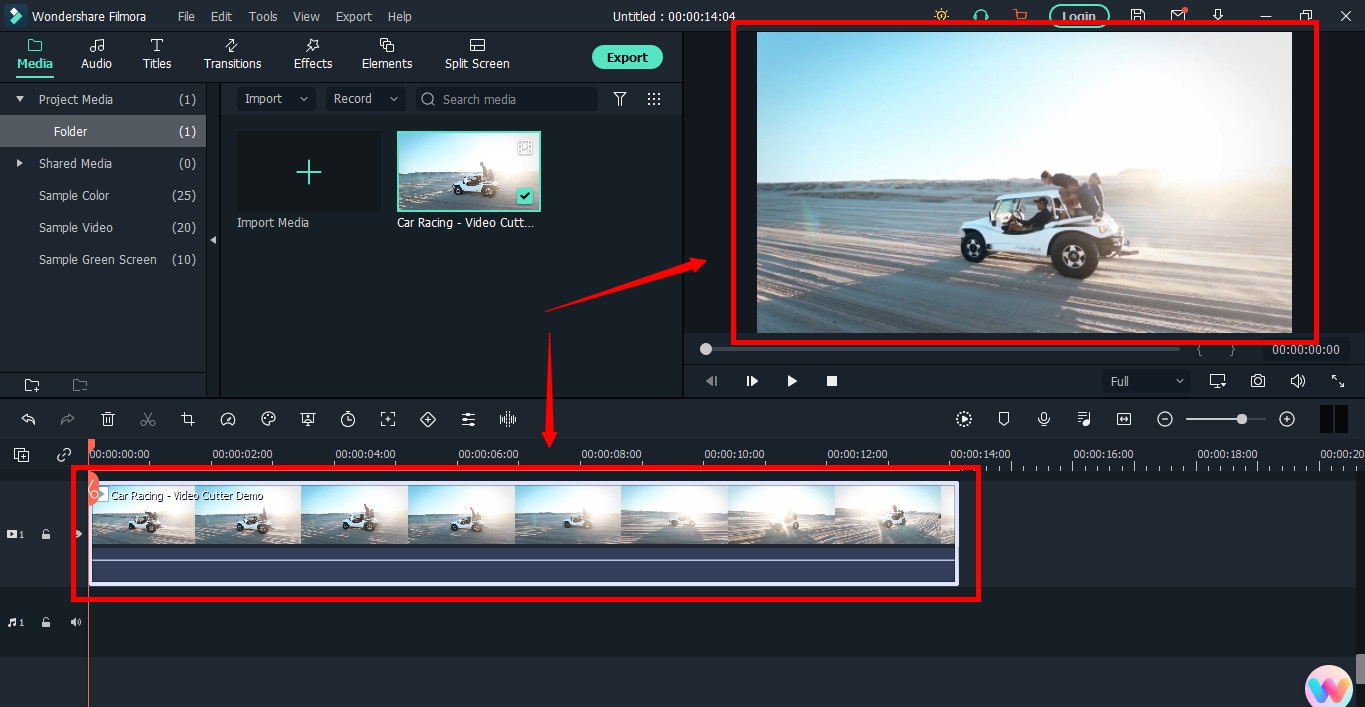
Select the video in the media folder by clicking over it once. Now, without leaving the hold of the left button of your mouse, slide the video down to the track in the timeline.
After that, a message will pop up, asking about your preference for the project settings. It is recommended to choose the “Match to Media” option unless you’re an experienced video editor who knows how to play with the resolution and frame rates.
You will see the video on the timeline with its preview on the “Preview Screen” on the right side of the interface.
Step 4: Cutting Your Video in Filmora
Here comes the core step you have been waiting for. But before you go any further, you need to know about the “Playhead.”
Playhead is an orange-reddish marker you can find on the timeline.
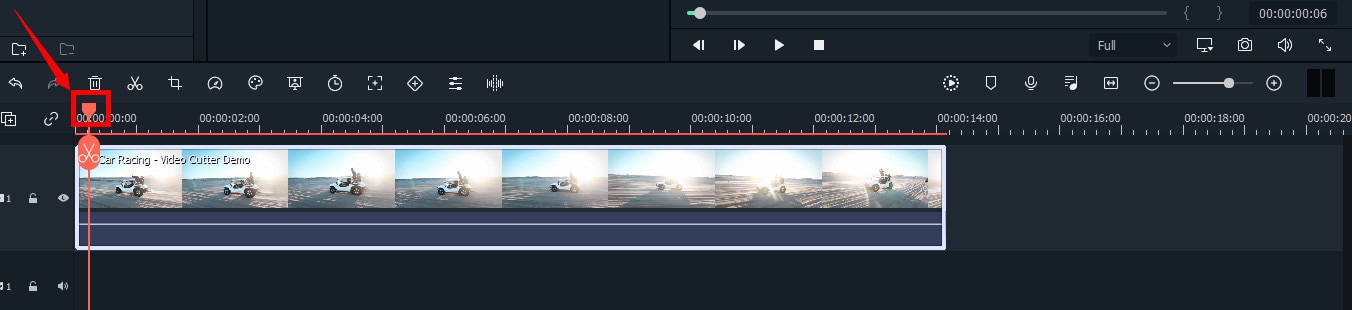
It has an important role in cutting your videos.
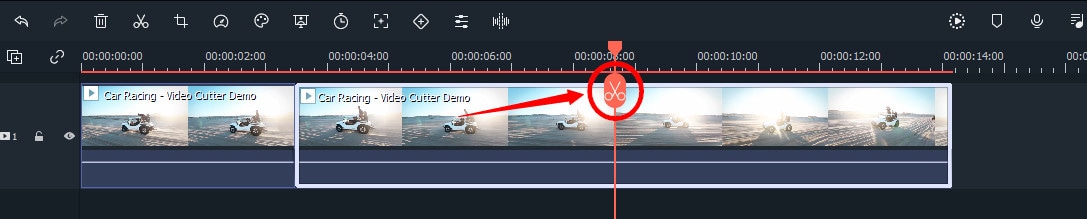
So, move the playhead to your desired frame and click on the “scissor” icon to make the “starting” cut.
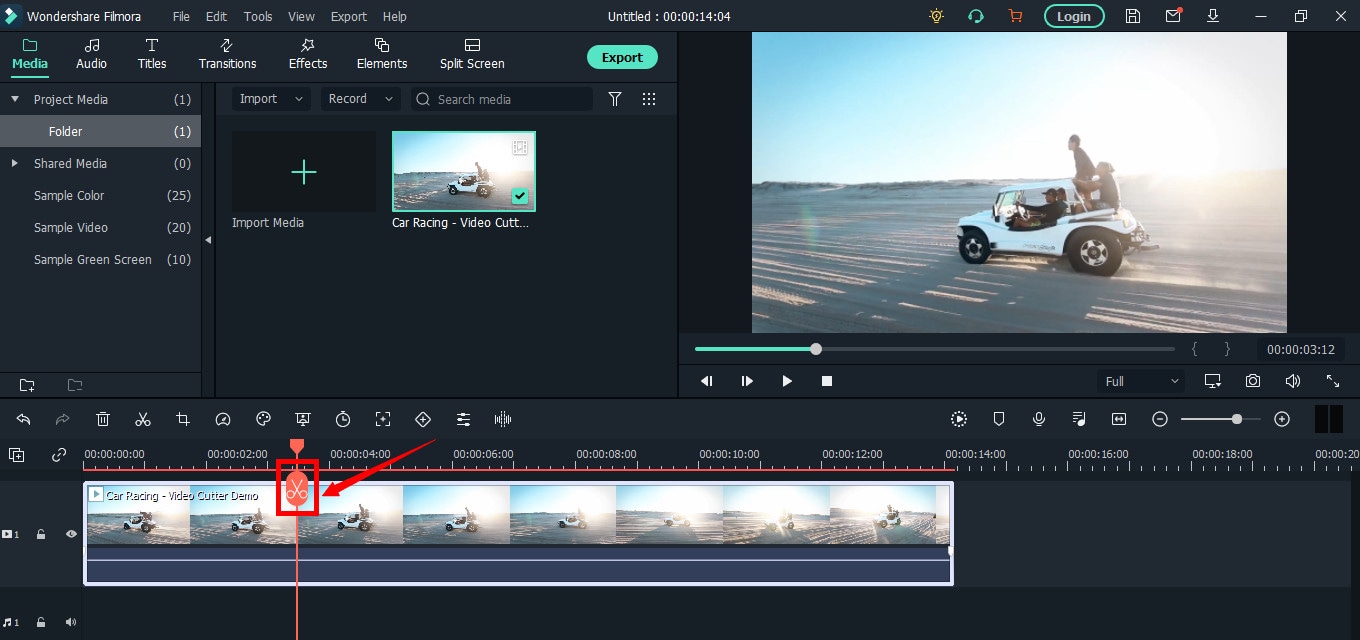
As soon as you do it, you will see that the single clip is now divided into two parts similar to this image.
The “Red” marked area in the above screenshot ensures a gap between the clips on the timeline. The “Yellow” arrows confirm two separate clips of the same video.
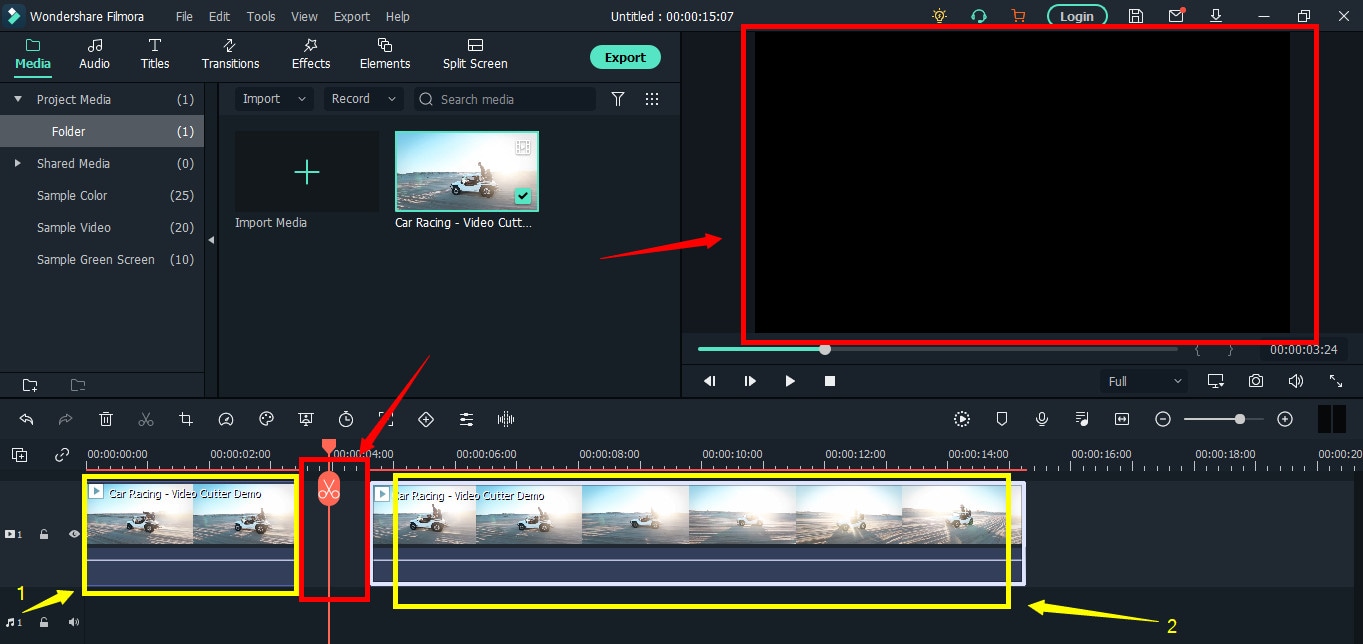
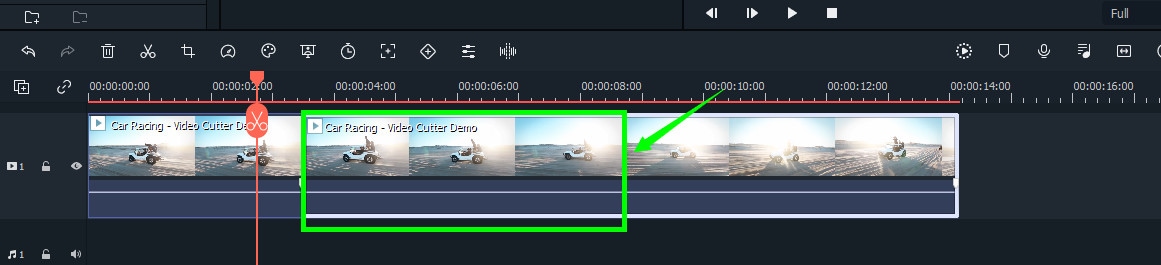
Place the two clips together as seen in this “Green” area.
And place the playhead anywhere on the clip. And click on the “scissor” icon once again to make the “ending” cut (second cut).
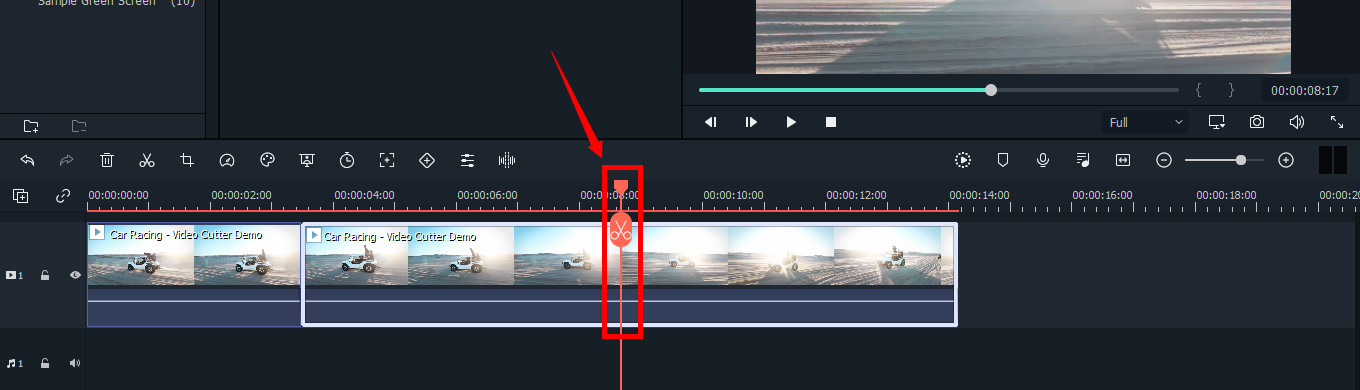
If done correctly, there should be three clips now of the same video, as you can observe in this screenshot.
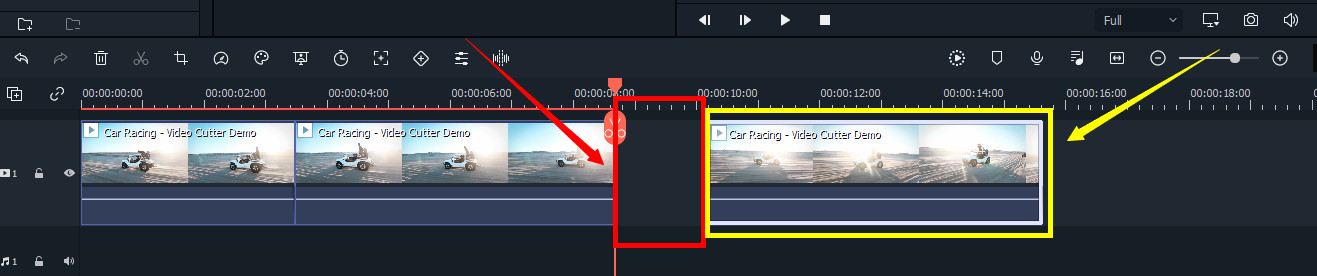
Again, the “Red” area in the above photo indicates the gap, and the “Yellow” area ensures a third segment of the video.
Note: The gaps you can see in the divided clips are made intentionally for understanding. Practically, Filmora doesn’t move the clip or make gaps in between after you have made the cuts.
Keep in mind that there are three clips on the timeline. Now, if you want to remove the second clip from the video, you need to select that portion first by clicking on it.
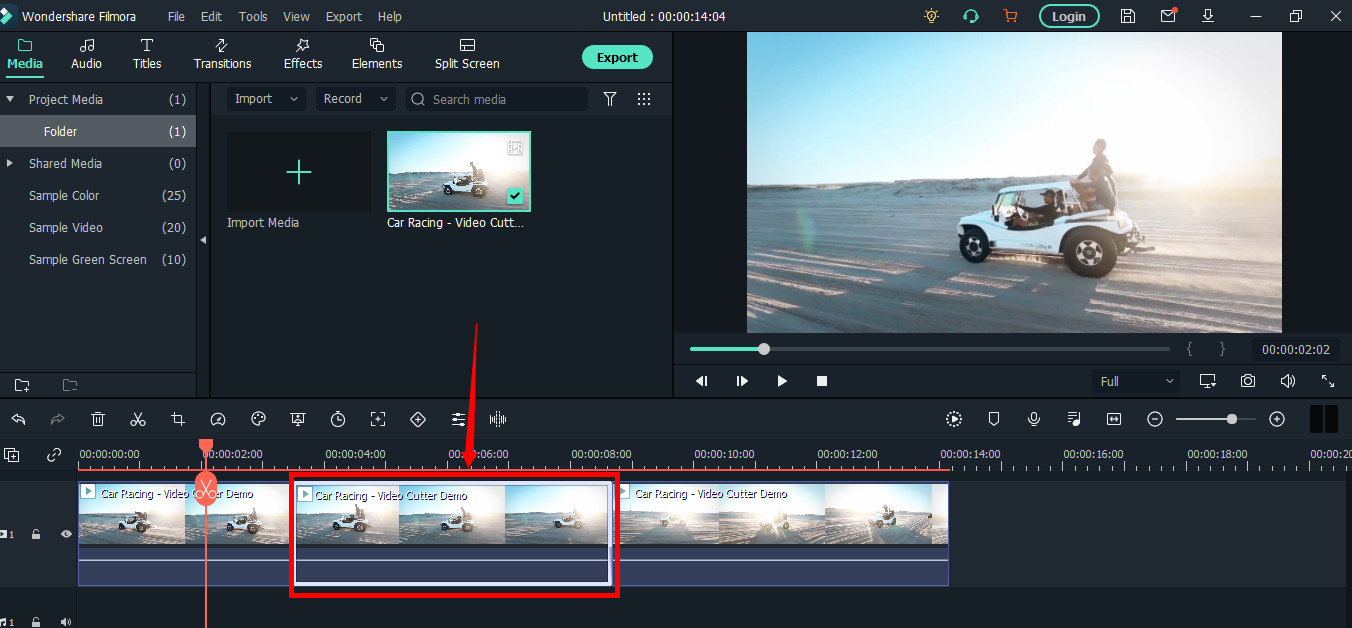
Then, right-click on the mouse and choose “Cut” from the menu.
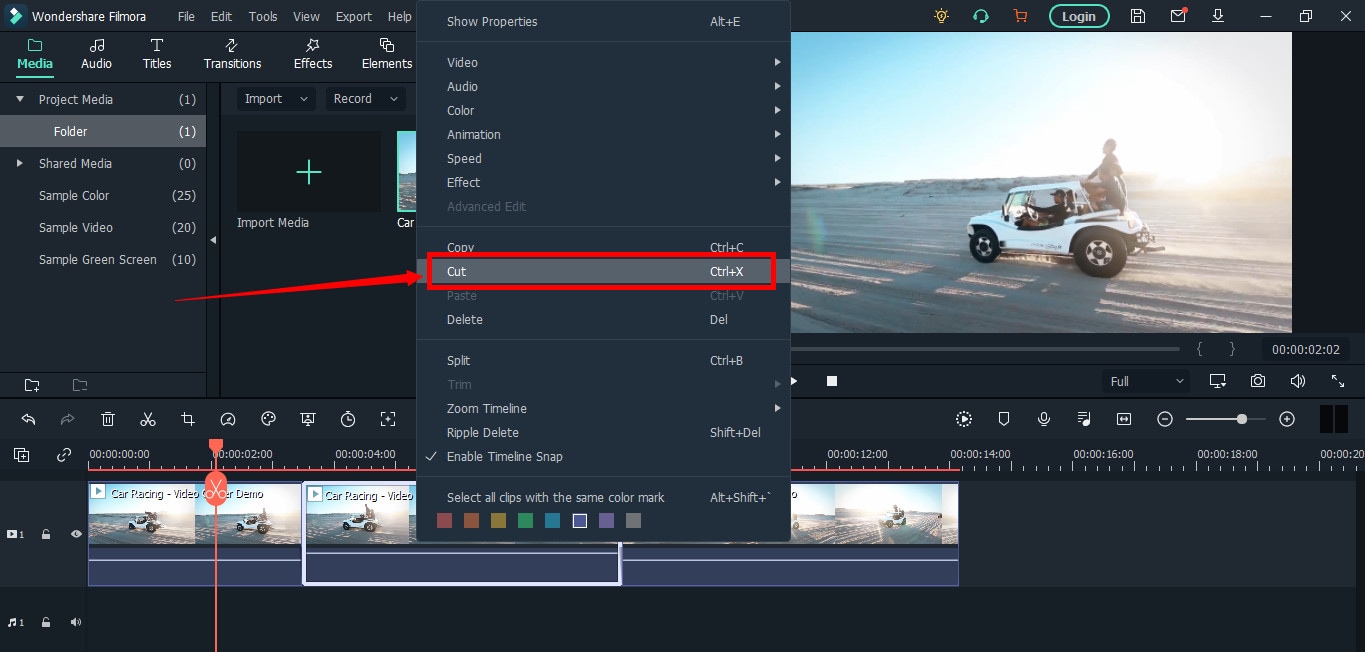
Within a semi-second, the selected portion will be removed from the timeline. And you will be able to see the remaining parts of the video. Now, pull the second clip using your mouse and place it at the end of the first clip without leaving a gap in between.
Then, click the “Play” button under the preview screen to see the results.
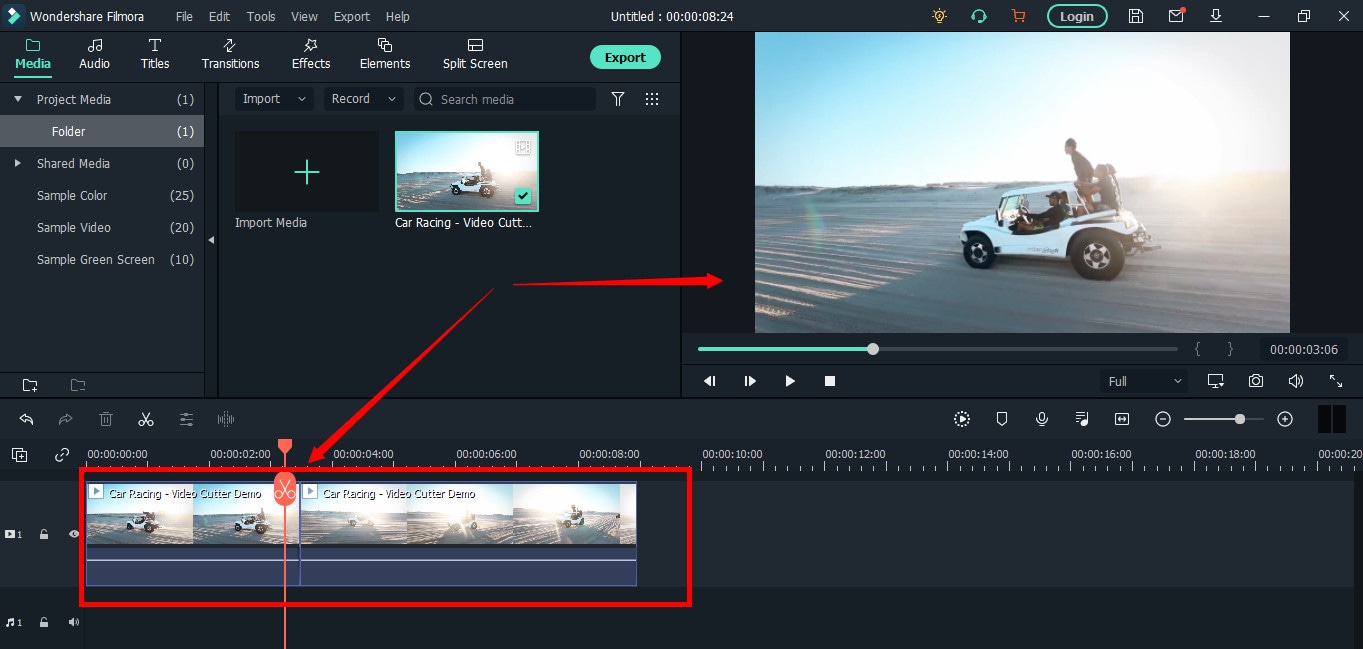
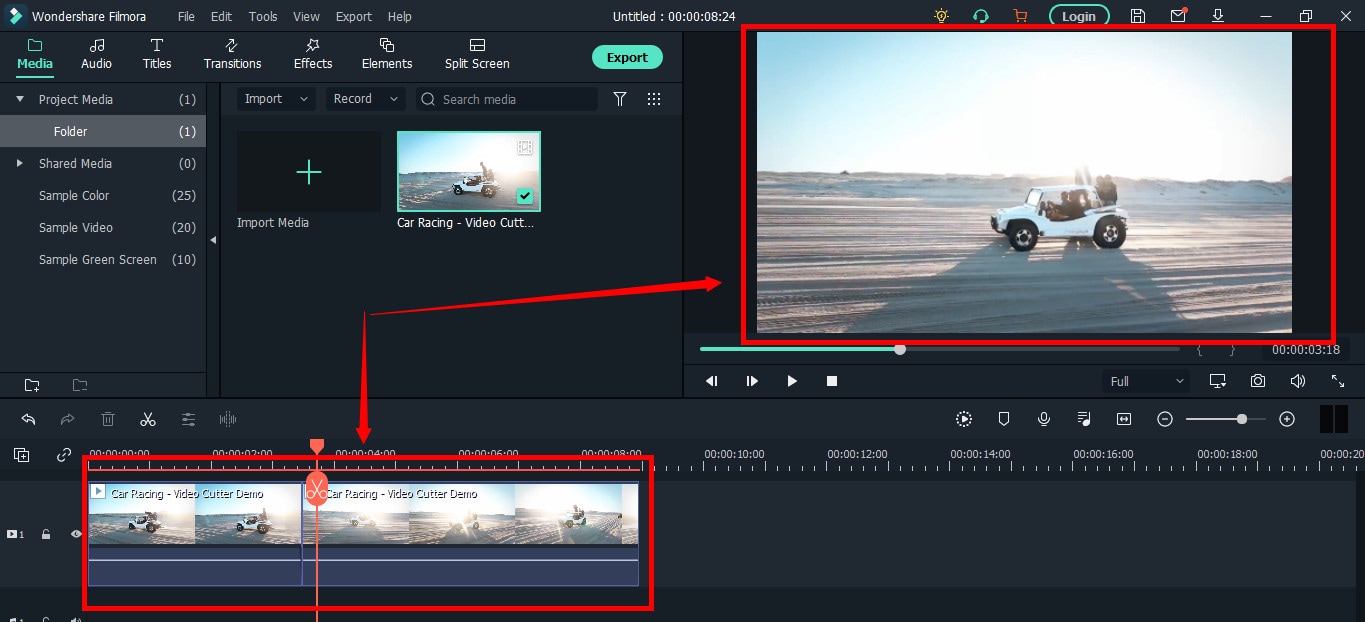
You can see in the above two screenshots that there’s a jump between the scenes due to cuts, confirming that video has been cut significantly.
Step 5: Trimming Your Video in Filmora
Remember that cutting and trimming in Filmora are two different things. Trimming allows you to remove a particular video part from visibility without deleting the portion.
So feel free to skip this step if you’re happy learning the cutting technique. But if you’re interested in trimming, here’s how you do it.
Take your mouse cursor at the beginning or end of the clip you want to trim. Keep holding the clip’s corner and slide the mouse back or front to trim the part
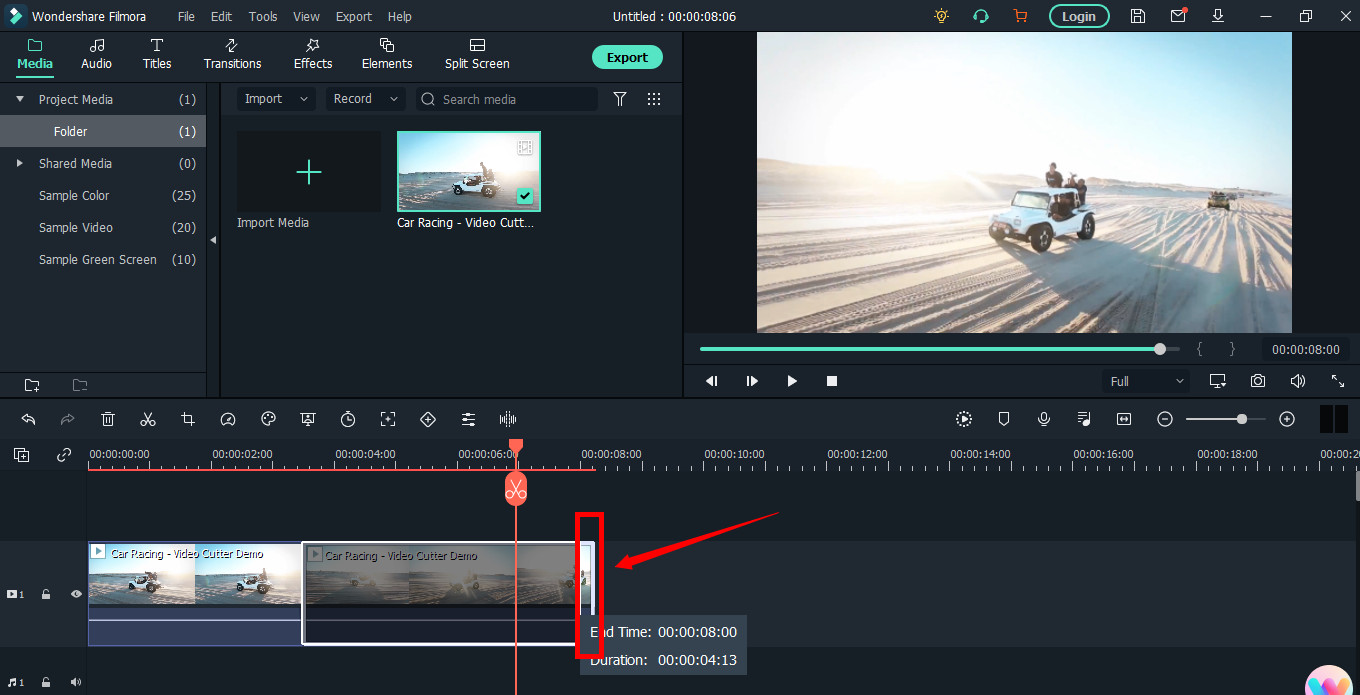
Note: Since the trim tool doesn’t delete the video, the final project based on trimming will be of a larger size. Therefore, it is advised to cut videos rather than trimming for fast rendering, better results, and small video size.
Step 6: Save Project and Export Your Cut/Trimmed AVI Video
Choose “Save Project” from the “File” menu.
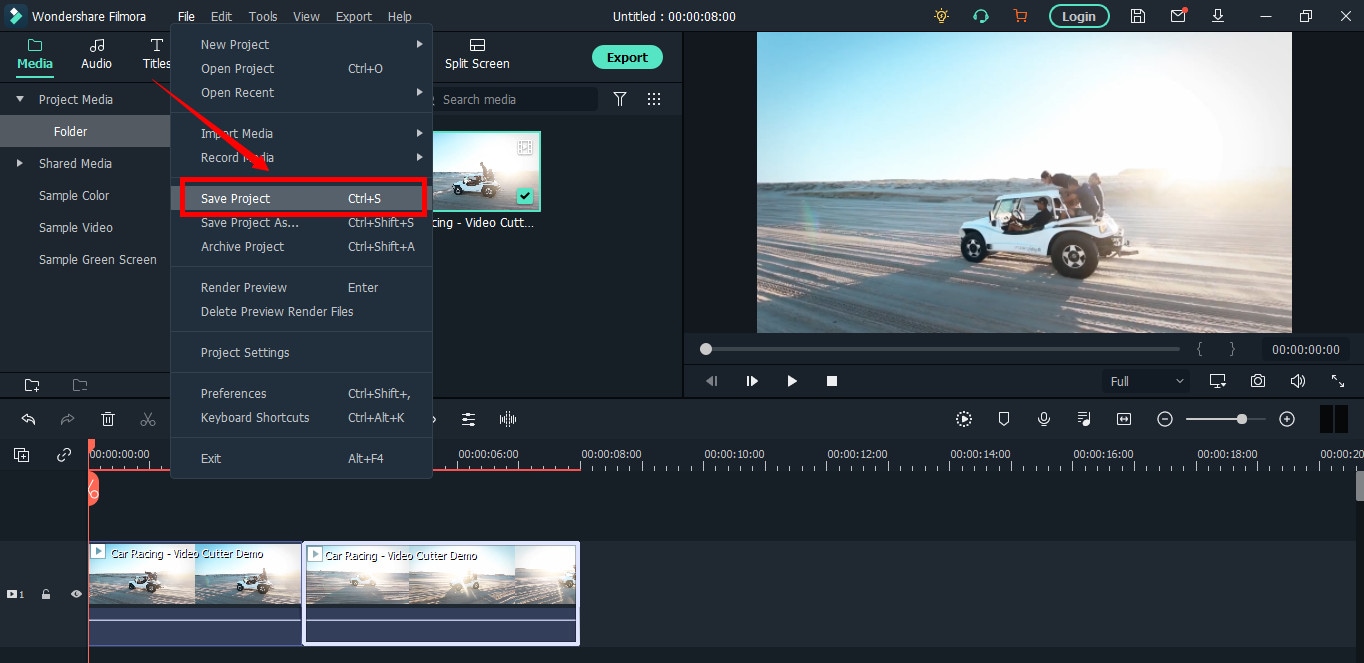
Select the directory to save the project, rename the new video, and click the “Save” button.

Click on the “Export” button to save the video in AVI or any other video format of your choice on your computer.
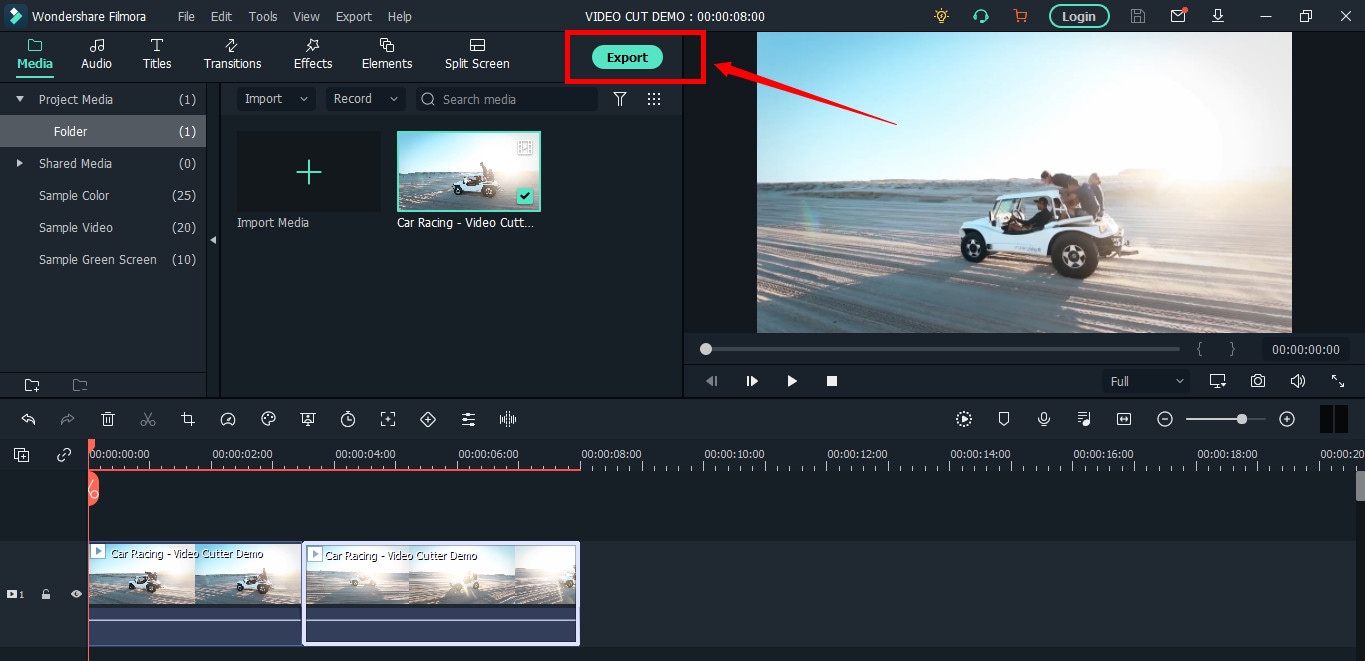
Part 2: Top 3 Free AVI Video Cutter on Windows
As a Windows user, finding an excellent video cutter is relatively easy. However, not all software permits importing AVI videos. In the same way, some video trimmers come at a price. So if you really don’t want to pay and enjoy cutting your AVI files, try using these three video cutting tools.
Microsoft Photos (Windows 10)
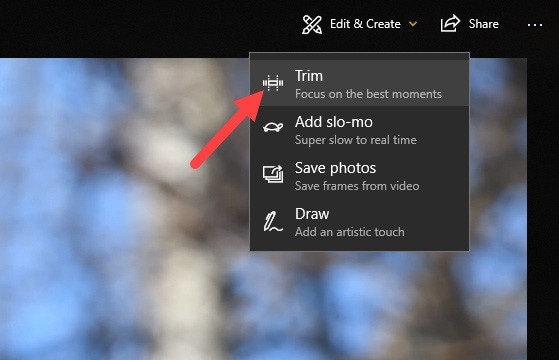
Microsoft Photos or Photo App is a free photo viewer and editor with your Windows 10. It offers incredible photo editing and enhancement along with different tools for organizing and editing videos in a very friendly way. Likewise, you can create drawings over the videos and add 3D effects and background music to your clips.
You can also trim AVI videos with Microsoft Photos quickly. All you need to do is open your clip with the Photo App, choose the “Trim” option, select a portion of the video you want to trim, and go ahead.
That’s it!
Features
- Quick video trimming
- Cool text effects
- 3D library and effects
- It has a clear interface
- You can find and tag people’s faces
- The program has 15+ filters for editing
- Motion tracking option for drawing on videos
- Allows you to view and organize your files easily
Pros
- Microsoft Photos is free for Windows users
- It automatically creates albums
- The program has a touch-friendly interface
- You can integrate your OneDrive with the software
Cons
- Lacks before and after view
- Not included in older Windows versions
- It doesn’t support selective focus or panorama stitching
Handbrake
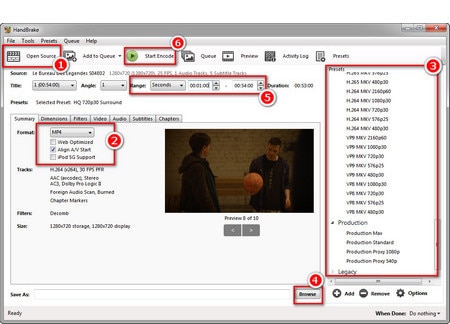
Handbrake is best-known for its video transcoding traits. Unlike typical video editors, this open-source tool includes limited options to rip Blu-rays and DVDs. Moreover, you can mix the 5.1 soundtracks and convert them to stereo to make the audio compatible with your TV speakers.
But the exciting thing about Handbrake is that you can use this software on your macOS 10.13 or later versions to cut AVI videos for free. However, it’s a bit technical process, as there’s no timeline to help you trim or make cuts on the clips directly with the help of your mouse.
You are required to mention a time range (seconds, minutes, or hours) to keep a specific part of the video while the software removes the non-ranged parts of the clip. For instance, you have a video of 10 seconds. You start the range from 5 seconds and end it at 10 seconds. So, the first four seconds of the video will be cut from the entire clip.
Features
- Video cutting, cropping, and resizing
- Low-quality and old video restoration
- Video conversion from any format to MKV or MP4
Pros
- Handbrake is free
- You can convert batch videos with ease
- It supports MAC, Windows, and Linux OS
- Allows you to import video files in all major formats
- The software comes with various video conversion presets
Cons
- Handbrake is not a user-friendly tool
- The video file output is limited to two formats (MKV and MP4) only
Gihosoft Video Cutter
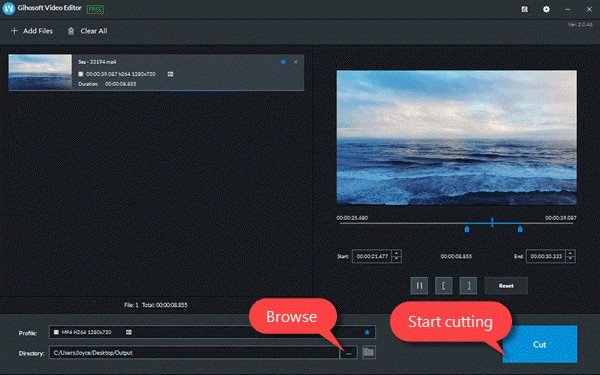
Gihosoft is a clean, free, lossless video cutter on your Windows PC. It’s a simple tool that helps you cut video files into various output formats. So be it AVI, MPEG, or any other file, with Gihosoft, everything becomes handy.
Another fascinating fact about this software is that it allows you to cut videos in three simple steps without losing the quality. So right after installing the program, you simply need to import your file, choose the start and end time, and click the “Cut” button to remove the part of the video.
Features
- Fast video and audio cutting
- Easy drag and drop audio/video files
- It supports most audio and video formats
Pros
- Free for both Windows and MAC operating systems
- The cutter saves video in original quality
Cons
- It does not include basic video editing features
Part 3: Top 3 Free AVI Video Cutter on MAC
Are you looking for a great AVI video cutter for your MAC? Sadly, you have limited product choices as compared to Windows users. But to ensure you don’t waste time looking for a suitable tool, here’s a list of three AVI video cutting programs you can use on your Macintosh.
iMovie
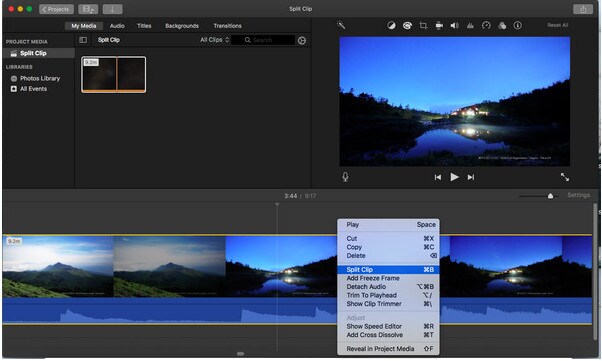
The first and foremost recommended software for free video cutting on MAC is Apple’s own tool, iMovie . It is a built-in program that comes with your system, so there is no need to spend extra on a video editor. iMovie allows you to browse and import most video files, including AVI, right from your computer. Also, this tool is equipped with multiple functions, such as audio editing, video quality enhancement, and much more.
This MAC’s video editor is ideal for beginners. Many home users and small business owners find this tool extremely simple, as they don’t like to be confused with complex features. So, if you want to make cuts to your video clips, start working on iMovie. And within a few clicks, you can trim or cut your videos for free.
Features
- Video cutting and trimming
- Cropping and rotation
- Effects and transitions
- Built-in themes
- HD and 4K video support
- Movie sharing
- Audio adjustments
- Chroma screen controls
- Character tracking
Pros
- Free to use for MAC users
- Clean timeline
- One-click video cutting and trimming
- Easy-to-remember keyboard shortcuts
- Direct share projects to your social media, like YouTube
Cons
- It takes a lot of time to export videos
- iMovie needs high HDD storage space
VideoPad by NCH

VideoPad by NCH is a beginner-level video editor with all the basic features. The software is specifically designed for home movie makers. That is why VideoPad is easy to understand and use.
VideoPad is entirely free of cost for non-commercial purposes, but it has limited features. On the other hand, if you want to enjoy full traits, you can purchase the tool.
VideoPad supports video files, including AVI, WMV, MPEG, MOV, MP4, ASF, and XviD. Likewise, you can also burn movies to Blu-ray, DVD, HD-DVD, or CD. And most importantly, you can easily cut or trim AVI videos on your MAC, as the software is available on both MAC and Windows systems.
Features
- Audio tools
- Video rotation
- Video sharing
- Visual effects
- Video transitions
- 3D Video editing
- Color correction
- Overlays and texts
- Video optimization
- Great plugin support
- Direct video uploading
- Multiple video resolutions
- Video cutting and trimming
- Files exportation to various devices
- Stereoscopic conversion from 2D to 3D
Pros
- You can use the basic tools for free
- Allows 360-degree video production
- It supports a wide range of video formats
- Compatible with MAC and Windows computers
Cons
- The auto speech feature performs poorly
- The free version has annoying notifications
Xilisoft Video Cutter
Xilisoft Video Cutter is the simplest tool to cut videos on MAC. This software has a straightforward option to cut the clip after importing it to the timeline. The program is fast and has a user-friendly interface.
Moreover, you can polish your videos by merging multiple clips or increasing the video quality once you’re done with the cutting process. At the same time, this video cutter allows you to import all video formats, including XviD, DivX, MOV, FLV, MP4, MPEG-4/, MKV, MPEG, WMV, and AVI.
Features
- Video joining
- Support multiple output video formats, including HD
Pros
- Easy video cutting and merging
- It doesn’t require a large storage space
- Extremely uncomplicated interface
- Real-time preview to make better cuts
- Available on both MAC and Windows systems
Cons
- The trial version is free to use but limits you from enjoying extra features
Part 4: Top 3 Free AVI Video Cutter on Android
After capturing nice videos with your Android mobile phone, you may need to cut unnecessary scenes to make your clips look professional. While there are numerous Android cutters, not all support the AVI format. So below, you will find the 3 best AVI video cutters for Android, which are free to use.
Quick – Video Editor & Maker
Quick – Video Editor & Maker is a free video editor with PRO results. Many photographers and vloggers love using this app to cut clips immediately. Furthermore, the application offers a wide range of options to assure you don’t have to look to any other tool to rotate or compress video. Quick – Video Editor & Maker lets you import videos in all major formats, including AVI, MPEG, WMA, and more.
Features
- Video cutting, fading, and rotation
- Speed control tools
- Conversion from video to GIF
Pros
- Free app
- Simple interface
Cons
- Lack of updates
- Some users complain about app crash
Funimate Video Editor & Maker
If you want to make some professional-grade video edits quickly, you are welcome to download and use Funimate Video Editor & Maker on your Android device. It’s a free tool to cut videos. It has an easy procedure, and you can cut AVI videos in a few seconds.
Plus, you can use the app to add custom animations, effects, and many other exciting elements. You can share your makes on social media like TikTok, Instagram, and other platforms. Contrarily, the app itself is a community with millions of Funimate-users who share their creations daily. You can also join or watch videos from other creators to learn more about new techniques and trends in video editing.
Features
- Video trimming and splitting
- Animation and cropping
- Filters and AI effects
- Speed adjustment
- Keyframing and video merging
Pros
- Free Android application with several editing tools
- Easy trimming, splitting, and cropping
- Aspect ratio, border, and color customization
- Direct social media sharing
Cons
- Free users cannot use templates
- The free version stamps watermarks on each project
Part 5: Top 3 Free AVI Video Cutter on iPhone
No wonder iPhone’s camera captures high-quality videos. But the problem begins when there’s no free app to cut AVI videos. So if you’re recording great spots, but deep inside, you really want to remove some parts, then these 3 free AVI video cutters will work smoothly on your iPhone.
Cut, Trim, Split Video Editor
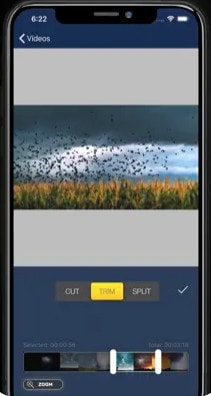
Download Cut, Trim, Split Video Editor on your iPhone to delete/cut unwanted portions of your video clips. The tool is also best for trimming iPhone-recorded clips without messing with the frames. Or, if you just want to split the video into multiple parts for your next WhatsApp status, this iPhone app can do that job for you.
The app supports multiple video file types, including MOV, MP4, AVI, MPEG, MPEG-2, and 3GPP
Features
- Easy trimming and cutting video clips
- Splitting big-sized videos into two smaller clips
- Import video from file-sharing platforms, like iCloud, using Wi-Fi
Pros
- Free app for fast video cutting and sharing
- Simple UI interface
Cons
- The free version shows advertisements
Splice - Video Editor & Maker
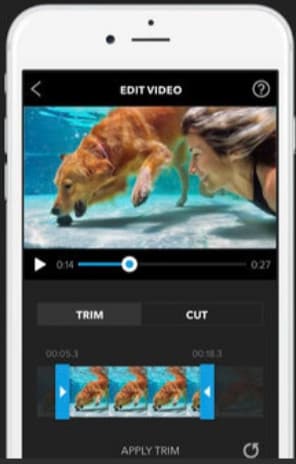
Splice is an extraordinary video editor that makes it easy to make fully customized and professional videos from your iPhone. The app is also best for video cutting. Besides, it has many interesting features, which you can use from your device.
Features
- Cutting, trimming, and cropping your videos
- Exposure, saturation, and exposure adjustment
- Slow and fast motion with speed ramping option
- Video masking and overlay
- Color correction and text overlays
Pros
- Free basic features, such as video cutting
- iTunes integration
- Supports AVI video input
- User-friendly application
- Access to the music library
- Quick and simple social sharing
Cons
- Output videos require high mobile storage space
Part 6: Top 3 Free AVI Video Cutter Online
Don’t want to install video cutters on your MAC, Windows, smartphone, or any other device? No problem! You can use online video cutters and trimmers to split, cut, or trim your clips for free.
However, the problem still exists in online tools, as not all web-based editors allow importing AVI files. So to save your time and energy, you can directly go to the following online AVI cutters to complete your tasks.
Kapwing
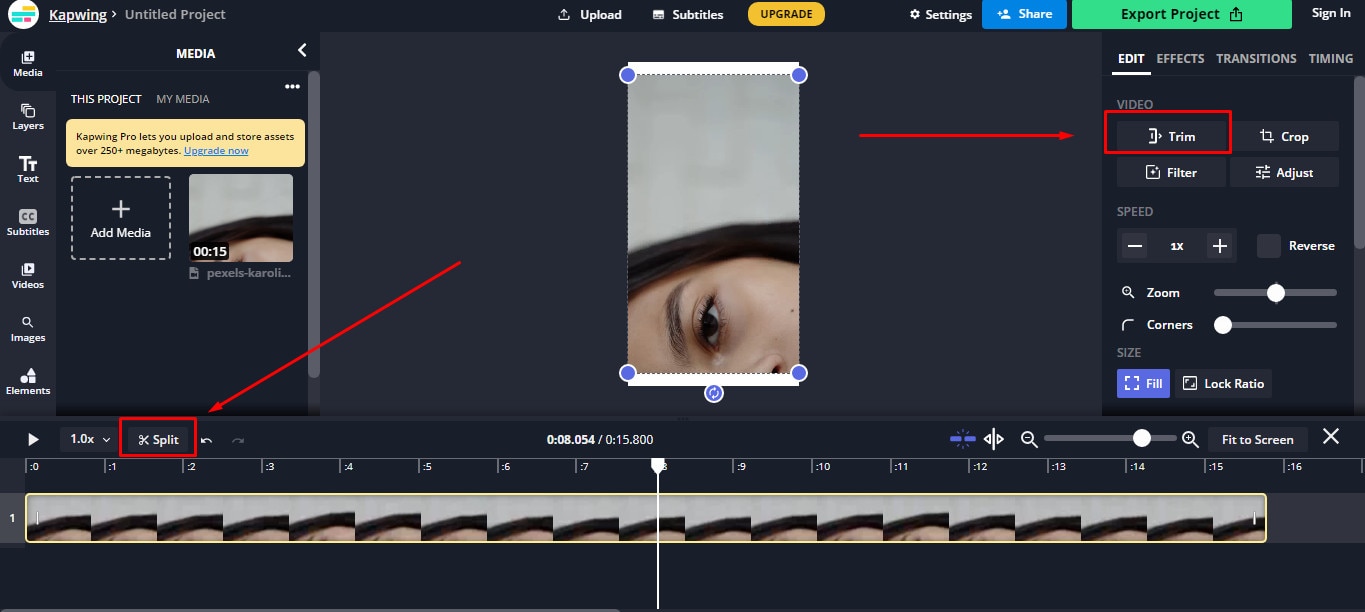
Kapwing is an online video editor best for casual creatives, such as Vloggers and YouTubers. You can use this web-based platform to cut your videos. Gladly, Kapwing supports all AVI incomings. You can upload your AVI video files to this platform and use its trim or split feature. To do that, you need to upload your AVI video and choose the “Trim” or “Split” tool to see the magic. Once done with the trimming process, you can explore Kapwing’s other incredible traits and apply them to your project.
Features
- Video splitting, trimming, and merging
- Audio capturing
- Speed adjustment
- Image and video library
- Text editing and overlay
- Auto-generated subtitles
- Several collaboration tools
- Video creation from scratch
- Templates, shapes, and emojis
- Simple drag-and-drop interface
- Video transitions, plugins, and elements
Pros
- Free online video trimmer
- User-friendly interface
- You can export 30-minutes long projects
- Allows you to export unlimited videos with a watermark
- One watermark-free video export is available each month
Cons
- Cannot export long videos with a free account
- Only 10 minutes transcription limit is available for free users
- You need to purchase a monthly or annual subscription to remove the watermark from multiple videos
Clideo
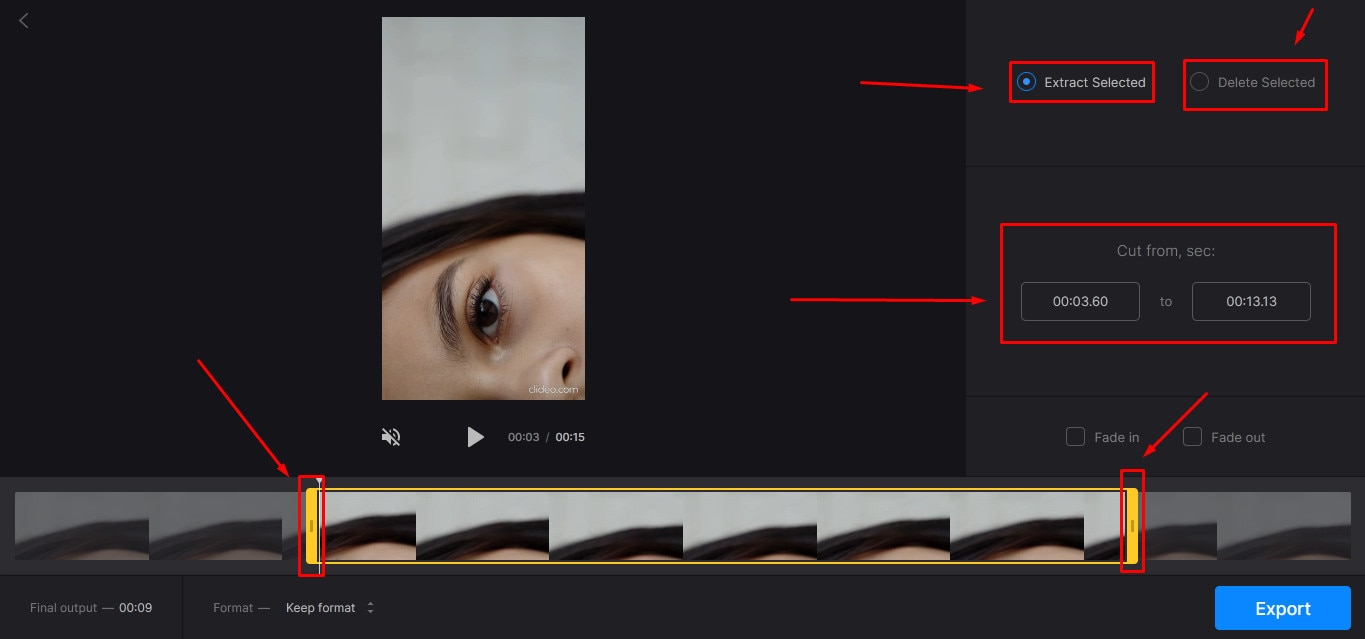
Clideo is not just a video cutter but an online solution to all your video editing problems. The tool is super popular, with 4 million+ users a month. And why not? This is one of those web-based platforms that allow AVI video files to be imported and exported without converting them into any other formats.
Nevertheless, if you’re only looking for video cutting options, this tool makes your life easy. Simply upload your video, and select the portion of it by setting start and end times. Choose whether you want to delete or extract the selected part from the clip, and hit the “Export” button.
And within a few moments, you can enjoy a trimmed video clip. And if you plan to be more creative, you can look for other Clideo features to make videos more fascinating.
Features
- Video combining and cutting
- Resize and crop clips
- Compress your videos
- Add text and subtitles
- Add music to your video files
- Filters and color correction tools
- Audio mute, cutting, and muting
- Video rotation, flipping, and speed adjustment
Pros
- Basic tools can be used for free
- Best for beginners and intermediate users
- Ideal for AVI videos and also supports other video formats
Cons
- You cannot use the free version regularly
Aspose
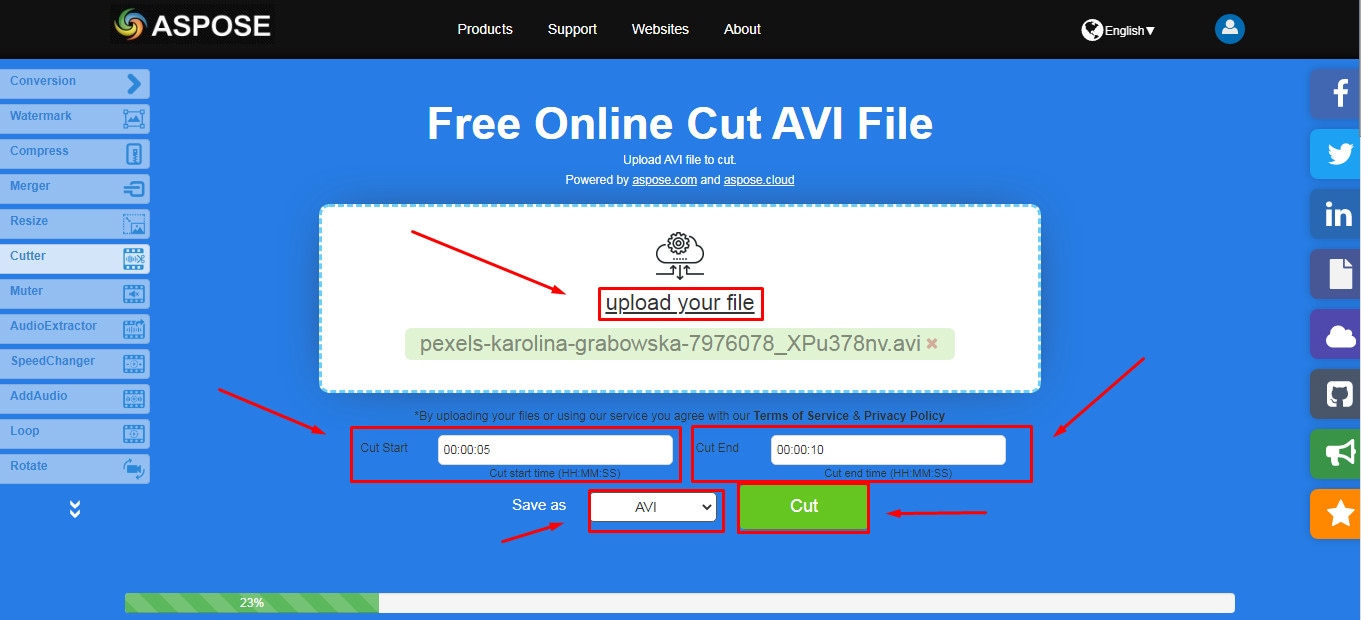
Aspose is a free web-based application to cut clips. You can use this tool on any operating system. It supports all major video file formats, including AVI, MKV, MOV, MP4, FLV, WMV, WEBM, and GIF. Additionally, you can use Aspose for various other reasons, such as audio extraction, video resizing, and more.
Features
- Video cutting and compressing
- Looping, rotation, and video merging
- Adding watermarks on videos
- Sound muting
- Speed change and audio addition
Pros
- Aspose is a free online tool
- It offers straightforward options to cut and edit videos
Cons
- No color correction option
- Slow video cutting process
- Lacks timeline and other valuable features
Part 7: Bottom Line
Tired of finding AVI cutters? Relax and try these top 16 AVI video cutters for Windows, MAC, iPhone, Android, and online. Almost all these tools are free to use and are extremely handy. On the other hand, if you want to cut and trim videos professionally, download Filmora and follow the step-by-step guide in this article for making clean cuts.
Part 8: FAQs
Q1. How do I trim an AVI video?
To trim an AVI video file, ensure that the software or tool you use supports AVI input. Generally, you need to upload or import a clip on the program, select the portion of the video, and apply the cut/trim feature to make it happen.
Q2. Which is the best online video cutter?
Kapwing and Clideo are the two best online video cutters you can use for free. Both web-based tools also allow you to cut your AVI videos.
Q3. Which is the best video cutter and joiner software?
Filmora, iMovie, and Kapwing are some of the best video cutters and joiner tools. These video editors are also free to use and come with different features.
Q4. How do I trim an AVI file in Windows 10?
Trimming an AVI video file in Windows 10 is very simple. Launch the Microsoft Photos (Photo App) application on your computer, add clip, and select the “Trim” tool to trim a specific video part.
Q5. How can I cut a video on my computer for free?
MAC and Windows users can download Filmora to cut videos for free. Filmora also offers a wide range of other features to make your clips exciting. Contrarily, Windows users can use the built-in Photo App in Windows 10 or download Gihosoft or Handbrake software to cut clips. Likewise, MAC users can download VideoPad, Xilisoft Video Cutter, or iMovie for free.
With the growing fame of video-sharing and social media applications like Twitter, Instagram, and TikTok, the demand for simple and fast video cutting and trimming tools has dramatically increased. Nowadays, you don’t have to play with complex video editing tools to produce high-quality videos.
Thanks to several user-friendly editing software to make things easy for everybody. However, finding the right programs to trim/cut videos is still challenging, especially in AVI format.
But, guess what? These top 16 AVI video cutters for Windows, MAC, Android, iPhone, and online will make video cutting and trimming fun, especially when you learn to do it using Filmora.
In this Article
Part 1: Best AVI Video Cutter to Trim/Cut AVI Video on Windows and MAC – Filmora Video Cutter [with steps}
Part 2: Top 3 Free AVI Video Cutter on Windows
Part 3: Top 3 Free AVI Video Cutter on MAC
Part 4: Top 3 Free AVI Video Cutter on Android
Part 5: Top 3 Free AVI Video Cutter on iPhone
Part 6: Top 3 Free AVI Video Cutter Online
Part 7: Bottom Line
Part 8: FAQs
Part 1: Best AVI Video Cutter to Trim/Cut AVI Video on Windows and MAC – Filmora Video Cutter [with steps]
Filmora by Wondershare is a star video editor with outstanding outcomes. Whether you have a MAC or Windows PC, you can download Filmora regardless of your operating system. The program best serves those who intend to make high-quality videos. The software provides editing support for all video formats, including AVI.
Although Filmora is an affordable editor with tons of audio and video editing options, you can still download the software for free and create projects if watermarks don’t bother you. Moreover, you can count this tool’s capabilities in cropping, resizing, and Chroma screen support. But that’s not the only sweet fruit.
In fact, Filmora is equipped with many jaw-dropping features, including preset templates, auto beat sync, split-screen, speed ramping, motion tracking, keyframing, creative transitions, titles, filters, and much more. And the best part is, you can learn and understand Filmora in no time. That’s why the program is loved and supported by all types of users.
So does Filmora helps cut and trim AVI videos? Yes! It does if you follow these steps correctly.
Step 1: Download Filmora Video Editor
First, download Filmora Video Editor by choosing your operating system, as seen in the screenshot below.
Run the setup and let it finish without any pause or break.
Step 2: Import Your Video to Filmora Video Editor
Importing your AVI video is a very simple process. Just click on the “Film Clip” icon.
It will open a new window screen on your computer to select the video from the directory. Find the clip you want to import and cut. Use your mouse to select it and click the “Open” button.
The video will be loaded in the “Media” folder of Filmora. The clip’s thumbnail should be visible to assure you have done everything correctly.
If you can see that, let’s go to the next step.
Step 3: Drag and Drop Video to Filmora’s Timeline
Select the video in the media folder by clicking over it once. Now, without leaving the hold of the left button of your mouse, slide the video down to the track in the timeline.
After that, a message will pop up, asking about your preference for the project settings. It is recommended to choose the “Match to Media” option unless you’re an experienced video editor who knows how to play with the resolution and frame rates.
You will see the video on the timeline with its preview on the “Preview Screen” on the right side of the interface.
Step 4: Cutting Your Video in Filmora
Here comes the core step you have been waiting for. But before you go any further, you need to know about the “Playhead.”
Playhead is an orange-reddish marker you can find on the timeline.
It has an important role in cutting your videos.
So, move the playhead to your desired frame and click on the “scissor” icon to make the “starting” cut.
As soon as you do it, you will see that the single clip is now divided into two parts similar to this image.
The “Red” marked area in the above screenshot ensures a gap between the clips on the timeline. The “Yellow” arrows confirm two separate clips of the same video.
Place the two clips together as seen in this “Green” area.
And place the playhead anywhere on the clip. And click on the “scissor” icon once again to make the “ending” cut (second cut).
If done correctly, there should be three clips now of the same video, as you can observe in this screenshot.
Again, the “Red” area in the above photo indicates the gap, and the “Yellow” area ensures a third segment of the video.
Note: The gaps you can see in the divided clips are made intentionally for understanding. Practically, Filmora doesn’t move the clip or make gaps in between after you have made the cuts.
Keep in mind that there are three clips on the timeline. Now, if you want to remove the second clip from the video, you need to select that portion first by clicking on it.
Then, right-click on the mouse and choose “Cut” from the menu.
Within a semi-second, the selected portion will be removed from the timeline. And you will be able to see the remaining parts of the video. Now, pull the second clip using your mouse and place it at the end of the first clip without leaving a gap in between.
Then, click the “Play” button under the preview screen to see the results.
You can see in the above two screenshots that there’s a jump between the scenes due to cuts, confirming that video has been cut significantly.
Step 5: Trimming Your Video in Filmora
Remember that cutting and trimming in Filmora are two different things. Trimming allows you to remove a particular video part from visibility without deleting the portion.
So feel free to skip this step if you’re happy learning the cutting technique. But if you’re interested in trimming, here’s how you do it.
Take your mouse cursor at the beginning or end of the clip you want to trim. Keep holding the clip’s corner and slide the mouse back or front to trim the part
Note: Since the trim tool doesn’t delete the video, the final project based on trimming will be of a larger size. Therefore, it is advised to cut videos rather than trimming for fast rendering, better results, and small video size.
Step 6: Save Project and Export Your Cut/Trimmed AVI Video
Choose “Save Project” from the “File” menu.
Select the directory to save the project, rename the new video, and click the “Save” button.
Click on the “Export” button to save the video in AVI or any other video format of your choice on your computer.
Part 2: Top 3 Free AVI Video Cutter on Windows
As a Windows user, finding an excellent video cutter is relatively easy. However, not all software permits importing AVI videos. In the same way, some video trimmers come at a price. So if you really don’t want to pay and enjoy cutting your AVI files, try using these three video cutting tools.
Microsoft Photos (Windows 10)
Microsoft Photos or Photo App is a free photo viewer and editor with your Windows 10. It offers incredible photo editing and enhancement along with different tools for organizing and editing videos in a very friendly way. Likewise, you can create drawings over the videos and add 3D effects and background music to your clips.
You can also trim AVI videos with Microsoft Photos quickly. All you need to do is open your clip with the Photo App, choose the “Trim” option, select a portion of the video you want to trim, and go ahead.
That’s it!
Features
- Quick video trimming
- Cool text effects
- 3D library and effects
- It has a clear interface
- You can find and tag people’s faces
- The program has 15+ filters for editing
- Motion tracking option for drawing on videos
- Allows you to view and organize your files easily
Pros
- Microsoft Photos is free for Windows users
- It automatically creates albums
- The program has a touch-friendly interface
- You can integrate your OneDrive with the software
Cons
- Lacks before and after view
- Not included in older Windows versions
- It doesn’t support selective focus or panorama stitching
Handbrake
Handbrake is best-known for its video transcoding traits. Unlike typical video editors, this open-source tool includes limited options to rip Blu-rays and DVDs. Moreover, you can mix the 5.1 soundtracks and convert them to stereo to make the audio compatible with your TV speakers.
But the exciting thing about Handbrake is that you can use this software on your macOS 10.13 or later versions to cut AVI videos for free. However, it’s a bit technical process, as there’s no timeline to help you trim or make cuts on the clips directly with the help of your mouse.
You are required to mention a time range (seconds, minutes, or hours) to keep a specific part of the video while the software removes the non-ranged parts of the clip. For instance, you have a video of 10 seconds. You start the range from 5 seconds and end it at 10 seconds. So, the first four seconds of the video will be cut from the entire clip.
Features
- Video cutting, cropping, and resizing
- Low-quality and old video restoration
- Video conversion from any format to MKV or MP4
Pros
- Handbrake is free
- You can convert batch videos with ease
- It supports MAC, Windows, and Linux OS
- Allows you to import video files in all major formats
- The software comes with various video conversion presets
Cons
- Handbrake is not a user-friendly tool
- The video file output is limited to two formats (MKV and MP4) only
Gihosoft Video Cutter
Gihosoft is a clean, free, lossless video cutter on your Windows PC. It’s a simple tool that helps you cut video files into various output formats. So be it AVI, MPEG, or any other file, with Gihosoft, everything becomes handy.
Another fascinating fact about this software is that it allows you to cut videos in three simple steps without losing the quality. So right after installing the program, you simply need to import your file, choose the start and end time, and click the “Cut” button to remove the part of the video.
Features
- Fast video and audio cutting
- Easy drag and drop audio/video files
- It supports most audio and video formats
Pros
- Free for both Windows and MAC operating systems
- The cutter saves video in original quality
Cons
- It does not include basic video editing features
Part 3: Top 3 Free AVI Video Cutter on MAC
Are you looking for a great AVI video cutter for your MAC? Sadly, you have limited product choices as compared to Windows users. But to ensure you don’t waste time looking for a suitable tool, here’s a list of three AVI video cutting programs you can use on your Macintosh.
iMovie
The first and foremost recommended software for free video cutting on MAC is Apple’s own tool, iMovie . It is a built-in program that comes with your system, so there is no need to spend extra on a video editor. iMovie allows you to browse and import most video files, including AVI, right from your computer. Also, this tool is equipped with multiple functions, such as audio editing, video quality enhancement, and much more.
This MAC’s video editor is ideal for beginners. Many home users and small business owners find this tool extremely simple, as they don’t like to be confused with complex features. So, if you want to make cuts to your video clips, start working on iMovie. And within a few clicks, you can trim or cut your videos for free.
Features
- Video cutting and trimming
- Cropping and rotation
- Effects and transitions
- Built-in themes
- HD and 4K video support
- Movie sharing
- Audio adjustments
- Chroma screen controls
- Character tracking
Pros
- Free to use for MAC users
- Clean timeline
- One-click video cutting and trimming
- Easy-to-remember keyboard shortcuts
- Direct share projects to your social media, like YouTube
Cons
- It takes a lot of time to export videos
- iMovie needs high HDD storage space
VideoPad by NCH
VideoPad by NCH is a beginner-level video editor with all the basic features. The software is specifically designed for home movie makers. That is why VideoPad is easy to understand and use.
VideoPad is entirely free of cost for non-commercial purposes, but it has limited features. On the other hand, if you want to enjoy full traits, you can purchase the tool.
VideoPad supports video files, including AVI, WMV, MPEG, MOV, MP4, ASF, and XviD. Likewise, you can also burn movies to Blu-ray, DVD, HD-DVD, or CD. And most importantly, you can easily cut or trim AVI videos on your MAC, as the software is available on both MAC and Windows systems.
Features
- Audio tools
- Video rotation
- Video sharing
- Visual effects
- Video transitions
- 3D Video editing
- Color correction
- Overlays and texts
- Video optimization
- Great plugin support
- Direct video uploading
- Multiple video resolutions
- Video cutting and trimming
- Files exportation to various devices
- Stereoscopic conversion from 2D to 3D
Pros
- You can use the basic tools for free
- Allows 360-degree video production
- It supports a wide range of video formats
- Compatible with MAC and Windows computers
Cons
- The auto speech feature performs poorly
- The free version has annoying notifications
Xilisoft Video Cutter
Xilisoft Video Cutter is the simplest tool to cut videos on MAC. This software has a straightforward option to cut the clip after importing it to the timeline. The program is fast and has a user-friendly interface.
Moreover, you can polish your videos by merging multiple clips or increasing the video quality once you’re done with the cutting process. At the same time, this video cutter allows you to import all video formats, including XviD, DivX, MOV, FLV, MP4, MPEG-4/, MKV, MPEG, WMV, and AVI.
Features
- Video joining
- Support multiple output video formats, including HD
Pros
- Easy video cutting and merging
- It doesn’t require a large storage space
- Extremely uncomplicated interface
- Real-time preview to make better cuts
- Available on both MAC and Windows systems
Cons
- The trial version is free to use but limits you from enjoying extra features
Part 4: Top 3 Free AVI Video Cutter on Android
After capturing nice videos with your Android mobile phone, you may need to cut unnecessary scenes to make your clips look professional. While there are numerous Android cutters, not all support the AVI format. So below, you will find the 3 best AVI video cutters for Android, which are free to use.
Quick – Video Editor & Maker
Quick – Video Editor & Maker is a free video editor with PRO results. Many photographers and vloggers love using this app to cut clips immediately. Furthermore, the application offers a wide range of options to assure you don’t have to look to any other tool to rotate or compress video. Quick – Video Editor & Maker lets you import videos in all major formats, including AVI, MPEG, WMA, and more.
Features
- Video cutting, fading, and rotation
- Speed control tools
- Conversion from video to GIF
Pros
- Free app
- Simple interface
Cons
- Lack of updates
- Some users complain about app crash
Funimate Video Editor & Maker
If you want to make some professional-grade video edits quickly, you are welcome to download and use Funimate Video Editor & Maker on your Android device. It’s a free tool to cut videos. It has an easy procedure, and you can cut AVI videos in a few seconds.
Plus, you can use the app to add custom animations, effects, and many other exciting elements. You can share your makes on social media like TikTok, Instagram, and other platforms. Contrarily, the app itself is a community with millions of Funimate-users who share their creations daily. You can also join or watch videos from other creators to learn more about new techniques and trends in video editing.
Features
- Video trimming and splitting
- Animation and cropping
- Filters and AI effects
- Speed adjustment
- Keyframing and video merging
Pros
- Free Android application with several editing tools
- Easy trimming, splitting, and cropping
- Aspect ratio, border, and color customization
- Direct social media sharing
Cons
- Free users cannot use templates
- The free version stamps watermarks on each project
Part 5: Top 3 Free AVI Video Cutter on iPhone
No wonder iPhone’s camera captures high-quality videos. But the problem begins when there’s no free app to cut AVI videos. So if you’re recording great spots, but deep inside, you really want to remove some parts, then these 3 free AVI video cutters will work smoothly on your iPhone.
Cut, Trim, Split Video Editor
Download Cut, Trim, Split Video Editor on your iPhone to delete/cut unwanted portions of your video clips. The tool is also best for trimming iPhone-recorded clips without messing with the frames. Or, if you just want to split the video into multiple parts for your next WhatsApp status, this iPhone app can do that job for you.
The app supports multiple video file types, including MOV, MP4, AVI, MPEG, MPEG-2, and 3GPP
Features
- Easy trimming and cutting video clips
- Splitting big-sized videos into two smaller clips
- Import video from file-sharing platforms, like iCloud, using Wi-Fi
Pros
- Free app for fast video cutting and sharing
- Simple UI interface
Cons
- The free version shows advertisements
Splice - Video Editor & Maker
Splice is an extraordinary video editor that makes it easy to make fully customized and professional videos from your iPhone. The app is also best for video cutting. Besides, it has many interesting features, which you can use from your device.
Features
- Cutting, trimming, and cropping your videos
- Exposure, saturation, and exposure adjustment
- Slow and fast motion with speed ramping option
- Video masking and overlay
- Color correction and text overlays
Pros
- Free basic features, such as video cutting
- iTunes integration
- Supports AVI video input
- User-friendly application
- Access to the music library
- Quick and simple social sharing
Cons
- Output videos require high mobile storage space
Part 6: Top 3 Free AVI Video Cutter Online
Don’t want to install video cutters on your MAC, Windows, smartphone, or any other device? No problem! You can use online video cutters and trimmers to split, cut, or trim your clips for free.
However, the problem still exists in online tools, as not all web-based editors allow importing AVI files. So to save your time and energy, you can directly go to the following online AVI cutters to complete your tasks.
Kapwing
Kapwing is an online video editor best for casual creatives, such as Vloggers and YouTubers. You can use this web-based platform to cut your videos. Gladly, Kapwing supports all AVI incomings. You can upload your AVI video files to this platform and use its trim or split feature. To do that, you need to upload your AVI video and choose the “Trim” or “Split” tool to see the magic. Once done with the trimming process, you can explore Kapwing’s other incredible traits and apply them to your project.
Features
- Video splitting, trimming, and merging
- Audio capturing
- Speed adjustment
- Image and video library
- Text editing and overlay
- Auto-generated subtitles
- Several collaboration tools
- Video creation from scratch
- Templates, shapes, and emojis
- Simple drag-and-drop interface
- Video transitions, plugins, and elements
Pros
- Free online video trimmer
- User-friendly interface
- You can export 30-minutes long projects
- Allows you to export unlimited videos with a watermark
- One watermark-free video export is available each month
Cons
- Cannot export long videos with a free account
- Only 10 minutes transcription limit is available for free users
- You need to purchase a monthly or annual subscription to remove the watermark from multiple videos
Clideo
Clideo is not just a video cutter but an online solution to all your video editing problems. The tool is super popular, with 4 million+ users a month. And why not? This is one of those web-based platforms that allow AVI video files to be imported and exported without converting them into any other formats.
Nevertheless, if you’re only looking for video cutting options, this tool makes your life easy. Simply upload your video, and select the portion of it by setting start and end times. Choose whether you want to delete or extract the selected part from the clip, and hit the “Export” button.
And within a few moments, you can enjoy a trimmed video clip. And if you plan to be more creative, you can look for other Clideo features to make videos more fascinating.
Features
- Video combining and cutting
- Resize and crop clips
- Compress your videos
- Add text and subtitles
- Add music to your video files
- Filters and color correction tools
- Audio mute, cutting, and muting
- Video rotation, flipping, and speed adjustment
Pros
- Basic tools can be used for free
- Best for beginners and intermediate users
- Ideal for AVI videos and also supports other video formats
Cons
- You cannot use the free version regularly
Aspose
Aspose is a free web-based application to cut clips. You can use this tool on any operating system. It supports all major video file formats, including AVI, MKV, MOV, MP4, FLV, WMV, WEBM, and GIF. Additionally, you can use Aspose for various other reasons, such as audio extraction, video resizing, and more.
Features
- Video cutting and compressing
- Looping, rotation, and video merging
- Adding watermarks on videos
- Sound muting
- Speed change and audio addition
Pros
- Aspose is a free online tool
- It offers straightforward options to cut and edit videos
Cons
- No color correction option
- Slow video cutting process
- Lacks timeline and other valuable features
Part 7: Bottom Line
Tired of finding AVI cutters? Relax and try these top 16 AVI video cutters for Windows, MAC, iPhone, Android, and online. Almost all these tools are free to use and are extremely handy. On the other hand, if you want to cut and trim videos professionally, download Filmora and follow the step-by-step guide in this article for making clean cuts.
Part 8: FAQs
Q1. How do I trim an AVI video?
To trim an AVI video file, ensure that the software or tool you use supports AVI input. Generally, you need to upload or import a clip on the program, select the portion of the video, and apply the cut/trim feature to make it happen.
Q2. Which is the best online video cutter?
Kapwing and Clideo are the two best online video cutters you can use for free. Both web-based tools also allow you to cut your AVI videos.
Q3. Which is the best video cutter and joiner software?
Filmora, iMovie, and Kapwing are some of the best video cutters and joiner tools. These video editors are also free to use and come with different features.
Q4. How do I trim an AVI file in Windows 10?
Trimming an AVI video file in Windows 10 is very simple. Launch the Microsoft Photos (Photo App) application on your computer, add clip, and select the “Trim” tool to trim a specific video part.
Q5. How can I cut a video on my computer for free?
MAC and Windows users can download Filmora to cut videos for free. Filmora also offers a wide range of other features to make your clips exciting. Contrarily, Windows users can use the built-in Photo App in Windows 10 or download Gihosoft or Handbrake software to cut clips. Likewise, MAC users can download VideoPad, Xilisoft Video Cutter, or iMovie for free.
MacVideo Editor
VirtualDub for Mac: Easily Edit Video in Mac

Ollie Mattison
Mar 27, 2024• Proven solutions
VirtualDub is a free and powerful video capture and processing software for Windows platform. Other than being able to accomplish the basic video editing tasks such as compress, trim, remove audio, you can also apply special effects like adding subtitles and more. However, if you have transferred to the Mac platform, you may need a VirtualDub alternative for Mac because VirtualDub only supports Windows OS natively.
Best VirtualDub for Mac Alternative - Filmora for Mac
As regard of the best VirtualDub for Mac alternative, Wondershare Filmora for Mac is an ideal choice. This software enables you to edit almost any video, audio or photo file, using all common video editing tools. Besides, you can also easily retouch your video with effects like jump cut, tilt-shift and much more. Now let’s take a close look at the main features of this easy-to-use yet powerful mac video editor.
Let’s check the video tutorial first!
 Download Mac Version ](https://tools.techidaily.com/wondershare/filmora/download/ )
Easily import almost any video files
This VirtualDub for Mac alternative supports virtually all video formats including MP4, FLV, AVI, MKV, VOB, 3GP, ASF, MOV, F4V, M4V, MPG, TS and more. That means you don’t have to deal with any ‘pre-conversion’ worries- just drop whatever you have to get started!
Intuitive and user-friendly interface
Filmora for Mac also provides a nice organized workspace that allows for video, text and audio layering. The drag-n-drop feature enables you to easily access everything, so you don’t need to upload your media files from the containing folders. The preview window is also included in the main interface so that you’re able to see the real-time effect without opening a player for it.

Powerful video editing functions
Want to cut out unwanted parts of the video? Have black bars around your video? Don’t worry. Just import your video to this VirtualDub for Mac and make it perfect. You can adjust your video using Contrast, Brightness and Saturation options with just one-click. An array of video effects like video filters, transitions, intro/credits, tilt shift, mosaic, face off, jump cut and more are also provided so you can enhance your video instantly.

Various output selections
When the editing process is completed, you can immediately save or share the creation. Filmora for Mac provides different output methods, including encoding the video into a specific file format that’s compatible with almost any popular mobile phones or portable devices; direct uploading or sharing onto YouTube or Facebook or burning a DVD.

Now download this best VirtualDub for Mac alternative to easily edit your videos in Mac!
Download Mac Version ](https://tools.techidaily.com/wondershare/filmora/download/ )
VirtualDub for Mac Alternative - iMovie
Developed by Apple, iMovie is one of the most popular video editing software on Mac. Free as VirtualDub, iMovie can conduct basic video editing and offer limited transitions and filters. If you only want to trim, crop , split or merge video clips, iMovie is the one you can go after. If you are serious about video editing, it sure can not meet your needs.
Ollie Mattison
Ollie Mattison is a writer and a lover of all things video.
Follow @Ollie Mattison
Ollie Mattison
Mar 27, 2024• Proven solutions
VirtualDub is a free and powerful video capture and processing software for Windows platform. Other than being able to accomplish the basic video editing tasks such as compress, trim, remove audio, you can also apply special effects like adding subtitles and more. However, if you have transferred to the Mac platform, you may need a VirtualDub alternative for Mac because VirtualDub only supports Windows OS natively.
Best VirtualDub for Mac Alternative - Filmora for Mac
As regard of the best VirtualDub for Mac alternative, Wondershare Filmora for Mac is an ideal choice. This software enables you to edit almost any video, audio or photo file, using all common video editing tools. Besides, you can also easily retouch your video with effects like jump cut, tilt-shift and much more. Now let’s take a close look at the main features of this easy-to-use yet powerful mac video editor.
Let’s check the video tutorial first!
Download Mac Version ](https://tools.techidaily.com/wondershare/filmora/download/ )
Easily import almost any video files
This VirtualDub for Mac alternative supports virtually all video formats including MP4, FLV, AVI, MKV, VOB, 3GP, ASF, MOV, F4V, M4V, MPG, TS and more. That means you don’t have to deal with any ‘pre-conversion’ worries- just drop whatever you have to get started!
Intuitive and user-friendly interface
Filmora for Mac also provides a nice organized workspace that allows for video, text and audio layering. The drag-n-drop feature enables you to easily access everything, so you don’t need to upload your media files from the containing folders. The preview window is also included in the main interface so that you’re able to see the real-time effect without opening a player for it.
Powerful video editing functions
Want to cut out unwanted parts of the video? Have black bars around your video? Don’t worry. Just import your video to this VirtualDub for Mac and make it perfect. You can adjust your video using Contrast, Brightness and Saturation options with just one-click. An array of video effects like video filters, transitions, intro/credits, tilt shift, mosaic, face off, jump cut and more are also provided so you can enhance your video instantly.
Various output selections
When the editing process is completed, you can immediately save or share the creation. Filmora for Mac provides different output methods, including encoding the video into a specific file format that’s compatible with almost any popular mobile phones or portable devices; direct uploading or sharing onto YouTube or Facebook or burning a DVD.
Now download this best VirtualDub for Mac alternative to easily edit your videos in Mac!
Download Mac Version ](https://tools.techidaily.com/wondershare/filmora/download/ )
VirtualDub for Mac Alternative - iMovie
Developed by Apple, iMovie is one of the most popular video editing software on Mac. Free as VirtualDub, iMovie can conduct basic video editing and offer limited transitions and filters. If you only want to trim, crop , split or merge video clips, iMovie is the one you can go after. If you are serious about video editing, it sure can not meet your needs.
Ollie Mattison
Ollie Mattison is a writer and a lover of all things video.
Follow @Ollie Mattison
Also read:
- New In 2024, The Anatomy of Great Lower Thirds A Guide for FCPX Editors
- New Top 8 Best Animation Maker for Beginners and Pros
- Unbiased Review How to Obtain Filmora Without Resorting to Piracy for 2024
- Elevate Your Events Best Video Invitation Apps for Mobile for 2024
- Updated Best Free MPEG Video Joiner Software Top 5 List for 2024
- Updated 2024 Approved Edit FLV Videos on Windows 8 with Ease A Beginner-Friendly Editor
- New Accelerate Your Videos A QuickTime Player Guide for Windows and Mac for 2024
- New Bringing Your Nikon Videos to Life Essential Editing Skills and Tools for 2024
- Updated Vlog Like a Pro 10 Essential Editing Apps for iOS and Android
- Updated In 2024, Get Best Subtitle Edit for Mac Alternatives
- Updated 2024 Approved Unleash Your Creativity A Beginners Guide to Online Video Editing
- New Unlocking M4R Conversion Essential Knowledge for Success
- 2024 Approved Top Apps to Convert Videos to Live Photos on iPhone
- New In 2024, From iMovie to Hollywood Mastering Movie Making on Mac
- New 2024 Approved Glowing Complexion in Minutes FCPX Skin Smoothing Tutorial
- 2024 Approved Top Open-Source Video Editing Software
- 2024 Approved Unlock Perfect Lighting Top Video Brightening Apps
- New In 2024, The Animators Handbook Stop Motion Studio and Beyond
- Updated In 2024, The Ultimate List 10 Best Cartoon Video Maker Apps for Android & iPhone
- New The Best of Both Worlds Free and Paid 3D Animation Software Options
- New In 2024, The Perfect Fit TikTok Aspect Ratio Guide for Creators
- In 2024, VHS Vibes Best Mobile Apps for Retro Video Editing
- Updated Free Security Camera Software Reviews Top 10 Options for 2024
- In 2024, Get Noticed on TikTok The Importance of Aspect Ratio
- Updated 2024 Approved Video Editing Battle Sony Vegas vs Adobe Premiere Pro - Features, Pricing, and More
- Updated Create Viral Memes with These 10 Amazing Apps
- VidEdit Mac for 2024
- Updated 2024 Approved Vertical Video Editing in the Cloud Best Web-Based Options
- Updated HD Video 101 Demystifying Pixel Size and Resolution for 2024
- 2024 Approved Canon Video Editor A Beginners Guide to Editing Your Camcorder Footage
- In 2024, Effortless VLC Trimming on Mac Maintain Original Video Quality
- New Master 1080P Video Editing Expert-Approved Software for Stunning Results
- Updated 2024 Approved Unleash Your Creativity 20 Best Adobe Premiere Title Templates Free Download
- New In 2024, Professional Results Without the Professionals DIY Movie Making for Beginners
- WhatsApp Status Video Editing Apps for 2024
- New Ratio Matters How Aspect Ratio Selection Impacts Your YouTube Videos Success
- New Mac Users, Rejoice! 10 Top-Rated Vegas Pro Alternatives for Video Editing
- New Discover the Power of Open-Source Best Free Video Editors
- Updated In 2024, Transform Your Photos Into Mesmerizing Videos with These 5 Apps
- New Ken Burns Effect in Final Cut Pro A Beginners Guide to Professional Results
- Updated 2024 Approved Androids Best Top 10 Video Editing Apps Like iMovie
- New In 2024, IMovie Alternative
- Updated From Boring to Brilliant Best Video Dubbing Apps for Comedy & Fun for 2024
- From Camcorder to Cinema Canon Video Editing Tips and Tricks for 2024
- Updated Proxy Powerhouses The Top Video Editing Apps for 4K for 2024
- Forgot iPhone SE Backup Password? Heres What to Do
- List of Pokémon Go Joysticks On Apple iPhone 12 Pro Max | Dr.fone
- A Detailed VPNa Fake GPS Location Free Review On Vivo Y28 5G | Dr.fone
- Mastering Android Device Manager The Ultimate Guide to Unlocking Your ZTE Nubia Z60 Ultra Device
- In 2024, Complete Tutorial to Use VPNa to Fake GPS Location On Honor Magic 5 Pro | Dr.fone
- Pattern Locks Are Unsafe Secure Your Samsung Galaxy A15 4G Phone Now with These Tips
- iPhone 11 Pro Asking for Passcode after iOS 17/14 Update, What to Do? | Dr.fone
- My Videos Arent Playing on Honor Magic Vs 2 – What Can I Do? | Dr.fone
- How to retrieve lost files from Honor X50?
- In 2024, The Top 5 Android Apps That Use Fingerprint Sensor to Lock Your Apps On Samsung Galaxy A15 4G
- Guide How To Unbrick a Bricked Motorola Defy 2 Phone | Dr.fone
- How to play MP4 files on Galaxy M14 4G?
- Title: Updated 2024 Approved Countdown in Minutes A 3-Part Guide to FCPX Timers
- Author: Charlotte
- Created at : 2024-04-29 06:33:44
- Updated at : 2024-04-30 06:33:44
- Link: https://smart-video-creator.techidaily.com/updated-2024-approved-countdown-in-minutes-a-3-part-guide-to-fcpx-timers/
- License: This work is licensed under CC BY-NC-SA 4.0.
