
:max_bytes(150000):strip_icc():format(webp)/how-to-watch-taylor-swift-movies-in-order-a8e26851d3d94bf183a144766801c16c.jpg)
Updated Video Blurring Made Easy Free Online Solutions for 2024
Video Blurring Made Easy: Free Online Solutions
How to Blur Video Online for Free

Liza Brown
Mar 27, 2024• Proven solutions
Sometimes it becomes important to blur the entire video or a particular part or section of it to draw the viewers’ attention or hide some sensitive or objectionable details from them respectively. Even though you can download and use any efficient app to get the job done, why take the pain when you can blur video online, and that too for free? Right?
With that said, in the following sections, you will learn about some portals available on the Internet that let you blur video background online. In addition, the options present in some of these web apps can also be exploited to blur part of video online free.
Best Online Tools to Blur Videos
A list of some of the best websites and their essential details are given below:
1. PickFrom
Visit: https://pickfrom.net/blur-video
PickFrom is a one-stop shop for almost all types of post-production tasks. For instance, you can blur a video or part of it, convert video to audio, add filters to the clips, and much more.
You Must Know About PickFrom Blur Tool
- No registration is required
- The free version adds a watermark while exporting
- Offers three pricing plans, namely Starter, Premium, and Enterprise
To blur video online with PickFrom:
- Go to the official website using your favorite Internet browser, and then click the Click to add files button
- Locate and upload the source video from your PC, and check the Blur part of the video box from the right pane
- Drag the selection box over the subject that you don’t want to get blurred, and resize the selection box as needed
- Turn off the Blur inside switch from the right pane, and choose a format from the Save As menu present at the bottom-left corner.
- Click Start, and then click Download or Copy the link to download the modified video to your PC or share it online, respectively.

Limitations
- Maximum acceptable video size is up to 2GB and 5GB for Starter and Premium subscriptions respectively.
- Enables you to blur either the full video or a part of it
- At the time of this writing, the ‘Blur video background’ feature isn’t smart enough to differentiate between the background and the main subject (humans)
2. WoFox
Visit: https://www.wofox.com/video-editing-tools/blur-an-object-in-video
WoFox is another website that offers almost every important tool for designing, post-production, and audio and video treatments. For example, you can create animation designs, GIF templates, infographic images, etc., with the web app.
You Must Know About Using WoFox to Blur Video
- No registration or credit card details are required
- Even the free access doesn’t add any watermark to the exported videos
- Offers three types of subscription plans, namely Free, Business Plan, Team Plan, and Virtual Assistant Plan
To blur part of video online free with WoFox:
- Launch your favorite web browser, and use the link given above to visit the portal;
- Click Upload and upload the source video, and then position and scale the selection box to cover the portion of the video that needs to be blurred.
- Optionally click the + button from the navigation pane on the left to add more selection boxes to cover multiple video portions. Click Download from the top-right corner of the page to download the modified clip.

Limitations of using Wo Fox to Blur Video Online
- In this writing, WoFox cannot differentiate between the normal background and humans.
- The free version can create videos only of up to 30 seconds
- The free version can export videos only in 360p resolution
3. Flixier
Visit: https://flixier.com/tools/blur-or-pixelate-video
This online portal offers many tools to make your source videos look more engaging and professional. With Flixier, you can create innovative adverts, slideshows, intros/outros, lyric videos, and even birthday clips. As for the social media part, you can create videos for YouTube, Twitch, Instagram, and Facebook.
Things You Must Know About Flixier
- Registration is required before you can start using Flixier
- The free access adds a watermark to the exported videos
- Offers three subscription plans, namely Creator, Business, and Enterprise
To blur video online with Flixier:
- Use your web browser to visit the URL given above, and then click Get Started;
- Sign up for a new account, or if you already have one, click login from the upper-right corner of the left section of the page;
- Right-click anywhere inside the Personal Library pane on the left, and then click Import;
- Choose your preferred method, and upload the source video to Flixier, and then click Import all when done;
- Close the Pick a layout box and drag the video from the Personal Library pane to the Timeline at the bottom;
- Position the Skimmer (Playhead) on the frame you want to start blurring the video from, and then click to select Shapes from the toolbox on the left;
- Click the Expand arrow next to the Square shape in the Shapes pane, and then click Square mask from the menu;
- Position and scale the square mask in the preview window, and then choose your preferred effect from the available options under the Masks section in the right pane;
- Drag the sides of the mask layer in the Timeline to specify for how long the mask should be applied in the video;
- Click Export from the top-right corner, and customize the output settings, and if need be, choose the target platform(s);
- Click Export Video from the lower area of the right pane, and wait while the video is rendered before you can start downloading it.

Limitations of using Flixier
- The free account can have only up to 2GB of storage
- It supports only 10 minutes of videos per month to be exported with a free account
- The maximum resolution for the videos exported with a free account is 720p
4. Kapwing
Visit: https://www.kapwing.com/studio
Kapwing is a trusted portal known to almost everyone who prefers online resources over PC applications. The website allows you to edit the videos, create memes for social media platforms, add audio and subtitles to the clips, resize them, etc.
Things You Must Know About Kapwing
- Registration is not necessary to blur video background online with Kapwing
- The free version does not add a watermark to the videos while exporting.
- Offers three subscription plans, namely Free, Pro, and For Teams
To blur video background online with Kapwing:
- Launch a web browser and visit the link given above
- Click Upload File, and upload the source video (or paste its URL if the clip is published online)
- Click Duplicate from the LAYER section of the right pane, and click to select the duplicate layer
- Click Crop from the top of the right pane, and crop the portion of the video that needs to be blurred
- Click Done Cropping, and then click Adjust from the top of the right pane
- Use the Blur slider to adjust the intensity of the blur effect
- Click Done Adjustingand use the Forward, Front, Backward, or Back buttons under the LAYER section to make the duplicate layer visible.
- Click Export Video from the top-right corner of the page, and wait while the modified video is rendered.
- Click the Download or Copy link to save the video to your PC or share it online, respectively.

Limitations
- You must register and sign in to a free account before exporting the videos to get rid of the watermark.
- Files of only up to 250MB can be uploaded while using a free account
- Videos of only up to 7 minutes each can be exported with a free account, while the total duration of the videos that can be exported is up to 3 hours.
5. Hippo Video
Visit: https://www.hippovideo.io/users/sign%5Fin
In addition to having various tools to edit the clips, including blur video online, Hippo Video can also record your PC screen and audio and even capture webcam footage. Creating engaging slideshows from the uploaded images is yet another feature that the web app offers.
You Must Know
- Registration is mandatory before you can start using Hippo Video
- The free/trial version doesn’t add a watermark to the exported videos
- Offers four subscription plans, namely Free, Personal, Classroom, and School
To blur video background online for free with Hippo Video:
- Use your favorite web browser to visit the URL given above
- Click Sign Up from the lower area of the Sign In to your account box (or sign in if you already have a Hippo Video account)
- Choose your preferred method to create an account, and then sign in
- Click Get Started and then populate the fields on the next couple of pages with the correct information on the next page.
- After completing the account creation process, click Import Video on the page that appears.
- On the Import Video box, choose your preferred method to locate and upload the source video, i.e., from your local computer or G-Drive.
- Click PROCEED from the bottom-right corner, and on the next page, add the necessary details related to the video (optional)
- Click IMPORT from the bottom-right corner to import the video and click EDIT VIDEO from the upper-right area of the preview window on the next page.
- Click Quick Edit from the list that appears, and then click the Blur tool from the bottom of the preview window.
- Click Add New Blur and position and scale the selection box in the preview window to cover the area that needs to be blurred.
- Drag the Blur marker in the progress bar to define the effect duration, and use the Strength slider to manage the intensity of the blur effect, and then click SAVE
- Back on the previous page, click EXPORT from the lower area of the preview window.
- Choose your preferred platform to export and publish the modified video to

Limitations
- The video resolution remains 480p while using a free account
- With the free version, you only get 1GB of bandwidth per month
6. YouTube Studio
Visit: https://studio.youtube.com/
Being one of the most viewed streaming media portals that offer free uploads and even lets you monetize your creations, YouTube has a separate section called YouTube Studio, where you can edit clips before publishing.
You Must Know
- A Gmail account is required to use YouTube Studio.
- All the videos can be uploaded without a watermark for free without any expiration date
- No subscription plans are enforced
To blur video online with YouTube Studio:
- Visit the URL given above using your favorite web browser (Google Chrome is recommended)
- If not already signed in, do so with your Gmail account when prompted for
- Click UPLOAD VIDEOS from the Channel dashboard section and on the Upload videos box, click SELECT FILES, and select and upload the source video from your PC
- While the video uploads, specify other publishing preferences using the options present on the box that appears
- Click NEXT from the bottom-right corner when done.
- On the Video elements box, add your preferred elements, click NEXT, review the details on the Checks box, click NEXT, choose your visibility preferences on the Visibility box, and click.
- Back on the main page, click Content from the navigation pane on the left and hover the mouse over the thumbnail of the video you uploaded, and click the Details icon that appears on the right.
- Click Editor from the Your video pane on the left and click GET STARTED from the right window and click BLUR PARTS OF YOUR VIDEO from the lower area of the Video editor window on the right.
- Click Custom blur from the list that appears and position and scale the selection box in the preview window to cover the object that needs to be blurred and drag the Blur slider in the Timeline to specify the duration of the effect.
- Optionally click BLUR from the upper-left area of the Video editor window to add another instance of the blur effect to blur another segment of the clip and click SAVE from the upper-right side.
- Click SAVE again on the Save changes confirmation box to save the changes
- Wait while Google reviews the modifications, and the video is made available for viewing
- Once this is done, get back to the Content section as explained earlier
- Hover mouse over the thumbnail, and click the Options icon from the right this time
- Click Download from the list to download the video with the blur effect to your PC

You can check more details of blurring videos with YouTube Studio .
Limitations
- Your YouTube account must be verified before you can publish long videos. Account verification is free.
- No copyright content is allowed to be published on YouTube
- No pornography or unethical content is allowed to be posted on YouTube
Bonus: How to Blur Video with Wondershare Filmora
 Download Mac Version ](https://tools.techidaily.com/wondershare/filmora/download/ )
Wondershare Filmora is a versatile post-production application with a built-in video editing tools and effects to edit videos with ease. The tool is usually considered a good competitor of Adobe Premiere Pro, Final Cut Pro X, etc.
Like any other similar program, even Filmora allows you to blur both landscape and portrait videos. The processes of getting these tasks done are given below:
1. Blur a Part of Video (Landscape Video)
Step 1: Import and Add the Source Video to Timeline
Launch Wondershare Filmora on your Windows or Mac computer (MacBook Pro M1 is used here), make sure that the 16:9 (Widescreen) layout preset is selected under the Select Project Aspect Ratio section on the flash screen, and click New Project.

Next, click to select My Media from the menu bar if not already selected, and from the navigation pane on the left, select Project Media.

Then, click Import from the Media box, select and import the source video to the program, drag the clip from the Media box to the Timeline at the bottom, and when the confirmation box appears, choose the option either under the Keep Project Settings or Match to Media sections to add the video to the Timeline.

Step 2: Add Blur Effect
Go to Effects from the menu bar, select Default from the top of the navigation pane on the left, and select Utility from the available list. From the right box, drag the Mosaic effect, and place it on a separate layer above the video track in the Timeline.

Step 3: Customize the Effect to Blur a Part of Video
Double-click the Blur effect in the Timeline, use the scaling handles in the preview window to scale and position the effect to cover your preferred part of the video and place it at your desired location respectively, choose a Mosaic style from the Type list present in the left box, and use the Intensity and Opacity sliders to customize further the appearance of effect as needed. Optionally, you can drag the side handles of the effect in the Timeline to adjust the duration of its visibility, and click OK from the bottom-right area of the upper-left box to save the changes.

2. Blur a Vertical Video
Download Mac Version ](https://tools.techidaily.com/wondershare/filmora/download/ )
Step 1: Import a Vertical Video and Add It to the Timeline
Use the above method to import the source vertical video to Filmora X and add it to the Timeline. However, it is important to choose the button under the Keep Project Settings label when the confirmation box appears, so you get some real estate because of the landscape mode to add the blur effect.
Step 2: Add Background Blur
Go to Effects and choose Default from the left pane, as explained earlier. Next, expand the Filters tree if not already expanded, click to select Background Blur from the list, from the box on the right, choose and drag your preferred blur effect, and place it on a separate layer in the Timeline above the video track.

Step 3: Customize the Blur Effect
Double-click the Blur effect in the Timeline, and use the available sliders to customize the effect that best fits your needs.

You can find more details about how to blur the background in the portrait video with Filmora .
Conclusion
If you want to have full control over the post-production process, having an efficient desktop program like Wondershare Filmora X would be something you might be looking for. On the other hand, if you are not a professional editor or are not much into editing and prefer playing around with the tools for personal use, going for a decent web portal to blur video online is your best bet.
Liza Brown
Liza Brown is a writer and a lover of all things video.
Follow @Liza Brown
Liza Brown
Mar 27, 2024• Proven solutions
Sometimes it becomes important to blur the entire video or a particular part or section of it to draw the viewers’ attention or hide some sensitive or objectionable details from them respectively. Even though you can download and use any efficient app to get the job done, why take the pain when you can blur video online, and that too for free? Right?
With that said, in the following sections, you will learn about some portals available on the Internet that let you blur video background online. In addition, the options present in some of these web apps can also be exploited to blur part of video online free.
Best Online Tools to Blur Videos
A list of some of the best websites and their essential details are given below:
1. PickFrom
Visit: https://pickfrom.net/blur-video
PickFrom is a one-stop shop for almost all types of post-production tasks. For instance, you can blur a video or part of it, convert video to audio, add filters to the clips, and much more.
You Must Know About PickFrom Blur Tool
- No registration is required
- The free version adds a watermark while exporting
- Offers three pricing plans, namely Starter, Premium, and Enterprise
To blur video online with PickFrom:
- Go to the official website using your favorite Internet browser, and then click the Click to add files button
- Locate and upload the source video from your PC, and check the Blur part of the video box from the right pane
- Drag the selection box over the subject that you don’t want to get blurred, and resize the selection box as needed
- Turn off the Blur inside switch from the right pane, and choose a format from the Save As menu present at the bottom-left corner.
- Click Start, and then click Download or Copy the link to download the modified video to your PC or share it online, respectively.
Limitations
- Maximum acceptable video size is up to 2GB and 5GB for Starter and Premium subscriptions respectively.
- Enables you to blur either the full video or a part of it
- At the time of this writing, the ‘Blur video background’ feature isn’t smart enough to differentiate between the background and the main subject (humans)
2. WoFox
Visit: https://www.wofox.com/video-editing-tools/blur-an-object-in-video
WoFox is another website that offers almost every important tool for designing, post-production, and audio and video treatments. For example, you can create animation designs, GIF templates, infographic images, etc., with the web app.
You Must Know About Using WoFox to Blur Video
- No registration or credit card details are required
- Even the free access doesn’t add any watermark to the exported videos
- Offers three types of subscription plans, namely Free, Business Plan, Team Plan, and Virtual Assistant Plan
To blur part of video online free with WoFox:
- Launch your favorite web browser, and use the link given above to visit the portal;
- Click Upload and upload the source video, and then position and scale the selection box to cover the portion of the video that needs to be blurred.
- Optionally click the + button from the navigation pane on the left to add more selection boxes to cover multiple video portions. Click Download from the top-right corner of the page to download the modified clip.
Limitations of using Wo Fox to Blur Video Online
- In this writing, WoFox cannot differentiate between the normal background and humans.
- The free version can create videos only of up to 30 seconds
- The free version can export videos only in 360p resolution
3. Flixier
Visit: https://flixier.com/tools/blur-or-pixelate-video
This online portal offers many tools to make your source videos look more engaging and professional. With Flixier, you can create innovative adverts, slideshows, intros/outros, lyric videos, and even birthday clips. As for the social media part, you can create videos for YouTube, Twitch, Instagram, and Facebook.
Things You Must Know About Flixier
- Registration is required before you can start using Flixier
- The free access adds a watermark to the exported videos
- Offers three subscription plans, namely Creator, Business, and Enterprise
To blur video online with Flixier:
- Use your web browser to visit the URL given above, and then click Get Started;
- Sign up for a new account, or if you already have one, click login from the upper-right corner of the left section of the page;
- Right-click anywhere inside the Personal Library pane on the left, and then click Import;
- Choose your preferred method, and upload the source video to Flixier, and then click Import all when done;
- Close the Pick a layout box and drag the video from the Personal Library pane to the Timeline at the bottom;
- Position the Skimmer (Playhead) on the frame you want to start blurring the video from, and then click to select Shapes from the toolbox on the left;
- Click the Expand arrow next to the Square shape in the Shapes pane, and then click Square mask from the menu;
- Position and scale the square mask in the preview window, and then choose your preferred effect from the available options under the Masks section in the right pane;
- Drag the sides of the mask layer in the Timeline to specify for how long the mask should be applied in the video;
- Click Export from the top-right corner, and customize the output settings, and if need be, choose the target platform(s);
- Click Export Video from the lower area of the right pane, and wait while the video is rendered before you can start downloading it.
Limitations of using Flixier
- The free account can have only up to 2GB of storage
- It supports only 10 minutes of videos per month to be exported with a free account
- The maximum resolution for the videos exported with a free account is 720p
4. Kapwing
Visit: https://www.kapwing.com/studio
Kapwing is a trusted portal known to almost everyone who prefers online resources over PC applications. The website allows you to edit the videos, create memes for social media platforms, add audio and subtitles to the clips, resize them, etc.
Things You Must Know About Kapwing
- Registration is not necessary to blur video background online with Kapwing
- The free version does not add a watermark to the videos while exporting.
- Offers three subscription plans, namely Free, Pro, and For Teams
To blur video background online with Kapwing:
- Launch a web browser and visit the link given above
- Click Upload File, and upload the source video (or paste its URL if the clip is published online)
- Click Duplicate from the LAYER section of the right pane, and click to select the duplicate layer
- Click Crop from the top of the right pane, and crop the portion of the video that needs to be blurred
- Click Done Cropping, and then click Adjust from the top of the right pane
- Use the Blur slider to adjust the intensity of the blur effect
- Click Done Adjustingand use the Forward, Front, Backward, or Back buttons under the LAYER section to make the duplicate layer visible.
- Click Export Video from the top-right corner of the page, and wait while the modified video is rendered.
- Click the Download or Copy link to save the video to your PC or share it online, respectively.
Limitations
- You must register and sign in to a free account before exporting the videos to get rid of the watermark.
- Files of only up to 250MB can be uploaded while using a free account
- Videos of only up to 7 minutes each can be exported with a free account, while the total duration of the videos that can be exported is up to 3 hours.
5. Hippo Video
Visit: https://www.hippovideo.io/users/sign%5Fin
In addition to having various tools to edit the clips, including blur video online, Hippo Video can also record your PC screen and audio and even capture webcam footage. Creating engaging slideshows from the uploaded images is yet another feature that the web app offers.
You Must Know
- Registration is mandatory before you can start using Hippo Video
- The free/trial version doesn’t add a watermark to the exported videos
- Offers four subscription plans, namely Free, Personal, Classroom, and School
To blur video background online for free with Hippo Video:
- Use your favorite web browser to visit the URL given above
- Click Sign Up from the lower area of the Sign In to your account box (or sign in if you already have a Hippo Video account)
- Choose your preferred method to create an account, and then sign in
- Click Get Started and then populate the fields on the next couple of pages with the correct information on the next page.
- After completing the account creation process, click Import Video on the page that appears.
- On the Import Video box, choose your preferred method to locate and upload the source video, i.e., from your local computer or G-Drive.
- Click PROCEED from the bottom-right corner, and on the next page, add the necessary details related to the video (optional)
- Click IMPORT from the bottom-right corner to import the video and click EDIT VIDEO from the upper-right area of the preview window on the next page.
- Click Quick Edit from the list that appears, and then click the Blur tool from the bottom of the preview window.
- Click Add New Blur and position and scale the selection box in the preview window to cover the area that needs to be blurred.
- Drag the Blur marker in the progress bar to define the effect duration, and use the Strength slider to manage the intensity of the blur effect, and then click SAVE
- Back on the previous page, click EXPORT from the lower area of the preview window.
- Choose your preferred platform to export and publish the modified video to
Limitations
- The video resolution remains 480p while using a free account
- With the free version, you only get 1GB of bandwidth per month
6. YouTube Studio
Visit: https://studio.youtube.com/
Being one of the most viewed streaming media portals that offer free uploads and even lets you monetize your creations, YouTube has a separate section called YouTube Studio, where you can edit clips before publishing.
You Must Know
- A Gmail account is required to use YouTube Studio.
- All the videos can be uploaded without a watermark for free without any expiration date
- No subscription plans are enforced
To blur video online with YouTube Studio:
- Visit the URL given above using your favorite web browser (Google Chrome is recommended)
- If not already signed in, do so with your Gmail account when prompted for
- Click UPLOAD VIDEOS from the Channel dashboard section and on the Upload videos box, click SELECT FILES, and select and upload the source video from your PC
- While the video uploads, specify other publishing preferences using the options present on the box that appears
- Click NEXT from the bottom-right corner when done.
- On the Video elements box, add your preferred elements, click NEXT, review the details on the Checks box, click NEXT, choose your visibility preferences on the Visibility box, and click.
- Back on the main page, click Content from the navigation pane on the left and hover the mouse over the thumbnail of the video you uploaded, and click the Details icon that appears on the right.
- Click Editor from the Your video pane on the left and click GET STARTED from the right window and click BLUR PARTS OF YOUR VIDEO from the lower area of the Video editor window on the right.
- Click Custom blur from the list that appears and position and scale the selection box in the preview window to cover the object that needs to be blurred and drag the Blur slider in the Timeline to specify the duration of the effect.
- Optionally click BLUR from the upper-left area of the Video editor window to add another instance of the blur effect to blur another segment of the clip and click SAVE from the upper-right side.
- Click SAVE again on the Save changes confirmation box to save the changes
- Wait while Google reviews the modifications, and the video is made available for viewing
- Once this is done, get back to the Content section as explained earlier
- Hover mouse over the thumbnail, and click the Options icon from the right this time
- Click Download from the list to download the video with the blur effect to your PC
You can check more details of blurring videos with YouTube Studio .
Limitations
- Your YouTube account must be verified before you can publish long videos. Account verification is free.
- No copyright content is allowed to be published on YouTube
- No pornography or unethical content is allowed to be posted on YouTube
Bonus: How to Blur Video with Wondershare Filmora
Download Mac Version ](https://tools.techidaily.com/wondershare/filmora/download/ )
Wondershare Filmora is a versatile post-production application with a built-in video editing tools and effects to edit videos with ease. The tool is usually considered a good competitor of Adobe Premiere Pro, Final Cut Pro X, etc.
Like any other similar program, even Filmora allows you to blur both landscape and portrait videos. The processes of getting these tasks done are given below:
1. Blur a Part of Video (Landscape Video)
Step 1: Import and Add the Source Video to Timeline
Launch Wondershare Filmora on your Windows or Mac computer (MacBook Pro M1 is used here), make sure that the 16:9 (Widescreen) layout preset is selected under the Select Project Aspect Ratio section on the flash screen, and click New Project.
Next, click to select My Media from the menu bar if not already selected, and from the navigation pane on the left, select Project Media.
Then, click Import from the Media box, select and import the source video to the program, drag the clip from the Media box to the Timeline at the bottom, and when the confirmation box appears, choose the option either under the Keep Project Settings or Match to Media sections to add the video to the Timeline.
Step 2: Add Blur Effect
Go to Effects from the menu bar, select Default from the top of the navigation pane on the left, and select Utility from the available list. From the right box, drag the Mosaic effect, and place it on a separate layer above the video track in the Timeline.
Step 3: Customize the Effect to Blur a Part of Video
Double-click the Blur effect in the Timeline, use the scaling handles in the preview window to scale and position the effect to cover your preferred part of the video and place it at your desired location respectively, choose a Mosaic style from the Type list present in the left box, and use the Intensity and Opacity sliders to customize further the appearance of effect as needed. Optionally, you can drag the side handles of the effect in the Timeline to adjust the duration of its visibility, and click OK from the bottom-right area of the upper-left box to save the changes.
2. Blur a Vertical Video
Download Mac Version ](https://tools.techidaily.com/wondershare/filmora/download/ )
Step 1: Import a Vertical Video and Add It to the Timeline
Use the above method to import the source vertical video to Filmora X and add it to the Timeline. However, it is important to choose the button under the Keep Project Settings label when the confirmation box appears, so you get some real estate because of the landscape mode to add the blur effect.
Step 2: Add Background Blur
Go to Effects and choose Default from the left pane, as explained earlier. Next, expand the Filters tree if not already expanded, click to select Background Blur from the list, from the box on the right, choose and drag your preferred blur effect, and place it on a separate layer in the Timeline above the video track.
Step 3: Customize the Blur Effect
Double-click the Blur effect in the Timeline, and use the available sliders to customize the effect that best fits your needs.
You can find more details about how to blur the background in the portrait video with Filmora .
Conclusion
If you want to have full control over the post-production process, having an efficient desktop program like Wondershare Filmora X would be something you might be looking for. On the other hand, if you are not a professional editor or are not much into editing and prefer playing around with the tools for personal use, going for a decent web portal to blur video online is your best bet.
Liza Brown
Liza Brown is a writer and a lover of all things video.
Follow @Liza Brown
Final Cut Pro Tutorial: Changing Aspect Ratio for Social Media and More
Wondershare Filmora
Create stunning effects with simple clicks.
Most of you must be wondering what is the purpose of changing the aspect ratio of a video. The aspect ratio is the size of the frame occupied by the video during the play mode. In other words, you can refer to it as the shape of the image concerning its width and height. There are surplus ways to change the size of the images but you must search for optimal tools to establish this task. While modifying the width and height values, make a note of the image resolution. You must resize the images without affecting the resolution and quality of the video. Making changes in one image parameter should not affect the other attributes.

The Final Cut Pro app helps to carry out this task professionally without any issues. This video editor works on every detail of the video and implements respective changes on the image size retaining the quality of the file. Quickly scroll down for more details on the efficient utilization of the Final Cut Pro app in modifying the aspect ratio of the video.
In this article
01 How to change the aspect ratio in the Final Cut Pro?
02 Why Can’t I change the aspect ratio of my video?
03 What is the common aspect ratio of videos?
How to change the aspect ratio in the Final Cut Pro?
The Final Cut Pro app is an exclusive program that edits videos professionally. The easy interface encourages the newbie to work on it without any hesitation. This app comprises essential and advanced controls to bring a great impact on the videos as per your requirements. It is enough if you make the right click to accomplish the desired effect on the video. Here, you will learn how to modify the aspect ratio in your video to resize the media file without affecting its quality.
There is a need to reshape the video frame for various reasons. If you want to upload any videos on a social media website, the platform supports only restricted aspect ratio video size. In those scenarios, you must learn to reshape your memorable captures without distorting the crucial factors in the video files. Watch the steps below carefully to study the change in aspect ratio attributes in the videos.
Step1Install the application
Download the Final Cut Pro app and install it in your system. Then, launch the tool and upload the desired video that requires the resize operation. Place the video on the timeline and move the pointer to any area on the video to work on its aspect ratio values.

Step2Modify the values
At the right top of the screen, you will find the property window. Tap the ‘Modify’ option to alter the aspect ratio values according to your needs. In the pop-up window change the Video format to ‘Custom’ and alter the resolution values based on the required video size. To convert the shape to 16:9, enter the values like 1920 and 1080. For a square type frame, type in the values like 1080 and 1080. Ensure that both the values are the same for a square type video size.
The values you enter nearby the ‘Video’ label carries the size of the video image. Based on the requirement, you can alter them optimally.


Finally, save the changes and witness the resize operation on the video. You can further modify the values if you are not convinced with the acquired shape.
The aspect ratio establishes complete control of the video size. Alter the video size and use the files on any platform without any hesitation on its compatibility.
For Win 7 or later (64-bit)
For macOS 10.12 or later
Why Can’t I change the aspect ratio of my video?
There are scenarios you may encounter while changing the aspect ratio of your videos. You can refer below to the common issues that require a better fix to overcome the irregular reframing activities.
Problem: Even after changing the resolution values to 1440 X 1080 using the final cut pro app, the video frame covers the widescreen without modifying the size concerning the assigned values.
Solution 1: In this situation, you must fix the default spatial fit settings to fill the format in the final cut pro app. When you import the videos for editing, automatically the video would have taken this fit option. Before working on the aspect ratio values, modify the fit to fill settings so that you can crop the unwanted areas in the video frames precisely.
Solution 2: Another alternate solution to overcome the above problem is that you must disclose the Video inspector in your Final Cut Pro application. Then, in the ‘Anamorphic Override’ settings change the value to Standard instead of the none or widescreen mode. By altering this value, you can get the desired outcomes without any hesitation.
When you struggle to change the aspect ratio in your videos using the Final Cut Pro app, you must look for alternative solutions to fix them.
What is the common aspect ratio of videos?
The allowable aspect ratio for the videos and images differs with the social media platforms. In the case of the Facebook cover photo, the image size varies with desktop and mobile view. You can go for a horizontal frame with an aspect ratio of 16:9. Here, the width is wider than height.
For Twitter and Facebook posts, set the aspect ratio for the media files to 1200 x 675 pixels. In other terms 16:9, again it looks more or like a horizontal frame. In the YouTube platform, the permitted channel art size is 2560 x 1440 and the thumbnail is 1280 x 720.
The Instagram and Pinterest pins opt for square type video frames like 1200 X 1200 pixels or 500 X 500 pixels. The latter value holds good to set profile pictures for your account. The YouTube channel icon must be 800 X 800 in a square frame to enhance visibility.

The Instagram posts allow the tallest media files like 1080 X 1350. The Snapchat and TikTok go with 1080 X 1920 values. You can find the long Pinterest carrying posts measuring 1000 X 2100. Though this platform does not recommend this size, still the posts are successfully uploaded in this dimension flawlessly.
It is highly recommended to follow the above-discussed guidelines to post the favorite videos on the relevant social media platform without witnessing any compatibility issues. These are the common aspect ratio dimensions supported by the respective platforms. While posting the media files in this environment, you must abide by its standards to get rid of unwanted uploading issues. In certain digital spaces, you may not know the reason for the failure in uploading the image or videos. In those scenarios, read the guidelines provided by that platform and modify the media file dimension according to those values and then try uploading it again. Most video upload failure happens due to the incompatibility of the media file sizes. Watch the dimensions before posting or uploading any media files in the online space.
Most social media platform allows both landscape and portrait video sizes optimally. You can switch to any size format as per your comfort. When you upload larger images or videos either you will receive an error message or it forces you to crop the content to fit perfectly with their guidelines. To overcome such a situation, you can check out the permittable file size before uploading the media files into its environment.
Conclusion
Therefore, you had a better understanding of how to change the aspect ratio using the Final Cut Pro program. You can follow the above-discussed instructions and carry out the task as per your needs.
A short synopsis of the common media file sizes permitted on social media platforms has been listed out in this article and these enlightening facts help you to get rid of file size compatibility issues. Overcome the challenges in modifying the rigid file sizes of the videos using the forceful altering options. Connect with this article to discover exciting performances of the Final Cut Pro tool and its potential utilization in editing a media file. Stay tuned for jaw-dropping information on the video edition functionalities of the incredible application Final Cut Pro.
Wondershare Filmora
Do magic with Filmora. Try it now.
Try It Free Try It Free Try It Free Learn More >

Most of you must be wondering what is the purpose of changing the aspect ratio of a video. The aspect ratio is the size of the frame occupied by the video during the play mode. In other words, you can refer to it as the shape of the image concerning its width and height. There are surplus ways to change the size of the images but you must search for optimal tools to establish this task. While modifying the width and height values, make a note of the image resolution. You must resize the images without affecting the resolution and quality of the video. Making changes in one image parameter should not affect the other attributes.
The Final Cut Pro app helps to carry out this task professionally without any issues. This video editor works on every detail of the video and implements respective changes on the image size retaining the quality of the file. Quickly scroll down for more details on the efficient utilization of the Final Cut Pro app in modifying the aspect ratio of the video.
In this article
01 How to change the aspect ratio in the Final Cut Pro?
02 Why Can’t I change the aspect ratio of my video?
03 What is the common aspect ratio of videos?
How to change the aspect ratio in the Final Cut Pro?
The Final Cut Pro app is an exclusive program that edits videos professionally. The easy interface encourages the newbie to work on it without any hesitation. This app comprises essential and advanced controls to bring a great impact on the videos as per your requirements. It is enough if you make the right click to accomplish the desired effect on the video. Here, you will learn how to modify the aspect ratio in your video to resize the media file without affecting its quality.
There is a need to reshape the video frame for various reasons. If you want to upload any videos on a social media website, the platform supports only restricted aspect ratio video size. In those scenarios, you must learn to reshape your memorable captures without distorting the crucial factors in the video files. Watch the steps below carefully to study the change in aspect ratio attributes in the videos.
Step1Install the application
Download the Final Cut Pro app and install it in your system. Then, launch the tool and upload the desired video that requires the resize operation. Place the video on the timeline and move the pointer to any area on the video to work on its aspect ratio values.
Step2Modify the values
At the right top of the screen, you will find the property window. Tap the ‘Modify’ option to alter the aspect ratio values according to your needs. In the pop-up window change the Video format to ‘Custom’ and alter the resolution values based on the required video size. To convert the shape to 16:9, enter the values like 1920 and 1080. For a square type frame, type in the values like 1080 and 1080. Ensure that both the values are the same for a square type video size.
The values you enter nearby the ‘Video’ label carries the size of the video image. Based on the requirement, you can alter them optimally.
Finally, save the changes and witness the resize operation on the video. You can further modify the values if you are not convinced with the acquired shape.
The aspect ratio establishes complete control of the video size. Alter the video size and use the files on any platform without any hesitation on its compatibility.
For Win 7 or later (64-bit)
For macOS 10.12 or later
Why Can’t I change the aspect ratio of my video?
There are scenarios you may encounter while changing the aspect ratio of your videos. You can refer below to the common issues that require a better fix to overcome the irregular reframing activities.
Problem: Even after changing the resolution values to 1440 X 1080 using the final cut pro app, the video frame covers the widescreen without modifying the size concerning the assigned values.
Solution 1: In this situation, you must fix the default spatial fit settings to fill the format in the final cut pro app. When you import the videos for editing, automatically the video would have taken this fit option. Before working on the aspect ratio values, modify the fit to fill settings so that you can crop the unwanted areas in the video frames precisely.
Solution 2: Another alternate solution to overcome the above problem is that you must disclose the Video inspector in your Final Cut Pro application. Then, in the ‘Anamorphic Override’ settings change the value to Standard instead of the none or widescreen mode. By altering this value, you can get the desired outcomes without any hesitation.
When you struggle to change the aspect ratio in your videos using the Final Cut Pro app, you must look for alternative solutions to fix them.
What is the common aspect ratio of videos?
The allowable aspect ratio for the videos and images differs with the social media platforms. In the case of the Facebook cover photo, the image size varies with desktop and mobile view. You can go for a horizontal frame with an aspect ratio of 16:9. Here, the width is wider than height.
For Twitter and Facebook posts, set the aspect ratio for the media files to 1200 x 675 pixels. In other terms 16:9, again it looks more or like a horizontal frame. In the YouTube platform, the permitted channel art size is 2560 x 1440 and the thumbnail is 1280 x 720.
The Instagram and Pinterest pins opt for square type video frames like 1200 X 1200 pixels or 500 X 500 pixels. The latter value holds good to set profile pictures for your account. The YouTube channel icon must be 800 X 800 in a square frame to enhance visibility.
The Instagram posts allow the tallest media files like 1080 X 1350. The Snapchat and TikTok go with 1080 X 1920 values. You can find the long Pinterest carrying posts measuring 1000 X 2100. Though this platform does not recommend this size, still the posts are successfully uploaded in this dimension flawlessly.
It is highly recommended to follow the above-discussed guidelines to post the favorite videos on the relevant social media platform without witnessing any compatibility issues. These are the common aspect ratio dimensions supported by the respective platforms. While posting the media files in this environment, you must abide by its standards to get rid of unwanted uploading issues. In certain digital spaces, you may not know the reason for the failure in uploading the image or videos. In those scenarios, read the guidelines provided by that platform and modify the media file dimension according to those values and then try uploading it again. Most video upload failure happens due to the incompatibility of the media file sizes. Watch the dimensions before posting or uploading any media files in the online space.
Most social media platform allows both landscape and portrait video sizes optimally. You can switch to any size format as per your comfort. When you upload larger images or videos either you will receive an error message or it forces you to crop the content to fit perfectly with their guidelines. To overcome such a situation, you can check out the permittable file size before uploading the media files into its environment.
Conclusion
Therefore, you had a better understanding of how to change the aspect ratio using the Final Cut Pro program. You can follow the above-discussed instructions and carry out the task as per your needs.
A short synopsis of the common media file sizes permitted on social media platforms has been listed out in this article and these enlightening facts help you to get rid of file size compatibility issues. Overcome the challenges in modifying the rigid file sizes of the videos using the forceful altering options. Connect with this article to discover exciting performances of the Final Cut Pro tool and its potential utilization in editing a media file. Stay tuned for jaw-dropping information on the video edition functionalities of the incredible application Final Cut Pro.
Wondershare Filmora
Do magic with Filmora. Try it now.
Try It Free Try It Free Try It Free Learn More >
Download the Best Video Dubbing Apps for PC (Free and Paid)
Best 6 Video Dubbing Software for PC in 2024

Shanoon Cox
Mar 27, 2024• Proven solutions
If you are a content creator and want to make your videos appealing to the masses, then you must master the art of video dubbing . It has become a vital part of post-production, making your videos available to an international audience. To get that effortless playback experience, you need to use the best video dubbing software. In this post, I will familiarize you with 6 of the best video dubbing software for PC with a free download option. Let’s begin!
- Part 1: What to Consider before Choosing Video Dubbing Software?
- Part 2: 6 Best Video Dubbing Software for PC [Free Download]
What to Consider While Choosing Video Dubbing Software?
Since there are so many videos dubbing software , picking the right tool to fit your needs can be crucial. I recommend considering the following things in mind while selecting a dubbing tool.
Voice Recording
If you are using different tools for voice recording and dubbing, then it will create a lot of problems. Therefore, getting an all-in-one solution to meet your post-production needs is better.
Audio Editing and Syncing
The tool should be able to extract the audio segment from the video, letting you edit it the way you like. Some applications even come with a syncing tool to save you time.
Learn how to sync video and audio in FCPX here.
Compatibility
Also, ensure that the hardware (like microphone or audio card) you use is supported by the tool. Besides that, it should also be compatible with your computer and the video and audio formats you are using.
Import/Export Features
You should be able to import files from different formats and export the dubbed video in the format of your choice.
Have problems exported? See how to export with Compressor here.
Other Things
Make sure that the application is easy to use. Otherwise, you would have to spend a lot of time learning its features. It should have good customer support and positive feedback from existing users and must come within your budget.
The 6 Best Video Dubbing Software for PC [Free Download]
After carefully considering the above things, I have come up with the following video dubbing software you can try.
1. Wondershare Filmora

Filmora is a complete video editing tool that will meet every requirement of yours in post-production. This video dubbing software has a dedicated music and audio mixer tool that can easily help you dub your videos and add voiceovers.
- With just a single click, you can start recording the voiceover for an existing video and make further edits to it.
- There are already 100+ audio tracks that you will get in the tool to help you manage your video’s voiceover.
- It has a seamless drag-and-drop interface to easily sync your voiceover component with the picture in less time.
- You can extract the audio components separately from the video and make changes to them.
- Other features include audio fade-in/fade-out, noise removal, keyframing, and many others.
Pros
- Tons of video editing features.
- Can import/export files in different formats.
- Extremely easy to use.
Cons
- The premium version is needed to use all features.
2.Magix
Magix is another reliable video dubbing software for PC with a free download option that you can explore. Though, if you want to experience its premium features, you must buy the Magix Pro version.
- Using Magix, you can do audio voiceovers, adjust the recordings, and further edit them for a perfect dubbing experience.
- There are inbuilt audio mixers and editing tools that you can use during the post-production of videos.
- You can also find inbuilt wizards, one-click audio effects, compressors, noise cancelation, and other features.
- Magix also has hundreds of effects and templates that you can try.
Pros
- Easy to use.
- Extensive compatibility.
Cons
- The Pro version is not available for free.
3.CamStudio
If you are looking for video dubbing software for a PC free download option, then CamStudio would be an ideal pick. Since this is an open-source desktop application, you can use it without paying anything.
- You can use this tool to add music and voiceover to your videos.
- It will let you reduce the audio noise, compress it, and further edit it.
- The tool follows a lossless codec compression to ensure your videos stay of the best quality.
- Besides being a video dubbing software, you can also use it to edit your videos.
Pros
- The tool is open-source and free available.
Cons
- Limited features.
- Only supports AVI files.
- Not as user-friendly as other tools.
4.Free Audio Dub
This is another resourceful video dubbing software for PC with a free download that you can consider. While the video dubbing software does not have a lot of features, it will meet your basic post-production needs.
- You can load the video and audio files, and the application will automatically merge them.
- It has an inbuilt algorithm to sync both files and give the best-suited dubbing results.
- Furthermore, you can crop any video/audio file section or move it to sync them together.
Pros
- Lightweight.
- Free available.
Cons
- Limited features.
5.Audacity
Audacity is one of the most popular audio editing tools available for leading platforms. Since it is an open-source application, it can also be used as video dubbing software for free.
- You can import and export your audio files in different formats so that they would be compatible with your video.
- It lets us record audio for voiceover and further make changes in it with its existing presets.
- There are several features to edit, fade in/out, clip, minimize noise, and perform many operations on your audio files.
- You can also put numerous effects on your audio before exporting it for dubbing.
Pros
- Free available.
- Various audio editing features.
Cons
- There are no video editing options.
- You can only record and edit audio, but later, you will need another tool for merging with videos.
6.ApowerSoft Video Editor
Lastly, you can also use the ApowerSoft video editor as a video dubbing software as it has built-in features to record and edit audio.
- The tool is pretty easy to use and lets us record audio and perform different operations on it.
- You can drag and adjust the audio component to sync it with the picture.
- There are several existing effects and presets that you can further implement to save your time.
- Apart from importing files of different formats, you can also export them in the format of your choice.
Pros
- Easy to use.
Cons
- Fewer features for audio editing.
- The premium version is paid.
Conclusion:
Now when you know six different video dubbing software for PC with free download options, you can easily pick up the best tool. While some are free applications, others only have a free demo version. You can explore the video dubbing software on your own and even try a few of them. I would recommend going with a multi-purpose tool like Filmora that will help you edit all kinds of videos and meet your post-production needs in one place.
FAQ:
- Can I use Filmora to make high-quality changes to videos?
Filmora is an all-in-one video editor with many features and can do many things well. It makes professional video editing easy because it offers a user-friendly interface, drag-and-drop editing, and other complex video editing functions.
- How well does Magix work?
Magix Movie Studio is an easy-to-use, stylish movie editor that doesn’t cost too much. There are still some problems, like the reverse track order, but it’s clear that this is a choice, and if you use other video editing programs, you’ll get used to it.
- Is Audacity good for the new learner?
Because it is so easy to use, Audacity is a great software for beginners who want to record and edit voices and recordings like a pro because it is so easy to use. Before we learn how to use Audacity step by step, let’s look at some of the things that make it useful.
- How long can Audacity record for?
Since Audacity stores samples as 64-bit values (even on 32-bit devices), there is no 32-bit rule that says recordings can’t be longer than 231 samples (which is for example, just over 13.5 hours at a 44,100 Hz sample rate).
- How do I change things in Apowersoft?
Use magic and fantasy to make your edits. To cut or crop a video file, click the scissors or cropping icon, depending on what you want to do. To join videos, drag files into the timeline in the order you want. Add filters and video overlay to your movie to make it look better.
Shanoon Cox
Shanoon Cox is a writer and a lover of all things video.
Follow @Shanoon Cox
Shanoon Cox
Mar 27, 2024• Proven solutions
If you are a content creator and want to make your videos appealing to the masses, then you must master the art of video dubbing . It has become a vital part of post-production, making your videos available to an international audience. To get that effortless playback experience, you need to use the best video dubbing software. In this post, I will familiarize you with 6 of the best video dubbing software for PC with a free download option. Let’s begin!
- Part 1: What to Consider before Choosing Video Dubbing Software?
- Part 2: 6 Best Video Dubbing Software for PC [Free Download]
What to Consider While Choosing Video Dubbing Software?
Since there are so many videos dubbing software , picking the right tool to fit your needs can be crucial. I recommend considering the following things in mind while selecting a dubbing tool.
Voice Recording
If you are using different tools for voice recording and dubbing, then it will create a lot of problems. Therefore, getting an all-in-one solution to meet your post-production needs is better.
Audio Editing and Syncing
The tool should be able to extract the audio segment from the video, letting you edit it the way you like. Some applications even come with a syncing tool to save you time.
Learn how to sync video and audio in FCPX here.
Compatibility
Also, ensure that the hardware (like microphone or audio card) you use is supported by the tool. Besides that, it should also be compatible with your computer and the video and audio formats you are using.
Import/Export Features
You should be able to import files from different formats and export the dubbed video in the format of your choice.
Have problems exported? See how to export with Compressor here.
Other Things
Make sure that the application is easy to use. Otherwise, you would have to spend a lot of time learning its features. It should have good customer support and positive feedback from existing users and must come within your budget.
The 6 Best Video Dubbing Software for PC [Free Download]
After carefully considering the above things, I have come up with the following video dubbing software you can try.
1. Wondershare Filmora
Filmora is a complete video editing tool that will meet every requirement of yours in post-production. This video dubbing software has a dedicated music and audio mixer tool that can easily help you dub your videos and add voiceovers.
- With just a single click, you can start recording the voiceover for an existing video and make further edits to it.
- There are already 100+ audio tracks that you will get in the tool to help you manage your video’s voiceover.
- It has a seamless drag-and-drop interface to easily sync your voiceover component with the picture in less time.
- You can extract the audio components separately from the video and make changes to them.
- Other features include audio fade-in/fade-out, noise removal, keyframing, and many others.
Pros
- Tons of video editing features.
- Can import/export files in different formats.
- Extremely easy to use.
Cons
- The premium version is needed to use all features.
2.Magix
Magix is another reliable video dubbing software for PC with a free download option that you can explore. Though, if you want to experience its premium features, you must buy the Magix Pro version.
- Using Magix, you can do audio voiceovers, adjust the recordings, and further edit them for a perfect dubbing experience.
- There are inbuilt audio mixers and editing tools that you can use during the post-production of videos.
- You can also find inbuilt wizards, one-click audio effects, compressors, noise cancelation, and other features.
- Magix also has hundreds of effects and templates that you can try.
Pros
- Easy to use.
- Extensive compatibility.
Cons
- The Pro version is not available for free.
3.CamStudio
If you are looking for video dubbing software for a PC free download option, then CamStudio would be an ideal pick. Since this is an open-source desktop application, you can use it without paying anything.
- You can use this tool to add music and voiceover to your videos.
- It will let you reduce the audio noise, compress it, and further edit it.
- The tool follows a lossless codec compression to ensure your videos stay of the best quality.
- Besides being a video dubbing software, you can also use it to edit your videos.
Pros
- The tool is open-source and free available.
Cons
- Limited features.
- Only supports AVI files.
- Not as user-friendly as other tools.
4.Free Audio Dub
This is another resourceful video dubbing software for PC with a free download that you can consider. While the video dubbing software does not have a lot of features, it will meet your basic post-production needs.
- You can load the video and audio files, and the application will automatically merge them.
- It has an inbuilt algorithm to sync both files and give the best-suited dubbing results.
- Furthermore, you can crop any video/audio file section or move it to sync them together.
Pros
- Lightweight.
- Free available.
Cons
- Limited features.
5.Audacity
Audacity is one of the most popular audio editing tools available for leading platforms. Since it is an open-source application, it can also be used as video dubbing software for free.
- You can import and export your audio files in different formats so that they would be compatible with your video.
- It lets us record audio for voiceover and further make changes in it with its existing presets.
- There are several features to edit, fade in/out, clip, minimize noise, and perform many operations on your audio files.
- You can also put numerous effects on your audio before exporting it for dubbing.
Pros
- Free available.
- Various audio editing features.
Cons
- There are no video editing options.
- You can only record and edit audio, but later, you will need another tool for merging with videos.
6.ApowerSoft Video Editor
Lastly, you can also use the ApowerSoft video editor as a video dubbing software as it has built-in features to record and edit audio.
- The tool is pretty easy to use and lets us record audio and perform different operations on it.
- You can drag and adjust the audio component to sync it with the picture.
- There are several existing effects and presets that you can further implement to save your time.
- Apart from importing files of different formats, you can also export them in the format of your choice.
Pros
- Easy to use.
Cons
- Fewer features for audio editing.
- The premium version is paid.
Conclusion:
Now when you know six different video dubbing software for PC with free download options, you can easily pick up the best tool. While some are free applications, others only have a free demo version. You can explore the video dubbing software on your own and even try a few of them. I would recommend going with a multi-purpose tool like Filmora that will help you edit all kinds of videos and meet your post-production needs in one place.
FAQ:
- Can I use Filmora to make high-quality changes to videos?
Filmora is an all-in-one video editor with many features and can do many things well. It makes professional video editing easy because it offers a user-friendly interface, drag-and-drop editing, and other complex video editing functions.
- How well does Magix work?
Magix Movie Studio is an easy-to-use, stylish movie editor that doesn’t cost too much. There are still some problems, like the reverse track order, but it’s clear that this is a choice, and if you use other video editing programs, you’ll get used to it.
- Is Audacity good for the new learner?
Because it is so easy to use, Audacity is a great software for beginners who want to record and edit voices and recordings like a pro because it is so easy to use. Before we learn how to use Audacity step by step, let’s look at some of the things that make it useful.
- How long can Audacity record for?
Since Audacity stores samples as 64-bit values (even on 32-bit devices), there is no 32-bit rule that says recordings can’t be longer than 231 samples (which is for example, just over 13.5 hours at a 44,100 Hz sample rate).
- How do I change things in Apowersoft?
Use magic and fantasy to make your edits. To cut or crop a video file, click the scissors or cropping icon, depending on what you want to do. To join videos, drag files into the timeline in the order you want. Add filters and video overlay to your movie to make it look better.
Shanoon Cox
Shanoon Cox is a writer and a lover of all things video.
Follow @Shanoon Cox
The Ultimate Vlog Editor’s Guide: Free and Paid Software for Every Platform
Best 10 Vlog Video Editing Software [Free & Paid]

Ollie Mattison
Mar 27, 2024• Proven solutions
Nowadays, more and more people are tending to share their life with short videos on social media platforms such as YouTube, Facebook, Instagram TV and Vimeo. Consequently, aspiring and accomplished vloggers must have at least basic video editing tools at their disposal that enable them to produce captivating visual content which grabs the audience’s attention.
If you’re curious about what software vloggers use, what is the best video editing software for vlogging, or which video editor to choose for YouTube vlog videos, you will get some clues based on the information below.
We’ve researched the internet and picked up the top 10 best video editing software for vlogging, which allows to record as well as edit videos easily for vlogs.
- Part 1: Best Free Vlog Video Editing Software for Beginners
- Part 2: Advanced Vlog Video Editing Software Products on Mac & PC Computers for semi-pros and pros
- Part 3: How to Edit Vlog Videos [Video Tutorial: take travel vlog video as an example]
Best Free & Paid Vlog Editing Software for Vloggers on YT/FB/Ins/Vimeo in 2024
Besides shooting with a goodvlogging camera , the post-production process is very important to your vlogging as well. The complexity of the videos you intend to produce should be one of the first things you consider when choosing vlog video editing software. For instance, if you don’t have a lot of experience in the field and you’d just like to piece a few clips together, then there is no reason to spend extensive amounts of money on professional video editing software.
For Win 7 or later (64-bit)
 Secure Download
For macOS 10.12 or later
Secure Download
Here we’ve sorted out some of the best video editing software for vloggers available on the market depending on your skills and experience level. Some of them are totally free to use, while some still provide unlimited free trial version such as Filmora. You can identify with one which is right for your needs after trying. But at first, let’s have a look at some of the free vlog editing options novice and advanced video editors have at their disposal.
Part 1: Best Free Vlog Video Editing Software for Beginners
1. Windows Built-in Movie Maker for Windows 7 and Photos app for Windows 10
Price: Free
Compatibility: Windows OS
Windows Movie Maker used to be bundled with the Windows operating system and has been assisting amateurs for a very long time. It features the drag-n-drop functions and offers almost all the classic video editing functions including trim, rotate, split, combine as well as adding music track, filters, and themes. The windows movie maker is simple yet the function is limited. After you editing one or two vlog videos with it, you will find that.
However, Windows Movie Maker has been discontinued, and it is no longer available for download, but if you are using an older version of the Windows 7 operating system, you can still edit your videos with this iconic PC-based software. The newcomers to the world of vlogging can use this software to put several video clips together or to perform basic video editing actions like cutting or trimming. Windows Movie Maker never had much to offer to skilled video editors, so if you take vlogging seriously, you won’t spend too much time editing your videos with it. Check our Picks of theBest Free Video Editing Software for Windows in 2020 >>

The latest news, Microsoft will stop supporting Windows 7 in January 2020. If you’re looking for some video editing software designed for Windows10, check some of the best movie makers for Windows 10 . If you’ve already updated and run to Windows10, you can also use the in-built Windows10 Photos app. The Photos app in Windows 10 allows you to pick up a theme, soundtrack to make a video easily. One of the interesting features of Photos is that you can choose a star and then it will create a video which focused on that person with videos and pics of your media collection. Learn more details about how to edit videos in the Photos app with Story Remix
What we like:
Totally free for windows users and the automatic video creation feature is interesting
What we don’t like:
Video Editing Features are limited
Only for Windows users
2. iMovie
Price: Free
Compatibility: MacOS and iOS
iMovie is a free video editing software for vloggers who using Mac to edit vidoes. It is equipped with an array of fantastic and practical video editing features, iMovie is an idea video editing tool for anyone. Comes with every new iMac, it’s free of charge and provides a wide range of effects and tools sets, thus it’s always considered as an essential tool for any Mac user to enhance their vologs.
Despite a somewhat limited scope of video editing features iMovie provides, the software is still powerful enough to enable you to edit footage captured in resolutions up to 4K . Additionally, you can create titles , apply visual effects and filters to video clips, or even record your own voiceovers. iMovie’s file sharing capabilities are perfectly suited for vlogging as you can upload a video to your YouTube channel or Facebook account directly from the software.
What we like:
Totally free for Mac users and you can also use it on iPhone or iPad to edit vlog videos
What we don’t like:
Limited features and effects
Only for Mac or iOS users
3. VSDC Free Video Editor
Price: Free
Compatibility: Windows
This non-linear editor seems to be a perfect solution for both established and aspiring vloggers because it offers a lot of video editing tools that are incredibly easy to use. Moreover, the software supports nearly all common image andvideo file formats , which means that you can record your vlog entries with any digital camera. The best part is that VSDC enables its users to export videos in HD and 4K resolutions directly to YouTube. The only downside is that you can only install this vlog editor on a PC computer.
What we like:
Anyone without previous knowledge can use this tool
What we don’t like:
Sometimes errors appear when opening the software
4. GoPro Quik Desktop app
Price: Free
Compatibility: Windows and MacOS
If you’re traveling around the world and spend a lot of time on the road shooting videos with a GoPro action camera, then you can try using the Quik desktop app to edit your vlog videos. The Quik video editor is perfectly optimized for editing footage captured with different models of GoPro cameras, but the amount of video editing options the app provides can be a bit underwhelming for professionals. This is a great option if the laptop you carry with you on your journeys doesn’t have enough processing power to run a more powerful video editing software. However, if you rarely use GoPro cameras to record your footage, then this video editing app won’t have a lot to offer you.
What we like:
It offers cloud storage
What we don’t like:
Some good features are paid and expensive
5. DaVinci Resolve
Price: Free and premium version
Compatibility: Windows and MacOS
Tools like Filmora and Adobe Premiere are full of great features, but these blessings come with a price. That’s why people love working on DaVinci, as most of its features are free. The good thing is that you can do all sorts of video editing using this software. While this editor is awesome for vlogs, it is already under significant usage in the Hollywood industry.
Although this software has a premium version with additional features, I have found everything I looked for in the free version. That includes color grading, animations, text, and effects. Moreover, it has a customizable and easy interface. But to be honest, you will find it a bit tricky at first. Also, you might need to watch some YouTube tutorials to get started with DaVinci Resolve.
What we like:
Complete video production tool with audio post-production options
What we don’t like:
4K video editing requires a premium version
6. VN Video Editor
Price: Free
Compatibility: iOS, Android, Mac, and Windows OS
Not many people have heard this name, but VN Video Editor is the best tool for cross-platform operating systems, including iOS and Android. You can also download this tool on your Mac and Windows.
Another fantastic thing about this software is that it’s free and doesn’t even leave a visible watermark on the edited stuff. Furthermore, it doesn’t demand any heavy system requirements whether you’re using it on a smartphone or computer.
You can use this tool on an Apple laptop or computer by downloading this tool from the Apps Store. However, the problem is that you can’t directly download VN Video Editor on your Windows PC. You have to go through a bit of struggle to use it on your system. First, you need to download BluesSacks and then search and install VN Video Editor through Google Play. Here’s a video for your reference.
So, is this struggle worth doing it? Let’s be realistic! I won’t tell you that you can edit an entire Christopher Nolan movie with it, but as a vlogging tool, this has almost everything you will need to make cool videos.
What we like:
No watermark and easy to use
What we don’t like
No direct download link
Not meant for professional editors
7. VideoPad
Price: Free and premium version
Compatibility: Mac and Windows OS
Despite being an old tool, VideoPad is still known to be an excellent pick if you’re looking for free editing software for vlogging. It has a simple interface and is extremely easy to use. Anyone with a bit of interest and knowledge can start editing videos without learning from tutorials.
In my experience, this software is almost similar to Filmora regarding easiness. However, compared to Filmora, it lacks some essential presets. Besides, the interface looks old. But it doesn’t mean that this tool lacks some modern traits.
Furthermore, the editor allows you to export videos in multiple formats, making it great for YouTube videos.
What we like:
The free version includes lots of exciting features
Affordable upgrade
What we don’t like:
Unable to export mp4 and limited audio tracks in free version
8. VideoProc Vlogger
Price: Free
Compatibility: Mac and Windows OS
VideoProc Vlogger is specially designed for vlogging. It is great for both beginners and professionals. It has an easy interface and options with lots of unique features, including 28 motion presets, pan & zoom, and motion cropping.
Likewise, you can also do color grading and color correction along with HSL color adjustment. In the same way, you can fix low light and overexposure and reduce noise.
A few more features of VideoProc Vlogger include fisheye removal, time-lapse, split screen, green screen, text addition, voice recording, audio extractor, and more.
What we like:
100% secure
Free tech – support
Video tutorials available
What we don’t like:
Minor issues with clips splitting
Part 2: Best Vlog Video Editing Software Products for Semi-pros & pros
1. Wondershare Filmora
Price: $79.99 for a perpetual license
Compatibility: Windows and MacOS
This vlog software is easy to edit videos for all creators. Both skilled video editing professionals and vlogging enthusiasts can use Filmora equally effectively to produce captivating videos. With its ability to record both Webcam and desktop screen, and voiceover directly and upload to YouTube and Vimeo social media platform, it has become one of the best solutions for Vloggers to edit their videos. Filmora is an easily mastered tool that enables users to join, cut, split, rotate, crop clips within clicks.
Besides a rich filter gallery and an impressive collection of royalty-free music , the Filmora’s latest update brings improved color correction and audio features. You can add up to a hundred video and audio tracks to the timeline and take full advantage of the software’s compositing capabilities.
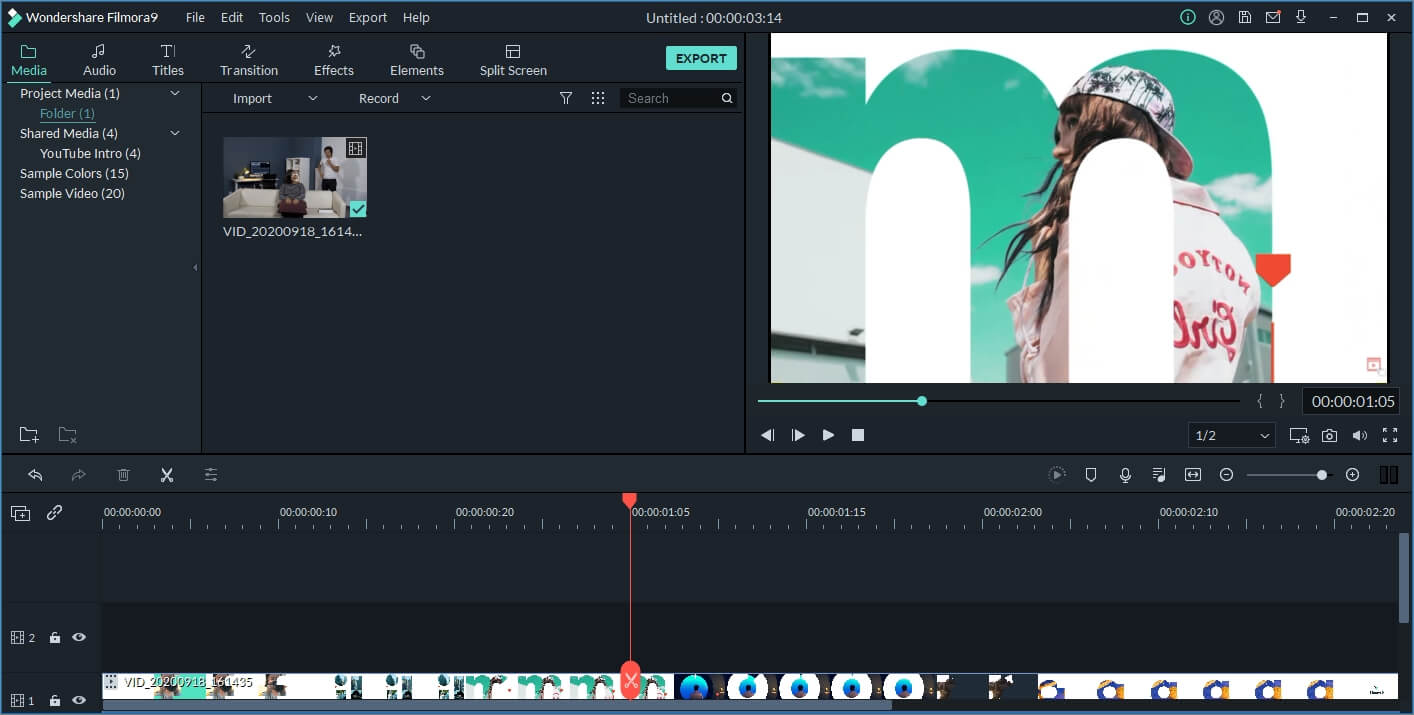
It also stocks a list of filters and options to add extra touches to your video. Vloggers can easily add annotations to their videos , create a PIP effect, or even stabilize shaky footage . The software’s file-sharing capabilities, as well as the fast rendering speeds, make it one of the best vlog video editors in 2020. What’s more, it offers you a lot of fashion and beautiful effects for Game, Beauty, Education, Travel, etc. It is now PC & Mac Cross-compatible, which means you can edit the Projects on either Operating system.
What we like:
Remove background noise easily
Record Voiceover, desktop, webcam simultaneously and change speed easily
Plenty Filters, Overlays, Effects (really important for vloggers)
Intuitive Interface & Easy to Use
What we don’t like:
Need to pay to remove the watermark
2. Lightworks
Price: Free version available $24.99 per month
Compatibility: Windows, Linus, and MacOS
Even the free version of this professional video editor offers the option to export 720p HD videos to Vimeo or YouTube. Furthermore, advanced Multicam editing features, as well as a rich effects library, make Lightwork an excellent choice for vlog editing even if you don’t want to purchase one of the available subscription plans. Vloggers who choose to purchase a monthly or an annual subscription have a much wider range of options at their disposal, so it is best to try the free version of Lightworks before you decide if you want to use it to edit your vlog entries on a constant basis.
What we like:
Proper support forum to get guidance
What we don’t like:
Some users find the interface extremely difficult
3. Adobe Premiere Pro
Price: $20.99 per month, as a single app
Compatibility: Windows and MacOS
Adobe Premiere is one of the best video editing apps ever created, if not the best, so if you’re looking for a reliable video editor with plenty of advanced video editing features, this is probably your best choice. The seemingly endless collection of tools, visual effects, and animation features will ensure that each video you edit in Adobe Premiere Pro meets the highest professional standards.

Vloggers in need of a powerful video editing app that is capable of performing even the most demanding video editing tasks will benefit from purchasing Adobe Premiere Pro as a single app or as a part of some other Creative Cloud plan.
It also supports manythird-party plug-ins for additional features. Please note that there is a 30-day limited trial period, so if you edit vlog videos with it, please remember to check before the trial expired, otherwise you can’t access the software anymore. And there will be a watermark in the free trial version as well.
What we like:
Gives you more controls over vlog footage
What we don’t like:
Expensive
Need some editing experience to handle it
4. Final Cut Pro:
Price: $299.99
Compatibility: MacOS
Over the course of the last couple of decades, Final Cut Pro has become one of the most frequently used video editing software packages in the film industry. That’s why it is hardly surprising that the Final Cut’s latest update is among the best vlog video editors you can use in 2020. A broad spectrum of video editing options grants you the creative freedom to visualize any idea, regardless of how complex that idea may be. However, if you are new to Final Cut Pro, you will need a lot of practice in order to be able to utilize its capabilities entirely.

Final Cut Pro is a sophisticated video editing program for professionals . It offers different almost all the video editing features and options you can imagine, such as multi-cam synchronization support, batch sequence capture as well as third-party plug-in support. However, it’s one of the most expensive video editing software available on the market. So think twice before you make the final decision. But professional video editing software costs much ($299) and need more time to learn how to edit with it. Check the video editing tips with Final Cut Pro >>
What we like:
Plugins available which makes it powerful
What we don’t like:
Available on Mac computer only
Professional and not easy to start
5. MAGIX Movie Studio 2024
Price: $69.99 – $99.99 for a lifetime
Compatibility: Windows and MacOS
MAGIX Movie Studio has two versions – advanced editing and simple editing.
You can work on projects in advance editing by creating multiple effects and layers. This version also allows you to edit your 4K videos, color correct them, and make them more stunning. Similarly, it also permits you to apply the green screen effect. However, this is suitable for professionals and takes a lot of time to do job.
On the contrary, the simple editing version comes with essential features, which are also best for quick vlog editing. So if you’re in a hurry and need to upload videos to your channel daily, you can use the simple mode.
And let me add a few more great things which make MAGIX Movie Studio wonderful. For example, there are lots of add-ons available. It has big effects and tools library best for pro vloggers.
What we like:
Affordable pricing for the features it has
What we don’t like:
The software crashes sometimes
6. Camtasia
Price: $299.99 per year
Compatibility: Mac and Windows OS
Camtasia is another kid on the block that is suitable for vloggers. The tool serves best on projects, including how-to-videos, tutorials, and instructional videos.
Camtasia has all the basic features you may need to edit YouTube videos, including animations, motion graphics, and more. Additionally, it comes with a screen recorder and green-screen effects.
What we like:
Simple interface
What we don’t like:
Expensive
Slow video rendering
Part 3: How to Edit Vlog Videos in Filmora Vlog Editing Software [Video Tutorial & Detailed Steps]
The video tutorial below will show you how to edit a travel vlog with this vlog editing software. If you don’t have time to watch the video tutorial right now, you can check our brief guide [3 steps] of how to edit vlog videos in Filmora below.
Bonus: More and more people are making money with videos, want to know how? Check our YouTube monetarization guide about How to make money on YouTube .
1. Importing Vlog Videos
Click the Import option or select Import Media Files Here to navigate to import your vlog video materials. It allows you to import folders from disks or from your iPhone or camera even from your social media account.

Then drag and drop the vlog media to the timeline to edit.
2. Editing Vlog Footage
It provides all the basic editing features such as trimming, cutting, deleting, rotating and flipping, as well as advanced features such as video stabilization, color grading, background noise removing and green screen compositing and blending. We know that most vloggers need filters and transition, all these effects are available on Filmora Effects library and Transition library, and you can also click Filmstock

3. Export vlog footage and share to YouTube/Vimeo or Save
Click the Export button to enter the Export window, here you can choose to save the video to popular formats on your computer, or save to mobile devices such as iPhone, iPad, and Android phone, or to TVs as well. You can also upload the vlog video to YouTube and Vimeo directly.

You can also check the step-by-step tutorial aboutHow to edit videos to know more details .
Related: How to create amazing food vlog or family vlog ?
Conclusion
Above are our picks of the best video editing software for vloggers, some are designed for free for video editing novices, while after editing several vlog videos, you may need professional ones, so I also introduced some video editing software for professionals. Having the right equipment is much more important than having the most expensive equipment. So instead of simply buying the priciest video editing software, you can find on the market, you should choose a video editor that provides all the tools you’ll need to create a vlog. Which video editing software are you going to be using to edit your vlogs in 2020?
FAQs About Vlog Video Editing
1. What Video Editing Software Do Vloggers Use?
Vloggers use a wide range of video editors based on their needs. Beginners who need a free & straightforward editor for light editing typically go for editors such as iMovie, Windows 10 Photos, etc. But consumer and pro-level Vloggers opt for more capable alternatives like Filmora. Drag-n-drop actions handle most of the editing in Filmora. Thanks to this, applying transitions, effects & filters is a breeze. There is an extensive library of stock content which is crucial for vloggers. Trendy filters & effects, Action Cam tool combined with 4K support makes it a must-have for vloggers.
2. What Is the Best Vlog Editing Software for Windows Free?
Microsoft Photos is the best free video editor for Windows. It delivers a solid video editing package in a simple interface. Since it comes built-in with Windows, no additional hassle is necessary. Microsoft Photos can create automatic videos from your media library. The videos don’t always turn out great, but they save a lot of time which you can dedicate to vlogging. You can choose from six themes to automatically take care of your text, filters, and soundtrack. The filters also come in eleven flavors to spice up your video.
For Win 7 or later (64-bit)
Secure Download
For macOS 10.12 or later
Secure Download
If you prefer to record vlog and edit it on your phones, you can check our picks of the Best Vlog Editor Apps [iOS & Android] .
Ollie Mattison
Ollie Mattison is a writer and a lover of all things video.
Follow @Ollie Mattison
Ollie Mattison
Mar 27, 2024• Proven solutions
Nowadays, more and more people are tending to share their life with short videos on social media platforms such as YouTube, Facebook, Instagram TV and Vimeo. Consequently, aspiring and accomplished vloggers must have at least basic video editing tools at their disposal that enable them to produce captivating visual content which grabs the audience’s attention.
If you’re curious about what software vloggers use, what is the best video editing software for vlogging, or which video editor to choose for YouTube vlog videos, you will get some clues based on the information below.
We’ve researched the internet and picked up the top 10 best video editing software for vlogging, which allows to record as well as edit videos easily for vlogs.
- Part 1: Best Free Vlog Video Editing Software for Beginners
- Part 2: Advanced Vlog Video Editing Software Products on Mac & PC Computers for semi-pros and pros
- Part 3: How to Edit Vlog Videos [Video Tutorial: take travel vlog video as an example]
Best Free & Paid Vlog Editing Software for Vloggers on YT/FB/Ins/Vimeo in 2024
Besides shooting with a goodvlogging camera , the post-production process is very important to your vlogging as well. The complexity of the videos you intend to produce should be one of the first things you consider when choosing vlog video editing software. For instance, if you don’t have a lot of experience in the field and you’d just like to piece a few clips together, then there is no reason to spend extensive amounts of money on professional video editing software.
For Win 7 or later (64-bit)
Secure Download
For macOS 10.12 or later
Secure Download
Here we’ve sorted out some of the best video editing software for vloggers available on the market depending on your skills and experience level. Some of them are totally free to use, while some still provide unlimited free trial version such as Filmora. You can identify with one which is right for your needs after trying. But at first, let’s have a look at some of the free vlog editing options novice and advanced video editors have at their disposal.
Part 1: Best Free Vlog Video Editing Software for Beginners
1. Windows Built-in Movie Maker for Windows 7 and Photos app for Windows 10
Price: Free
Compatibility: Windows OS
Windows Movie Maker used to be bundled with the Windows operating system and has been assisting amateurs for a very long time. It features the drag-n-drop functions and offers almost all the classic video editing functions including trim, rotate, split, combine as well as adding music track, filters, and themes. The windows movie maker is simple yet the function is limited. After you editing one or two vlog videos with it, you will find that.
However, Windows Movie Maker has been discontinued, and it is no longer available for download, but if you are using an older version of the Windows 7 operating system, you can still edit your videos with this iconic PC-based software. The newcomers to the world of vlogging can use this software to put several video clips together or to perform basic video editing actions like cutting or trimming. Windows Movie Maker never had much to offer to skilled video editors, so if you take vlogging seriously, you won’t spend too much time editing your videos with it. Check our Picks of theBest Free Video Editing Software for Windows in 2020 >>
The latest news, Microsoft will stop supporting Windows 7 in January 2020. If you’re looking for some video editing software designed for Windows10, check some of the best movie makers for Windows 10 . If you’ve already updated and run to Windows10, you can also use the in-built Windows10 Photos app. The Photos app in Windows 10 allows you to pick up a theme, soundtrack to make a video easily. One of the interesting features of Photos is that you can choose a star and then it will create a video which focused on that person with videos and pics of your media collection. Learn more details about how to edit videos in the Photos app with Story Remix
What we like:
Totally free for windows users and the automatic video creation feature is interesting
What we don’t like:
Video Editing Features are limited
Only for Windows users
2. iMovie
Price: Free
Compatibility: MacOS and iOS
iMovie is a free video editing software for vloggers who using Mac to edit vidoes. It is equipped with an array of fantastic and practical video editing features, iMovie is an idea video editing tool for anyone. Comes with every new iMac, it’s free of charge and provides a wide range of effects and tools sets, thus it’s always considered as an essential tool for any Mac user to enhance their vologs.
Despite a somewhat limited scope of video editing features iMovie provides, the software is still powerful enough to enable you to edit footage captured in resolutions up to 4K . Additionally, you can create titles , apply visual effects and filters to video clips, or even record your own voiceovers. iMovie’s file sharing capabilities are perfectly suited for vlogging as you can upload a video to your YouTube channel or Facebook account directly from the software.
What we like:
Totally free for Mac users and you can also use it on iPhone or iPad to edit vlog videos
What we don’t like:
Limited features and effects
Only for Mac or iOS users
3. VSDC Free Video Editor
Price: Free
Compatibility: Windows
This non-linear editor seems to be a perfect solution for both established and aspiring vloggers because it offers a lot of video editing tools that are incredibly easy to use. Moreover, the software supports nearly all common image andvideo file formats , which means that you can record your vlog entries with any digital camera. The best part is that VSDC enables its users to export videos in HD and 4K resolutions directly to YouTube. The only downside is that you can only install this vlog editor on a PC computer.
What we like:
Anyone without previous knowledge can use this tool
What we don’t like:
Sometimes errors appear when opening the software
4. GoPro Quik Desktop app
Price: Free
Compatibility: Windows and MacOS
If you’re traveling around the world and spend a lot of time on the road shooting videos with a GoPro action camera, then you can try using the Quik desktop app to edit your vlog videos. The Quik video editor is perfectly optimized for editing footage captured with different models of GoPro cameras, but the amount of video editing options the app provides can be a bit underwhelming for professionals. This is a great option if the laptop you carry with you on your journeys doesn’t have enough processing power to run a more powerful video editing software. However, if you rarely use GoPro cameras to record your footage, then this video editing app won’t have a lot to offer you.
What we like:
It offers cloud storage
What we don’t like:
Some good features are paid and expensive
5. DaVinci Resolve
Price: Free and premium version
Compatibility: Windows and MacOS
Tools like Filmora and Adobe Premiere are full of great features, but these blessings come with a price. That’s why people love working on DaVinci, as most of its features are free. The good thing is that you can do all sorts of video editing using this software. While this editor is awesome for vlogs, it is already under significant usage in the Hollywood industry.
Although this software has a premium version with additional features, I have found everything I looked for in the free version. That includes color grading, animations, text, and effects. Moreover, it has a customizable and easy interface. But to be honest, you will find it a bit tricky at first. Also, you might need to watch some YouTube tutorials to get started with DaVinci Resolve.
What we like:
Complete video production tool with audio post-production options
What we don’t like:
4K video editing requires a premium version
6. VN Video Editor
Price: Free
Compatibility: iOS, Android, Mac, and Windows OS
Not many people have heard this name, but VN Video Editor is the best tool for cross-platform operating systems, including iOS and Android. You can also download this tool on your Mac and Windows.
Another fantastic thing about this software is that it’s free and doesn’t even leave a visible watermark on the edited stuff. Furthermore, it doesn’t demand any heavy system requirements whether you’re using it on a smartphone or computer.
You can use this tool on an Apple laptop or computer by downloading this tool from the Apps Store. However, the problem is that you can’t directly download VN Video Editor on your Windows PC. You have to go through a bit of struggle to use it on your system. First, you need to download BluesSacks and then search and install VN Video Editor through Google Play. Here’s a video for your reference.
So, is this struggle worth doing it? Let’s be realistic! I won’t tell you that you can edit an entire Christopher Nolan movie with it, but as a vlogging tool, this has almost everything you will need to make cool videos.
What we like:
No watermark and easy to use
What we don’t like
No direct download link
Not meant for professional editors
7. VideoPad
Price: Free and premium version
Compatibility: Mac and Windows OS
Despite being an old tool, VideoPad is still known to be an excellent pick if you’re looking for free editing software for vlogging. It has a simple interface and is extremely easy to use. Anyone with a bit of interest and knowledge can start editing videos without learning from tutorials.
In my experience, this software is almost similar to Filmora regarding easiness. However, compared to Filmora, it lacks some essential presets. Besides, the interface looks old. But it doesn’t mean that this tool lacks some modern traits.
Furthermore, the editor allows you to export videos in multiple formats, making it great for YouTube videos.
What we like:
The free version includes lots of exciting features
Affordable upgrade
What we don’t like:
Unable to export mp4 and limited audio tracks in free version
8. VideoProc Vlogger
Price: Free
Compatibility: Mac and Windows OS
VideoProc Vlogger is specially designed for vlogging. It is great for both beginners and professionals. It has an easy interface and options with lots of unique features, including 28 motion presets, pan & zoom, and motion cropping.
Likewise, you can also do color grading and color correction along with HSL color adjustment. In the same way, you can fix low light and overexposure and reduce noise.
A few more features of VideoProc Vlogger include fisheye removal, time-lapse, split screen, green screen, text addition, voice recording, audio extractor, and more.
What we like:
100% secure
Free tech – support
Video tutorials available
What we don’t like:
Minor issues with clips splitting
Part 2: Best Vlog Video Editing Software Products for Semi-pros & pros
1. Wondershare Filmora
Price: $79.99 for a perpetual license
Compatibility: Windows and MacOS
This vlog software is easy to edit videos for all creators. Both skilled video editing professionals and vlogging enthusiasts can use Filmora equally effectively to produce captivating videos. With its ability to record both Webcam and desktop screen, and voiceover directly and upload to YouTube and Vimeo social media platform, it has become one of the best solutions for Vloggers to edit their videos. Filmora is an easily mastered tool that enables users to join, cut, split, rotate, crop clips within clicks.
Besides a rich filter gallery and an impressive collection of royalty-free music , the Filmora’s latest update brings improved color correction and audio features. You can add up to a hundred video and audio tracks to the timeline and take full advantage of the software’s compositing capabilities.
It also stocks a list of filters and options to add extra touches to your video. Vloggers can easily add annotations to their videos , create a PIP effect, or even stabilize shaky footage . The software’s file-sharing capabilities, as well as the fast rendering speeds, make it one of the best vlog video editors in 2020. What’s more, it offers you a lot of fashion and beautiful effects for Game, Beauty, Education, Travel, etc. It is now PC & Mac Cross-compatible, which means you can edit the Projects on either Operating system.
What we like:
Remove background noise easily
Record Voiceover, desktop, webcam simultaneously and change speed easily
Plenty Filters, Overlays, Effects (really important for vloggers)
Intuitive Interface & Easy to Use
What we don’t like:
Need to pay to remove the watermark
2. Lightworks
Price: Free version available $24.99 per month
Compatibility: Windows, Linus, and MacOS
Even the free version of this professional video editor offers the option to export 720p HD videos to Vimeo or YouTube. Furthermore, advanced Multicam editing features, as well as a rich effects library, make Lightwork an excellent choice for vlog editing even if you don’t want to purchase one of the available subscription plans. Vloggers who choose to purchase a monthly or an annual subscription have a much wider range of options at their disposal, so it is best to try the free version of Lightworks before you decide if you want to use it to edit your vlog entries on a constant basis.
What we like:
Proper support forum to get guidance
What we don’t like:
Some users find the interface extremely difficult
3. Adobe Premiere Pro
Price: $20.99 per month, as a single app
Compatibility: Windows and MacOS
Adobe Premiere is one of the best video editing apps ever created, if not the best, so if you’re looking for a reliable video editor with plenty of advanced video editing features, this is probably your best choice. The seemingly endless collection of tools, visual effects, and animation features will ensure that each video you edit in Adobe Premiere Pro meets the highest professional standards.
Vloggers in need of a powerful video editing app that is capable of performing even the most demanding video editing tasks will benefit from purchasing Adobe Premiere Pro as a single app or as a part of some other Creative Cloud plan.
It also supports manythird-party plug-ins for additional features. Please note that there is a 30-day limited trial period, so if you edit vlog videos with it, please remember to check before the trial expired, otherwise you can’t access the software anymore. And there will be a watermark in the free trial version as well.
What we like:
Gives you more controls over vlog footage
What we don’t like:
Expensive
Need some editing experience to handle it
4. Final Cut Pro:
Price: $299.99
Compatibility: MacOS
Over the course of the last couple of decades, Final Cut Pro has become one of the most frequently used video editing software packages in the film industry. That’s why it is hardly surprising that the Final Cut’s latest update is among the best vlog video editors you can use in 2020. A broad spectrum of video editing options grants you the creative freedom to visualize any idea, regardless of how complex that idea may be. However, if you are new to Final Cut Pro, you will need a lot of practice in order to be able to utilize its capabilities entirely.
Final Cut Pro is a sophisticated video editing program for professionals . It offers different almost all the video editing features and options you can imagine, such as multi-cam synchronization support, batch sequence capture as well as third-party plug-in support. However, it’s one of the most expensive video editing software available on the market. So think twice before you make the final decision. But professional video editing software costs much ($299) and need more time to learn how to edit with it. Check the video editing tips with Final Cut Pro >>
What we like:
Plugins available which makes it powerful
What we don’t like:
Available on Mac computer only
Professional and not easy to start
5. MAGIX Movie Studio 2024
Price: $69.99 – $99.99 for a lifetime
Compatibility: Windows and MacOS
MAGIX Movie Studio has two versions – advanced editing and simple editing.
You can work on projects in advance editing by creating multiple effects and layers. This version also allows you to edit your 4K videos, color correct them, and make them more stunning. Similarly, it also permits you to apply the green screen effect. However, this is suitable for professionals and takes a lot of time to do job.
On the contrary, the simple editing version comes with essential features, which are also best for quick vlog editing. So if you’re in a hurry and need to upload videos to your channel daily, you can use the simple mode.
And let me add a few more great things which make MAGIX Movie Studio wonderful. For example, there are lots of add-ons available. It has big effects and tools library best for pro vloggers.
What we like:
Affordable pricing for the features it has
What we don’t like:
The software crashes sometimes
6. Camtasia
Price: $299.99 per year
Compatibility: Mac and Windows OS
Camtasia is another kid on the block that is suitable for vloggers. The tool serves best on projects, including how-to-videos, tutorials, and instructional videos.
Camtasia has all the basic features you may need to edit YouTube videos, including animations, motion graphics, and more. Additionally, it comes with a screen recorder and green-screen effects.
What we like:
Simple interface
What we don’t like:
Expensive
Slow video rendering
Part 3: How to Edit Vlog Videos in Filmora Vlog Editing Software [Video Tutorial & Detailed Steps]
The video tutorial below will show you how to edit a travel vlog with this vlog editing software. If you don’t have time to watch the video tutorial right now, you can check our brief guide [3 steps] of how to edit vlog videos in Filmora below.
Bonus: More and more people are making money with videos, want to know how? Check our YouTube monetarization guide about How to make money on YouTube .
1. Importing Vlog Videos
Click the Import option or select Import Media Files Here to navigate to import your vlog video materials. It allows you to import folders from disks or from your iPhone or camera even from your social media account.
Then drag and drop the vlog media to the timeline to edit.
2. Editing Vlog Footage
It provides all the basic editing features such as trimming, cutting, deleting, rotating and flipping, as well as advanced features such as video stabilization, color grading, background noise removing and green screen compositing and blending. We know that most vloggers need filters and transition, all these effects are available on Filmora Effects library and Transition library, and you can also click Filmstock
3. Export vlog footage and share to YouTube/Vimeo or Save
Click the Export button to enter the Export window, here you can choose to save the video to popular formats on your computer, or save to mobile devices such as iPhone, iPad, and Android phone, or to TVs as well. You can also upload the vlog video to YouTube and Vimeo directly.
You can also check the step-by-step tutorial aboutHow to edit videos to know more details .
Related: How to create amazing food vlog or family vlog ?
Conclusion
Above are our picks of the best video editing software for vloggers, some are designed for free for video editing novices, while after editing several vlog videos, you may need professional ones, so I also introduced some video editing software for professionals. Having the right equipment is much more important than having the most expensive equipment. So instead of simply buying the priciest video editing software, you can find on the market, you should choose a video editor that provides all the tools you’ll need to create a vlog. Which video editing software are you going to be using to edit your vlogs in 2020?
FAQs About Vlog Video Editing
1. What Video Editing Software Do Vloggers Use?
Vloggers use a wide range of video editors based on their needs. Beginners who need a free & straightforward editor for light editing typically go for editors such as iMovie, Windows 10 Photos, etc. But consumer and pro-level Vloggers opt for more capable alternatives like Filmora. Drag-n-drop actions handle most of the editing in Filmora. Thanks to this, applying transitions, effects & filters is a breeze. There is an extensive library of stock content which is crucial for vloggers. Trendy filters & effects, Action Cam tool combined with 4K support makes it a must-have for vloggers.
2. What Is the Best Vlog Editing Software for Windows Free?
Microsoft Photos is the best free video editor for Windows. It delivers a solid video editing package in a simple interface. Since it comes built-in with Windows, no additional hassle is necessary. Microsoft Photos can create automatic videos from your media library. The videos don’t always turn out great, but they save a lot of time which you can dedicate to vlogging. You can choose from six themes to automatically take care of your text, filters, and soundtrack. The filters also come in eleven flavors to spice up your video.
For Win 7 or later (64-bit)
Secure Download
For macOS 10.12 or later
Secure Download
If you prefer to record vlog and edit it on your phones, you can check our picks of the Best Vlog Editor Apps [iOS & Android] .
Ollie Mattison
Ollie Mattison is a writer and a lover of all things video.
Follow @Ollie Mattison
Also read:
- Updated 2024 Approved The Ultimate List of Free Online Face Creators
- Facebook Video Success Everything You Need to Know About Aspect Ratios for 2024
- Updated 2024 Approved Optimize Your LinkedIn Video A Guide to Custom Thumbnails
- Updated The 10 Most Popular Free Video Compressor Apps for Windows 10
- Updated 2024 Approved The Perfect Fit Instagrams Recommended Video Dimensions
- Updated In 2024, Unbiased Comparison Final Cut Pro and LumaFusion for Video Editors
- Animate on the Go Best Stop Motion Apps for Mobile Phones
- Updated In 2024, Rotate Videos in Seconds A Step-by-Step Guide
- New Discover the Best 3D Video Production Tools for Stunning Visuals for 2024
- Cut MP4 Videos for Free 9 Excellent Options for 2024
- 2024 Approved Reaction Video Essentials Top Mobile Apps You Need to Know
- New Elevate Your Video Game Top 4K/8K Video Editing Solutions for 2024
- Updated No-Cost VOB Video Editing Top 5 Tools You Need
- Top Online Stop Motion Animation Tools Free and Paid Options for 2024
- New 2024 Approved If You Want to Download some Free PC and Android Games, Here Is a List of 10 Best Free Websites to Providing Free Games Available for Download
- Updated In 2024, Stream Movies From Your Device to Chromecast Windows, Mac, Android, and iOS Instructions
- Updated In 2024, The Ultimate List 10 Free Online Video Compressors Without Downloads
- Steady Shots Best Free Video Stabilizers for Better Videos for 2024
- Updated S Best Video Editors for High-Resolution Proxy Video Editing
- Updated In 2024, Free Movie Magic 16 User-Friendly Video Editors to Try
- 2024 Approved The Ultimate List 10 Best Cartoon Video Editing Apps
- In 2024, Free Video Editing Made Easy A Wax Tutorial for Beginners
- Adjust Video Playback Speed in Camtasia
- Updated The One-Stop Shop for Facebook Video Aspect Ratios A Beginners Guide for 2024
- Free and Fantastic Top Video Editing Software for Chromebook Users for 2024
- Updated 2024 Approved Unleash Your GoPro Footage A Quik Review and Top PC Video Editing Alternatives
- Updated In 2024, Best Automatic Video Reframing Software for Creators
- New 2024 Approved Unleash Your Creativity Top WhatsApp Status Photo and Video Editors
- 2024 Approved Best Top Free Video Editing Tools for Gamers
- Streamline Your MPEG2 Videos with VirtualDub Download for 2024
- Color Correction Mastery Blending Video Clips Seamlessly in PowerDirector
- In 2024, Selecting the Best YouTube to MP4 Converter A Quick Guide
- In 2024, New to Video Editing? Here Are the Best Free Tools Desktop/Online/Mobile
- New Mastering Face Blurring Essential Apps, Tips, and Tricks for Beginners for 2024
- Optimizing Mobile Video A Guide to Vertical Aspect Ratio for 2024
- New In 2024, Find the Perfect Audio Converter Top 12 Options Reviewed
- The Best Free Online Movie Making Platforms for 2024
- Updated In 2024, Best Video Makers with Music for Android and iPhone
- New In 2024, From Basic to Brilliant Using Ken Burns Effect in Final Cut Pro Like a Pro
- New In 2024, Fast Forward Your Videos A Beginners Guide to Time Lapse Software
- New No Budget? No Problem! Top 10 Free Video Editing Software for Chromebook
- 2024 Approved Education Exclusive Get Final Cut Pro at an Unbeatable Price
- New In 2024, The 10 Best Aspect Ratio Adjustment Software Options
- Updated Mastering Video Editing A Guide for Sony Camcorder Footage
- Process of Screen Sharing Xiaomi Redmi 13C 5G to PC- Detailed Steps | Dr.fone
- In 2024, How Do You Get Sun Stone Evolutions in Pokémon For Vivo V29? | Dr.fone
- Prevent Cross-Site Tracking on Vivo Y27 4G and Browser | Dr.fone
- 9 Quick Fixes to Unfortunately TouchWiz has stopped Of Motorola Edge 40 Neo | Dr.fone
- In 2024, How To Change Infinix Hot 30i Lock Screen Clock in Seconds
- How to Change Credit Card from Your Apple iPhone 14 Pro Max Apple ID and Apple Pay
- How To Get Out of DFU Mode on Apple iPhone 15 Pro? | Dr.fone
- In 2024, List of Pokémon Go Joysticks On Sony Xperia 1 V | Dr.fone
- In 2024, Apple ID is Greyed Out On iPhone SE How to Bypass?
- In 2024, Latest Guide How To Bypass OnePlus Nord CE 3 5G FRP Without Computer
- 4 Solutions to Fix Unfortunately Your App Has Stopped Error on Realme Narzo 60 5G | Dr.fone
- AVCHD on Redmi Note 12 4G-convert MTS for Redmi Note 12 4G
- In 2024, How to Change Google Play Location On Samsung Galaxy S23+ | Dr.fone
- How to Fake GPS on Android without Mock Location For your Samsung Galaxy S21 FE 5G (2023) | Dr.fone
- In 2024, How to Zoom In and Out on Mac
- In 2024, How to Remove iPhone SE Device from iCloud
- Updated In 2024, The Secret Sauce for Making GIF Instagram Story More Aesthetic
- How to Unlock Note 30 VIP Racing Edition Without Password?
- In 2024, How to Unlock Infinix Zero 5G 2023 Turbo Phone Password Without Factory Reset?
- Top 10 Fingerprint Lock Apps to Lock Your Realme Narzo N55 Phone
- A Detailed Guide on Faking Your Location in Mozilla Firefox On Motorola G24 Power | Dr.fone
- How To Track IMEI Number Of Realme C55 Through Google Earth?
- Why Is My Realme GT Neo 5 Offline? Troubleshooting Guide | Dr.fone
- Updated 2024 Approved Learn Simple Blender Rigging in Only 2 Minutes
- 4 Methods to Turn off Life 360 On Tecno Phantom V Fold without Anyone Knowing | Dr.fone
- How to Transfer Text Messages from Tecno Camon 30 Pro 5G to New Phone | Dr.fone
- Unlock Your Boost Mobile Apple iPhone 7 Plus Before the Plan Expires
- In 2024, Solutions to Spy on Apple iPhone 6 with and without jailbreak | Dr.fone
- How To Bypass iCloud By Checkra1n Even On Apple iPhone 14 Plus If Youve Tried Everything
- iPhone Is Disabled? Here Is The Way To Unlock Disabled iPhone 13 Pro
- Which Pokémon can Evolve with a Moon Stone For Vivo Y17s? | Dr.fone
- How To Check if Your Vivo Y200e 5G Is Unlocked
- In 2024, Guide to Mirror Your Samsung Galaxy A24 to Other Android devices | Dr.fone
- Unlock iPhone 8 Plus screen lock without password
- Ways to trade pokemon go from far away On Apple iPhone XR? | Dr.fone
- New Watermark-Free Video Editing on Android The Top 10 Apps You Need for 2024
- Title: Updated Video Blurring Made Easy Free Online Solutions for 2024
- Author: Charlotte
- Created at : 2024-04-29 06:47:57
- Updated at : 2024-04-30 06:47:57
- Link: https://smart-video-creator.techidaily.com/updated-video-blurring-made-easy-free-online-solutions-for-2024/
- License: This work is licensed under CC BY-NC-SA 4.0.
